Weather radar is one of the most practical tools in a pilot's cockpit for detecting, assessing, and avoiding hazardous precipitation and convective activity. Whether you're a student pilot learning basic weather concepts, an instrument-rated pilot flying complex equipment, or an instructor training decision making, understanding weather radar helps you make safer routing and go/no-go choices.
This article explains how weather radar works, what the displays show, common limitations, and how to use radar information in real-world flying. You'll find practical techniques for interpreting radar returns, examples of how radar data informs in-flight decisions, common mistakes to avoid, and an FAQ addressing the everyday questions pilots ask. The emphasis is on operational understanding rather than marketing claims or technical minutiae that belong in maintenance manuals.
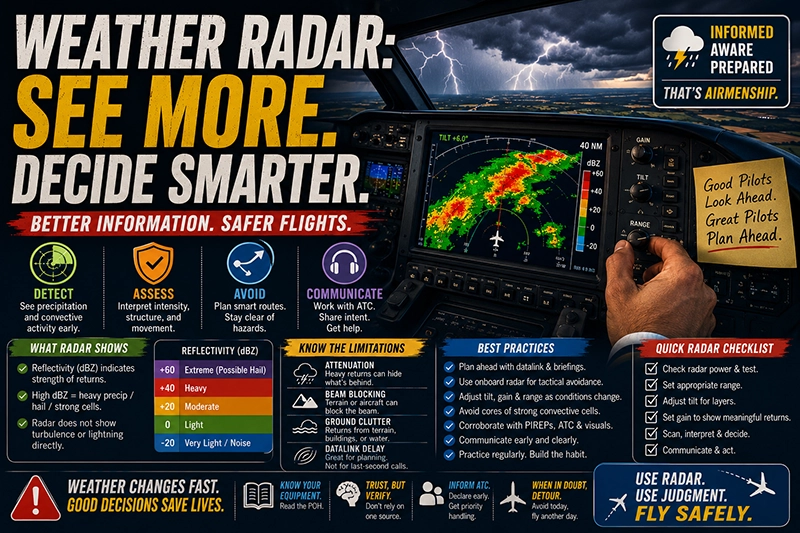
How Weather Radar Works
At its simplest, weather radar transmits pulses of microwave energy and listens for echoes returned from targets in the atmosphere. Precipitation particles, water droplets, hail, and, to a lesser extent, airborne debris and birds, reflect some of that energy back to the antenna. The strength of the returned signal indicates how much energy was reflected, and the system displays that return strength as different colors or numeric values.
Onboard aviation weather radar usually presents reflectivity information. Reflectivity is often expressed in decibels relative to Z, abbreviated dBZ. Higher reflectivity values generally indicate more or larger precipitation particles. Pilots typically learn to interpret low-to-moderate reflectivity as light to moderate precipitation and high reflectivity as potentially heavy precipitation, strong convective updrafts, or hail. The radar does not directly measure turbulence or lightning but provides a valuable proxy for where severe turbulence or hail may be present.
Two broad categories of radar sources are relevant to pilots: onboard, airborne weather radar, and remote ground-based radar products transmitted to the cockpit via datalink. Onboard radar gives a real-time, short-range, line-of-sight view from the aircraft. Datalink services provide composite views generated from multiple ground radars, often at higher resolution and longer range, but with processing delays and smoothing that can obscure small-scale features. Both have uses and limitations; pilots should understand how each product is created and displayed.
Why This Matters in Real-World Aviation
Weather radar directly supports operational safety by helping pilots detect convective cells, heavy precipitation, and areas with a high probability of turbulence or hail. In the en route environment and on approach, radar allows crews to identify and avoid cells that could produce rapid changes in aircraft performance, wind shear, or structural stress. For single-pilot or single-pilot IFR operations, radar provides situational awareness that complements ATC advisories, onboard stormscope or lightning displays, and preflight weather briefings.
In training, using radar responsibly teaches judgment about when to divert, delay, or deviate. It fosters conservative decision making when weather threats are ambiguous and improves pilots' ability to combine multiple sources of weather information—radar, visual cues, pilot reports, ATIS/ATC advisories, and datalink products—into a coherent plan.
How Pilots Should Understand Weather Radar
Understanding weather radar means learning what the display shows and what it doesn't. Key operational concepts include tilt, gain and sensitivity, range, attenuation, shadowing, and clutter. Each affects the image and how you interpret returns in the cockpit.
Tilt and Volume Scanning
The radar beam has a vertical angle relative to the aircraft. Adjusting tilt points the beam higher or lower in elevation. A low tilt scans closer to the aircraft's level flight path and detects precipitation at low altitudes. Increasing tilt samples higher in the storm. Because convective cells have vertical structure, a single tilt can miss mid- or upper-level reflectivity or, conversely, overrepresent small areas of heavy return that are aloft and not a threat at your altitude. Many modern systems provide automatic scanning or multiple tilt layers to show a composite view.
Gain, Sensitivity, and Range
Gain or sensitivity controls how weak a return must be to appear on the screen. Too much gain can clutter the display with non-hazardous returns like light drizzle, ground returns, or noise. Too little gain can suppress legitimate precipitation echoes. Range setting determines how far the radar looks. At long range, returns are spatially smoothed and less precise; at short range, returns are more detailed but cover less airspace.
Attenuation and Beam Blocking
Attenuation occurs when heavy precipitation absorbs or scatters the radar beam so that areas beyond the heavy precipitation appear weaker or invisible. This can create a deceptive ring of strong returns followed by a void. Beam blocking occurs when terrain, the aircraft structure, or other obstacles partially obstruct the beam and create gaps or spurious returns. Recognizing attenuation and beam blocking prevents overconfidence in apparent clear areas.
Ground Clutter and Anomalous Propagation
Ground clutter includes echoes from terrain, buildings, or waves on the sea surface. Anomalous propagation happens when atmospheric conditions duct the radar beam, producing false echoes from distant layers that are not precipitation. Many systems use filters and filters like sea- or ground-clutter suppression, but these filters can sometimes remove legitimate echoes or leave artifacts. Always correlate what you see on radar with what you observe visually and with other weather information.
Datalink vs Onboard Radar
Datalink weather products often come from composites of ground-based radars and are processed for consistency over a wide area. They may show products such as reflectivity mosaics, storm tracking overlays, and lightning detections. However, datalink images have latency because radar scans take time and processing and datalink transmission add delays. Onboard radar provides near-real-time returns within its line-of-sight horizon and reports the environment immediately ahead of the aircraft. Use each source for what it is: datalink for strategic planning and trend awareness, onboard radar for tactical avoidance in the immediate flight path.
Common Mistakes or Misunderstandings
Pilots often assume radar is definitive or that bright colors always mean extreme danger. A few frequent misunderstandings include:
- Overreliance on color scale without understanding range and tilt. The same color can represent different threat levels at different ranges and altitudes.
- Mistaking radar shadowing and attenuation for a safe corridor. Areas behind very heavy returns may be obscured rather than clear.
- Using datalink images tactically when they are delayed. Datalink radar is valuable for planning but not always suitable for last-minute tactical decisions close to convective cells.
- Failing to adjust tilt or gain. A single fixed radar setting rarely provides a complete picture of a cell’s vertical extent and severity.
- Neglecting non-precipitation hazards. Radar does not show microbursts, icing, or lightning directly. These hazards are often associated with strong radar returns but may be present in other situations too.
Recognizing these pitfalls is essential. Training scenarios should emphasize confirming radar indications with visual cues, ATC advisories, pilot reports, and other sensors where available.
Practical Example
Imagine you are the pilot flying a turbocharged single-engine aircraft on an IFR cross-country at 8,500 feet. En route, ATC reports a line of convective activity 40 miles ahead along your planned track. You have both an onboard weather radar and a datalinked composite reflectivity image displayed in the cockpit.
Use the datalink radar to identify the general location, orientation, and movement of the line for strategic planning. Note the movement direction and estimate how long before it crosses your path. Because datalink has processing latency, do not rely on it for tactical clearance through small gaps.
Switch focus to the onboard radar as you close within the radar’s effective range. Adjust tilt to sample the cells at multiple elevations. If you see a strong core with high reflectivity that aligns with the convective line, increase separation. Look for signs of attenuation behind strong returns; if you see a dark area beyond a bright core, be cautious—there may be obscured hazardous cells beyond the attenuation zone.
Communicate your intentions with ATC early, request a reroute if the cell extends across your planned track, or request vectors around the most intense echoes. If you plan to penetrate a sparse area between echoes, verify there is a practical margin: the gap should be wide and the cells well separated in both space and time. Remember that radar does not reveal turbulence intensity directly. If thunderstorms are present, standard operating practice is to avoid penetrating the core of convective cells; deviation around the entire weather system is usually the safer option.
Best Practices for Pilots
Practical habits and decision-making principles help you use weather radar effectively:
- Start with strategic planning using preflight weather products and datalink composites. Identify potential hazards and alternative routes before takeoff.
- Use onboard radar for tactical avoidance within visual range. Adjust tilt and gain as conditions change and scan at multiple ranges.
- Conservatively interpret returns. Err on the side of avoidance when returns are strong, when cells show vertical development, or when you see signs of attenuation and shadowing.
- Communicate early and clearly with ATC about weather deviations, and request assistance when needed. Controllers can provide traffic separation and routing away from known hazards.
- Combine radar information with other sources: pilot reports, ATIS/ASOS advisories, lightning detection, and visual observations. Corroboration improves confidence.
- Practice radar use in training flights. Simulated encounters and instructor-led debriefs help develop good habits with tilt, gain, and range management.
Frequently Asked Questions
How does dBZ relate to precipitation intensity?
dBZ is a logarithmic measure of returned energy from precipitation. Higher dBZ values indicate stronger returns, which generally correspond to heavier precipitation or larger particles like hail. Because it is a measure of reflectivity, the same dBZ value can represent different precipitation types under different conditions. Use dBZ values qualitatively, and interpret them in context with altitude, storm structure, and other available weather information.
Can radar detect turbulence?
Radar does not directly measure turbulence. However, strong convective returns often indicate areas where intense vertical motion and turbulence are likely. Some advanced systems provide turbulence proxies derived from reflectivity structure or Doppler velocity products, but those are not direct turbulence measurements and should be used as guidance rather than proof of turbulence intensity.
Should I trust datalink radar for tactical decisions?
Datalink radar is invaluable for strategic planning and trend awareness but usually has latency due to scan, processing, and transmission times. For final tactical decisions—especially when close to convective cells—rely on onboard radar for near-real-time information, supplemented by visual observation and ATC advisories.
What does attenuation look like on the radar screen?
Attenuation often appears as a bright ring of strong returns with a reduced or absent echo pattern beyond that ring. It can create the false impression that there is a safe gap behind a storm when, in fact, the beam cannot penetrate further. Recognize attenuation and avoid assuming that low returns beyond a heavy core indicate safe flying conditions.
How should I adjust tilt and gain in busy weather?
There is no single correct setting; adjust tilt to sample different altitudes through the storm and adjust gain to suppress noise without removing legitimate echoes. If you see a strong return at a low tilt, raise the tilt to determine whether the core extends higher. If the display is cluttered with marginal returns, reduce gain. Practice in noncritical flights to become comfortable with these controls.
Key Takeaways
- Practical takeaway: Use datalink for planning and onboard radar for tactical avoidance; adjust tilt, gain, and range to understand a storm's vertical and horizontal structure.
- Safety takeaway: Do not assume low radar returns beyond heavy echoes are safe—attenuation can hide hazards. Avoid penetrating strong convective cores.
- Training takeaway: Build radar skills in training flights, practice interpreting artifacts, and emphasize corroborating radar with visual cues, pilot reports, and ATC information.
Weather radar is a powerful tool when pilots understand what it shows, what it obscures, and how to combine its information with other sources. Through conservative interpretation, good cockpit procedures, and regular practice, pilots can make safer decisions when approaching or diverting around convective weather. Make radar proficiency part of your standard operating skills rather than an occasional, uncertain resource.