
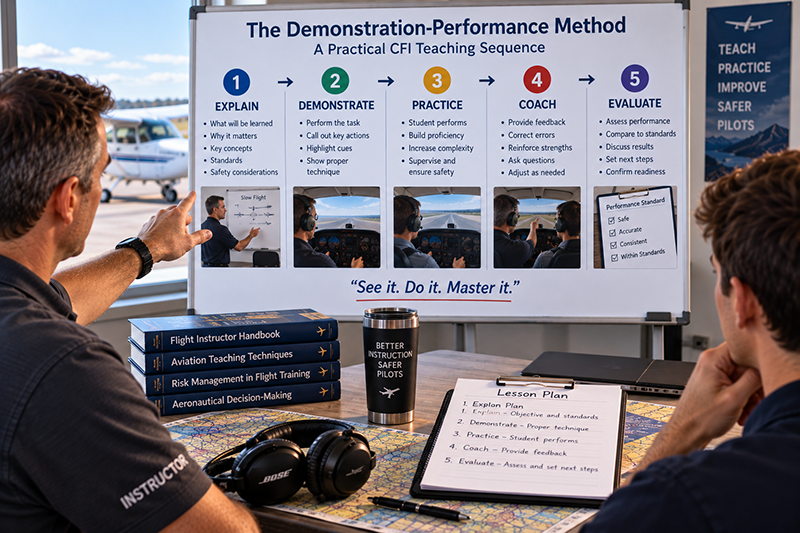
The demonstration-performance method is one of the most practical teaching sequences a flight instructor can use because it turns an aviation maneuver, procedure, or cockpit habit into something a learner can see, try, refine, and eventually perform with confidence. For a CFI, the value is not simply that the instructor demonstrates and the student copies. The real value is that the lesson is intentionally structured so the student understands what is happening, observes correct technique, practices under supervision, receives meaningful coaching, and is evaluated against a clear performance standard.
In flight training, a poorly sequenced lesson can create confusion quickly. The cockpit is noisy, dynamic, time-sensitive, and full of competing sensory inputs. A student may be managing aircraft control, radio calls, traffic scanning, checklists, airspace awareness, and instructor feedback at the same time. The demonstration-performance method gives the instructor a way to reduce that workload at the right moments and increase it gradually as the learner becomes ready. Used well, it supports safety, skill development, aeronautical decision-making, and student confidence.
This article explains the demonstration-performance method as a practical CFI teaching sequence, with emphasis on how to use it in real flight instruction rather than as a classroom theory term. It is written for flight instructors, CFI applicants, check instructors, chief instructors, and serious student pilots who want to understand how effective aviation teaching actually happens in the airplane.
What the Demonstration-Performance Method Means
The demonstration-performance method is an instructional approach in which the instructor explains and demonstrates a task, then guides the learner through performance, supervises practice, and evaluates the result. In aviation, that task might be a steep turn, short-field landing, emergency descent, radio call, checklist flow, preflight inspection technique, or even a cockpit resource management habit.
The method works because it combines three important learning channels. The student hears the explanation, sees the correct performance, and then physically or mentally performs the task. For many flight training tasks, especially those involving control pressures, aircraft attitude, sight picture, timing, and coordination, observation alone is not enough. The student must feel the aircraft respond and learn how small inputs produce specific results.
A useful way to think about the sequence is: explain, demonstrate, practice, coach, evaluate. The words may vary from one instructor training program to another, but the instructional flow is consistent. The instructor first establishes what will be learned and why it matters. The instructor then demonstrates the task in a way the student can actually observe. The student performs the task while the instructor supervises and intervenes as needed. Finally, the instructor evaluates performance and gives feedback that helps the student improve.
The method is not limited to aircraft control maneuvers. It can be used for ground lessons, simulator sessions, avionics training, risk management exercises, and postflight debriefing. For example, a CFI might demonstrate how to brief a takeoff emergency before departure, have the student practice the briefing, coach the student toward concise and specific language, and later evaluate whether the student can brief the plan without prompting.
Why This Matters in Real-World Aviation
Flight instruction is different from many other forms of teaching because the learning environment is also an operational environment. Mistakes can affect safety, airspace compliance, traffic separation, passenger comfort, and aircraft limitations. The instructor must teach while also managing risk. A strong demonstration-performance sequence helps the CFI decide when to talk, when to show, when to let the student work, and when to take control.
In real-world aviation, pilots rarely succeed by memorizing isolated steps alone. They need to recognize conditions, select an appropriate technique, and adapt that technique without losing control of the bigger operational picture. A student learning slow flight, for instance, is not only learning pitch and power relationships. The student is learning energy management, trim use, rudder coordination, traffic awareness, and the importance of recognizing reduced margins above stall speed. The demonstration-performance method gives the instructor a structure for connecting the maneuver to practical aircraft handling and decision-making.
The method also supports safety because it allows the instructor to set boundaries before the student begins. Before practicing stalls, emergency procedures, unusual attitudes, or landings, the instructor can clarify altitude, configuration, recovery criteria, transfer of controls, and conditions that will cause the instructor to intervene. This does not need to become a long lecture in the airplane. It should be a focused setup that tells the learner what matters, what to watch for, and what safe performance looks like.
For instructors, the method helps prevent two common extremes. One extreme is over-demonstration, where the instructor flies too much and the student becomes a passenger. The other is premature student performance, where the student is asked to do something before seeing or understanding what good performance looks like. The demonstration-performance method balances instructor modeling with student ownership.
The Practical Teaching Sequence for CFIs
A well-run demonstration-performance lesson begins before the aircraft moves. The instructor should know the lesson objective, the student’s current ability, the likely errors, and the safety considerations. The student should know what is being learned and what successful performance will generally look like. This does not require a lengthy classroom session before every maneuver, but it does require enough preparation that the flight portion is not improvised without purpose.
The first step is a clear explanation. The instructor introduces the task in plain language, connects it to real flying, and identifies the key cues the student should observe. If the lesson is about steep turns, the explanation should include the purpose of coordinated bank control, altitude control, outside visual references, trim and back pressure, and the importance of clearing turns and traffic awareness. The student does not need every aerodynamic detail in the first minute, but the student does need a mental model for what is about to happen.
The second step is the demonstration. A demonstration is not just the instructor flying the maneuver. It is the instructor deliberately showing the maneuver in a way that supports learning. The CFI should manage cockpit workload so the student can observe the important details. That may mean briefing the maneuver before beginning, narrating only the most relevant cues during the demonstration, and avoiding unnecessary cockpit chatter. The student should be directed where to look, what to feel, and how to judge the outcome.
The third step is student performance. The student now attempts the maneuver or procedure, usually with instructor prompting at first. This is where the CFI must be disciplined. The instructor should allow the student enough space to process and correct minor deviations, while still maintaining safety margins. Constant verbal correction can overload the learner and prevent skill development. Silence at the wrong time can also be a problem if the student is becoming unsafe or practicing an incorrect habit. The instructor’s job is to coach with timing and purpose.
The fourth step is supervised practice. One attempt rarely creates proficiency. Students need repetition, but repetition should not mean mindless repetition. Each attempt should have a purpose. The instructor might focus one repetition on outside references, another on trim, another on rollout timing, and another on dividing attention. This prevents the student from trying to fix every element at once and becoming saturated.
The final step is evaluation and debrief. Evaluation is not merely saying whether the maneuver was good or bad. A useful debrief tells the student what met the objective, what needs improvement, why the error occurred, and what to do on the next attempt or next lesson. The best debriefs are specific. Instead of saying, “Your altitude control needs work,” the instructor might say, “As the bank increased, you waited too long to add back pressure, so the nose dropped and the aircraft descended. On the next attempt, anticipate the pitch change as the bank passes through the entry phase.”
How Pilots Should Understand This Topic
For student pilots, understanding the demonstration-performance method can make training less mysterious. If your instructor first explains, then demonstrates, then asks you to try, that is not random. It is a structured way to build a new skill. During the demonstration, your job is not to passively admire the maneuver. Your job is to observe the cues that will help you perform it: aircraft attitude, sound, control pressure, outside references, instrument indications, configuration changes, and timing.
For CFIs, the method should be understood as flexible, not mechanical. Some students need more explanation before the first attempt. Others learn better with a short demonstration and early hands-on practice. A student with strong simulator experience may understand the sequence intellectually but need more help with control feel. A student with prior tailwheel or glider experience may grasp energy management quickly but need help adapting to the training aircraft’s procedures and sight picture. The method provides the framework, but the instructor still has to teach the person in front of them.
For experienced pilots receiving transition or recurrent training, the demonstration-performance sequence remains valuable. A pilot checking out in a different avionics suite, high-performance airplane, technically advanced aircraft, or unfamiliar operating environment still benefits from seeing the correct flow before being expected to perform it. The instructor can demonstrate how to brief an instrument approach with a specific navigator, how to manage an autopilot mode change, or how to conduct a rejected landing in that aircraft. The learner then performs while the instructor monitors both technique and judgment.
The most important practical point is that the method is not about instructor performance. It is about learner performance. A beautiful demonstration does not help if the student does not understand what was demonstrated, cannot identify the cues, or never receives enough practice to internalize the skill. The instructor’s demonstration should be clear, accurate, and teachable rather than theatrical.
Adapting the Method to Different Flight Training Tasks
The demonstration-performance method looks slightly different depending on the task. A cockpit flow, for example, can be demonstrated slowly on the ground before engine start. The instructor can explain the logic of moving through switches and controls in an organized pattern, demonstrate the flow, then have the student perform it while referencing the checklist appropriately. In this case, the demonstration is visual and procedural.
A landing lesson requires a different style. The instructor may demonstrate one full pattern and landing while describing key sight pictures, aiming point control, power changes, flare timing, and go-around readiness. But during the student’s attempt, the instructor must balance teaching with safety. Too much talking in the flare can distract the student. Too little guidance may allow unstable approach habits to develop. The instructor may choose short, timely prompts such as “hold the attitude,” “eyes down the runway,” or “add a little power,” then save the detailed analysis for the debrief.
Instrument training provides another example. When teaching an instrument scan or approach setup, the CFI or CFII may demonstrate how to brief the procedure, load or verify avionics, identify course guidance, configure the aircraft, and manage workload before the final approach segment. The student then performs the same sequence. In this environment, the instructor should be careful not to let button-pushing replace situational awareness. The demonstration should show not only what to press, but why each action supports navigation, aircraft control, and risk management.
Emergency procedure training also benefits from this method, but it must be handled with particular care. The instructor should brief expectations clearly, maintain safe margins, and avoid creating unnecessary surprise or confusion that interferes with learning. The demonstration might focus on memory items, aircraft control priorities, checklist use, communication, and decision-making. Student performance should be supervised closely, with the instructor ready to intervene whenever safety, aircraft limitations, or airspace considerations require it.
Common Mistakes or Misunderstandings
One common misunderstanding is that the demonstration-performance method means the instructor should always demonstrate first. In many primary training situations, that is appropriate. However, there are times when guided discovery, scenario-based discussion, or student review may come first, especially if the learner already has relevant experience. The key is not rigid order for its own sake. The key is that the student receives enough explanation, modeling, practice, and feedback to learn safely and effectively.
Another mistake is demonstrating while talking too much. Instructors often want to explain every detail in real time, but the student’s attention is limited. During a maneuver, the student may be trying to watch outside references, listen to engine sound, feel control pressure, and interpret instruments. A long verbal stream can bury the important cues. A better approach is to brief the maneuver before starting, use concise callouts during the demonstration, and debrief afterward.
A third mistake is taking the controls too early. New instructors sometimes correct every small deviation immediately because they are uncomfortable watching a student struggle. But learning requires the student to detect and correct errors. If safety permits, allow the learner to notice the trend and make a correction. The CFI can prompt with a question such as, “What is the altitude doing?” or “Where is the nose relative to the horizon?” This builds perception and judgment, not just obedience to instructor commands.
The opposite mistake is waiting too long to intervene. The instructor is always responsible for maintaining safety during training. If the aircraft is approaching an unsafe condition, violating an assigned clearance, exceeding a limitation, drifting toward traffic conflict, or entering a situation beyond the student’s ability, the instructor must act. The art of instruction is knowing the difference between a productive learning error and an unacceptable risk.
Another common weakness is vague feedback. “Better,” “not bad,” and “do it again” do not give the student enough information. Feedback should be tied to observable performance. Tell the student what happened, what likely caused it, and what adjustment to make. When possible, ask the student to self-assess first. This encourages the learner to develop internal standards instead of depending entirely on the instructor.
Finally, some instructors treat the method as a maneuver-only tool. In reality, it is just as useful for teaching judgment. A CFI can demonstrate how to evaluate deteriorating weather, how to brief a runway incursion risk at a complex airport, or how to decide whether to discontinue an unstable approach. The student can then practice the same decision process in scenarios, simulator sessions, or supervised flight operations.
Practical Example: Teaching a Short-Field Landing
Consider a CFI teaching short-field landings to a private pilot student. The instructor begins on the ground with a focused discussion. The student already knows normal landings, so the instructor does not need to reteach the entire traffic pattern. Instead, the CFI explains what makes the short-field landing different: precise airspeed control, stabilized approach path, aiming point discipline, appropriate use of flaps as recommended for the aircraft, positive go-around decision-making, and smooth touchdown at the desired location without forcing the airplane onto the runway.
Before takeoff, the instructor also clarifies safety boundaries. The lesson will use published aircraft procedures and the operating limitations for the specific airplane. The student will not chase an unsafe touchdown point. If the approach becomes unstable, the correct response is a go-around. This is important because short-field training can accidentally teach a student to salvage poor approaches if the instructor emphasizes touchdown accuracy without emphasizing stability and judgment.
In the pattern, the instructor demonstrates first. The CFI flies a stable approach, points out the selected aiming point, manages configuration and speed, and keeps the narration concise. Rather than talking nonstop, the instructor highlights only the cues the student needs: “Notice the aiming point is not moving up or down in the windshield,” “airspeed is steady,” and “we are prepared to go around if this changes.” During the flare and touchdown, the instructor minimizes talking so the student can observe sight picture and timing.
Next, the student flies the approach. On the first attempt, the student is slightly fast on final. The instructor does not wait until the flare to discuss it. The CFI asks, “What is the airspeed trend?” The student recognizes the excess speed and reduces power slightly while maintaining approach path. If the aircraft remains stable and within safe training parameters, the instructor allows the student to continue. If not, the instructor directs a go-around and turns the event into a decision-making lesson rather than a failure.
After landing or going around, the debrief is specific. The instructor might say, “Your pattern spacing was good, and you selected the aiming point early. The main issue was allowing airspeed to build on base-to-final. Next time, make the correction earlier, before the airplane is close to the runway. A short-field landing begins with energy control, not with braking after touchdown.” That feedback connects performance to principle, which helps the student transfer the lesson to other runways and conditions.
Best Practices for Pilots and Instructors
The demonstration-performance method works best when it is intentional. A CFI should not simply demonstrate because that is how the instructor was taught. The instructor should know what the student is supposed to observe, what the student will do next, and how performance will be evaluated. The student should understand the purpose of the exercise and the cues that matter most.
Instructors should also manage the learning environment. If the airspace is busy, turbulence is strong, weather is changing, or the student is saturated, it may not be the right moment for a complex demonstration. Good teaching includes choosing the right time and place. A maneuver that requires concentration should be taught where altitude, airspace, traffic, and workload are appropriate for training.
Another best practice is to separate critical safety instruction from optional detail. Before a task, the student needs to know the safety boundaries and the essential technique. Additional theory can often wait until the ground lesson or postflight debrief. This keeps the in-flight lesson focused and reduces cognitive overload.
Useful CFI habits include:
- Brief the objective and safety considerations before the maneuver or procedure begins.
- Demonstrate at a pace and workload level the student can actually observe.
- Use concise in-flight coaching and save longer explanations for the debrief.
- Allow safe student errors long enough for recognition and correction.
- Intervene promptly when safety, aircraft limitations, airspace, or task objectives require it.
- Debrief with specific, actionable feedback tied to observable performance.
Students can also improve the process by being active participants. Ask what you should watch during the demonstration. Verbalize what you noticed after the instructor demonstrates. During your own performance, focus on the primary objective instead of trying to perfect every detail at once. Afterward, honestly assess what happened before waiting for the instructor’s opinion. These habits build self-monitoring, which is essential for safe solo and certificated pilot operations.
Using the Method in Ground and Simulator Training
Although the demonstration-performance method is often associated with flight maneuvers, it is equally valuable in ground instruction and simulator-based training. In a classroom or briefing room, the instructor can demonstrate how to interpret a weather product, calculate aircraft performance using approved data, brief a departure procedure, or organize a cross-country planning process. The student then performs the task using a realistic scenario.
In simulators and aviation training devices, the method is especially useful because the instructor can pause, reset, and repeat scenarios more easily than in the aircraft. A CFII teaching missed approach procedures can demonstrate the flow, show the relationship between aircraft control and navigation tasks, then let the student repeat the scenario several times with increasing complexity. The instructor can introduce distractions only after the student has the foundation to manage them.
Simulation also allows instructors to teach decision-making without creating unnecessary risk. For example, an instructor can demonstrate how to recognize an unstable approach in instrument conditions and execute a missed approach. The student can then practice the same decision in several variations. The goal is not only procedural compliance. The goal is building the habit of recognizing when the safest option is to discontinue an approach or maneuver and try again under better conditions.
Connecting Demonstration-Performance to Scenario-Based Training
Some instructors wonder whether the demonstration-performance method conflicts with scenario-based training. It does not. The two approaches can complement each other. Demonstration-performance is a method for teaching a task or behavior. Scenario-based training places that task or behavior into an operational context.
For example, the instructor might use demonstration-performance to teach a diversion procedure: identify the need to divert, maintain aircraft control, select an appropriate airport, estimate heading and time, consider fuel and weather, communicate as needed, and navigate. Once the student can perform the basic procedure, the instructor can place it into a scenario involving weather, passenger pressure, airspace constraints, or changing fuel considerations. The demonstration-performance method builds the tool. Scenario-based training teaches when and how to use the tool.
This distinction matters because pilots do not operate in isolated maneuver boxes after certification. They use skills in changing environments. A good CFI uses demonstration-performance to establish correct technique, then uses realistic scenarios to develop judgment, prioritization, and aeronautical decision-making.
Frequently Asked Questions
What is the demonstration-performance method in flight training?
It is a teaching sequence in which the instructor explains and demonstrates a task, the student performs it under supervision, and the instructor provides coaching and evaluation. In aviation, it is commonly used for maneuvers, procedures, cockpit flows, avionics tasks, and decision-making skills.
Should a CFI always demonstrate a maneuver before the student tries it?
Often, yes, especially when the student is new to the maneuver or procedure. However, the instructor should adapt to the learner’s experience and the training objective. If the student already understands the task, a short review, guided attempt, or scenario may be more effective than a full demonstration.
How much should an instructor talk during a demonstration?
The instructor should talk enough to direct attention to the important cues, but not so much that the student becomes overloaded. A good technique is to brief the details before the demonstration, use concise callouts during it, and save deeper analysis for the debrief.
What makes feedback effective after student performance?
Effective feedback is specific, timely, and connected to observable performance. It identifies what went well, what needs improvement, why the error likely occurred, and what the student should do differently on the next attempt.
Can the demonstration-performance method be used for aeronautical decision-making?
Yes. An instructor can demonstrate a decision process, such as evaluating weather, briefing a takeoff emergency, deciding to go around, or managing an avionics issue. The student can then practice that process in realistic scenarios with instructor coaching.
Key Takeaways
- The demonstration-performance method gives CFIs a practical sequence for explaining, showing, coaching, and evaluating aviation skills.
- Safe instruction requires balancing student practice with timely instructor intervention when aircraft control, limitations, traffic, airspace, or workload demand it.
- The method is most effective when paired with specific feedback, realistic scenarios, and clear performance objectives rather than rote repetition.