
Chapter 5
Aircraft Welding
Once the edges are tacked, begin welding by either starting at the second tack and continuing on, or starting the weld one inch in from the end and then welding back to the edge of the sheet. Allow this initial skip-weld to chill and solidify. Then, begin to weld from the previous starting point and continue all the way to the end. Decrease the heat at the end of the seam to allow the accumulated heat to dissipate. The last inch or so is tricky and must be dabbed to prevent blow-through. (Dabbing is the adding of filler metal in the molten pool while controlling the heat on the metal by raising and lowering the torch.)
Weld bead appearance, or making ringlets, is caused by the movement of the torch and dabbing the filler metal. If the torch and add filler metal is moved at the same time, the ringlet is more pronounced. A good weld has a bead that is not too proud and has penetration that is complete.
Immediately after welding, the flux must be cleaned by using hot (180 °F) water and the stainless steel brush, followed by liberal rinsing with fresh water. If only the filler was fluxed, the amount of cleanup is minimal. All flux residues must be removed from voids and pinholes. If any particular area is suspect to hidden flux, pass a neutral flame over it and a yellow-orange incandescence will betray hiding residues.
Proper scrubbing with an etching solution and waiting no longer than 20 minutes to prime and seal avoids the lifting, peeling, or blistering of the finished topcoat.
Magnesium Welding
Gas welding of magnesium is very similar to welding aluminum using the same equipment. Joint design also follows similar practice to aluminum welding. Care must be taken to avoid designs that may trap flux after the welding is completed, with butt and edge welds being preferred. Of special interest is the high expansion rate of magnesium-based alloys, and the special attention that must be given to avoid stresses being set up in the parts. Rigid fixtures should be avoided; use careful planning to eliminate distortion.
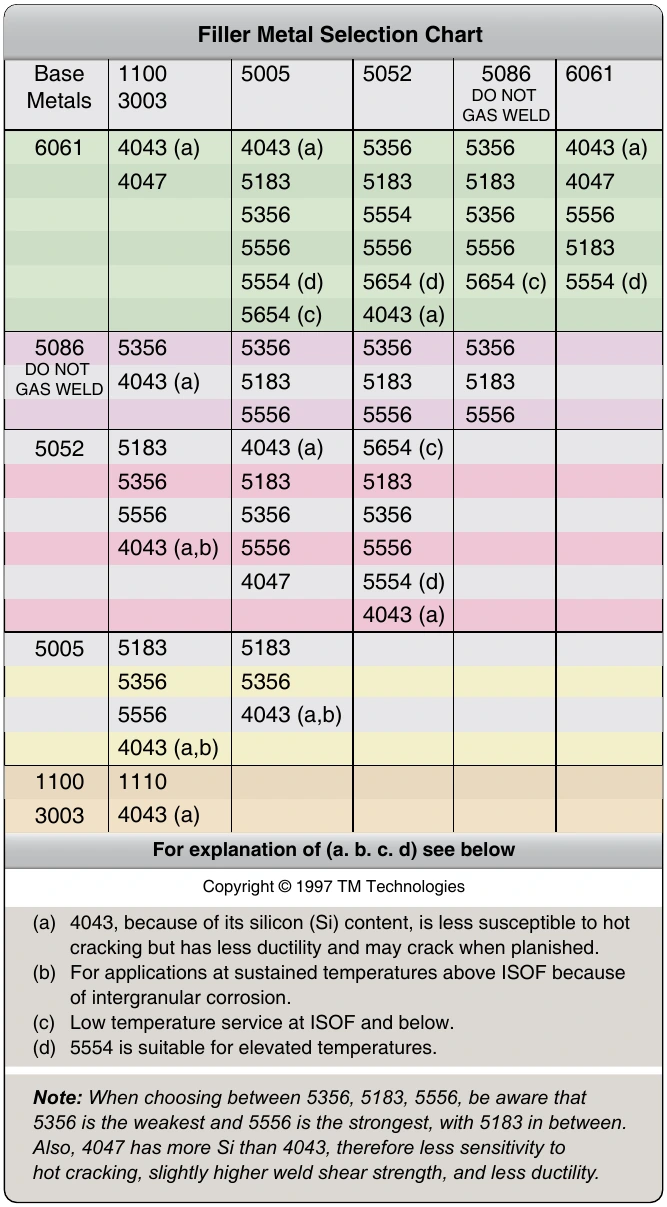
In most cases, filler material should match the base material in alloy. When welding two different magnesium alloys together, the material manufacturer should be consulted for recommendations. Aluminum should never be welded to magnesium. As in aluminum welding, a flux is required to break down the surface oxides and ensure a sound weld. Fluxes sold specifically for the purpose of fusion welding magnesium are available in powder form and are mixed with water in the same manner as for aluminum welding. Use the minimum amount of flux necessary to reduce the corrosive effects and cleaning time required after the weld is finished. The sodium-flare reducing eye protection used for aluminum welding is of the same benefit on magnesium welding.
Welding is done with a neutral flame setting using the same tip size for aluminum welding. The welding technique follows the same pattern as aluminum with the welding being completed in a single pass on sheet gauge material. Generally, the TIG process has replaced gas welding of magnesium due to the elimination of the corrosive flux and its inherent limitations on joint design.
Brazing & Soldering
Torch Brazing of Steel
The definition of joining two pieces of metal by brazing typically meant using brass or bronze as the filler metal. However, that definition has been expanded to include any metal joining process in which the bonding material is a nonferrous metal or alloy with a melting point higher than 800 °F, but lower than that of the metals being joined.
Brazing requires less heat than welding and can be used to join metals that may be damaged by high heat. However, because the strength of a brazed joint is not as great as that of a welded joint, brazing is not used for critical structural repairs on aircraft. Also, any metal part that is subjected to a sustained high temperature should not be brazed.
Brazing is applicable for joining a variety of metals, including brass, copper, bronze and nickel alloys, cast iron, malleable iron, wrought iron, galvanized iron and steel, carbon steel, and alloy steels. Brazing can also be used to join dissimilar metals, such as copper to steel or steel to cast iron.
When metals are joined by brazing, the base metal parts are not melted. The brazing metal adheres to the base metal by molecular attraction and intergranular penetration; it does not fuse and amalgamate with them.
In brazing, the edges of the pieces to be joined are usually beveled as in welding steel. The surrounding surfaces must be cleaned of dirt and rust. Parts to be brazed must be securely fastened together to prevent any relative movement. The strongest brazed joint is one in which the molten filler metal is drawn in by capillary action, requiring a close fit.
A brazing flux is necessary to obtain a good union between the base metal and the filler metal. It destroys the oxides and floats them to the surface, leaving a clean metal surface free from oxidation. A brazing rod can be purchased with a flux coating already applied, or any one of the numerous fluxes available on the market for specific application may be used. Most fluxes contain a mixture of borax and boric acid.
The base metal should be preheated slowly with a neutral soft flame until it reaches the flowing temperature of the filler metal. If a filler rod that is not precoated with flux is used, heat about 2 inches of the rod end with the torch to a dark purple color and dip it into the flux. Enough flux adheres to the rod that it is unnecessary to spread it over the surface of the metal. Apply the flux-coated rod to the red-hot metal with a brushing motion, using the side of the rod; the brass flows freely into the steel. Keep the torch heat on the base metal to melt the filler rod. Do not melt the rod with the torch. Continue to add the rod as the brazing progresses, with a rhythmic dipping action so that the bead is built to a uniform width and height. The job should be completed rapidly and with the fewest possible passes of the rod and torch.
Notice that some metals are good conductors of heat and dissipate the heat more rapidly away from the joint. Other metals are poor conductors that tend to retain the heat and overheat readily. Controlling the temperature of the base metal is extremely important. The base metal must be hot enough for the brazing filler to flow, but never overheated to the filler boiling point. This causes the joint to be porous and brittle.