
Chapter 5
Aircraft Welding
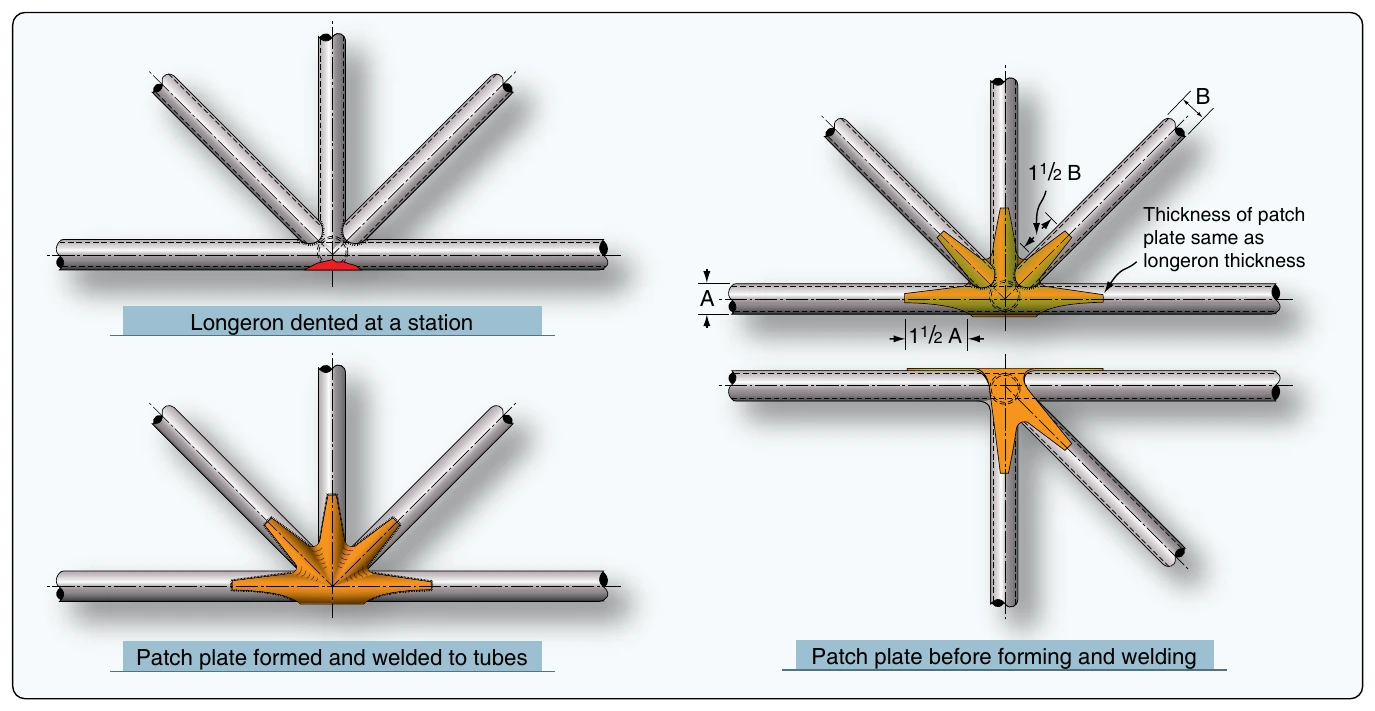
Dents at a cluster weld can be repaired by welding a formed steel patch plate over the dented area and surrounding tubes. Remove any existing finish on the damaged area and thoroughly clean prior to welding.
To prepare the patch plate, cut a section from a steel sheet of the same material and thickness as the heaviest tube damaged. Fashion the reinforcement plate so that the fingers extend over the tubes a minimum of 1½ times the respective tube diameter. The plate may be cut and formed prior to welding ol r cut and tack welded to the cluster, then heated and formed around the joint to produce a snug smooth contour. Apply sufficient heat to the plate while forming so there is a gap of no more than 1⁄16-inch from the contour of the joint to the plate.
In this operation, avoid unnecessary heating and exercise care to prevent damage at the point of the angle formed by any two adjacent fingers of the plate. After the plate is formed and tack welded to the joint, weld all the plate edges to the cluster joint. [Figure 5-46]
Dents Between Clusters
A damaged tubular section can be repaired using welded split sleeve reinforcement. The damaged member should be carefully straightened and should be stop drilled at the ends of any cracks with a No. 40 drill bit.
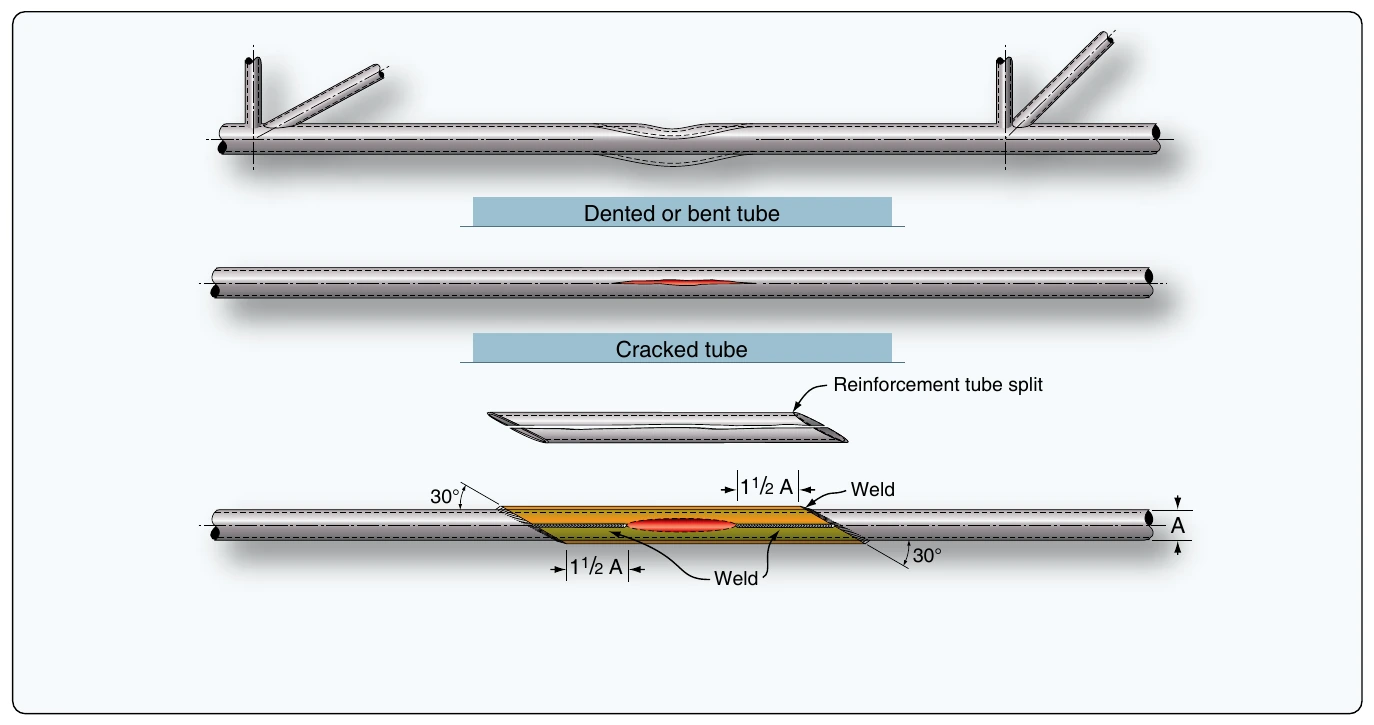
Select a length of steel tube of the same material and at least the same wall thickness having an inside diameter approximately equal to the outside diameter of the damaged tube.
Diagonally cut the selected piece at a 30° angle on both ends so the minimum distance of the sleeve from the edge of the crack or dent is not less than 1½ times the diameter of the damaged tube. Then, cut through the entire length of the sleeve and separate the half sections as shown in Figure 5-47. Clamp the two sleeve sections in the proper position on the damaged area of the tube. Weld the reinforcement sleeve along the length of the two sides, and weld both ends of the sleeve to the damaged tube.
Tube Splicing with Inside Sleeve Reinforcement
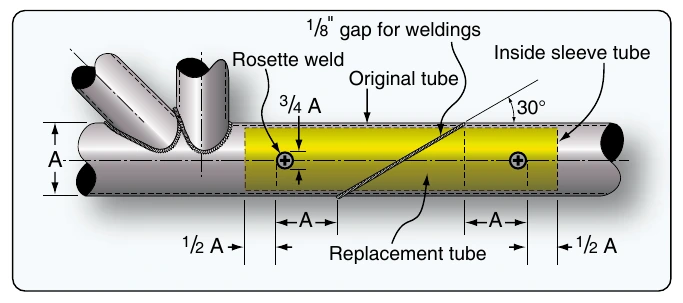
If a partial replacement of the tube is necessary, do an inner sleeve splice, especially where you want a smooth tube surface.
Make a diagonal cut to remove the damaged section of the tube, and remove the burrs from the inner and outer cut edges with a file or similar means. Diagonally cut a replacement steel tube of the same material, diameter, and wall thickness to match the length of the removed section of the damaged tube. The replacement tube should allow a 1⁄8-inch gap for welding at each end to the stubs of the original tube.
Select a length of steel tubing of the same material and at least the same wall thickness with an outside diameter equal to the inside diameter of the damaged tube. From this inner sleeve tube material, cut two sections of tubing, each of such a length that the ends of the inner sleeve is a minimum distance of 1½ times the tube diameter from the nearest end of the diagonal cut. Tack the outer and inner replacement tubes using rosette welds. Weld the inner sleeve to the tube stubs through the 1⁄8-inch gap forming a weld bead over the gap and joining with the new replacement section. [Figure 5-48]
Tube Splicing with Outer Split Sleeve Reinforcement
If partial replacement of a damaged tube is necessary, make the outer sleeve splice using a replacement tube of the same diameter and material. [Figures 5-49 and 5-50]
To perform the outer sleeve repair, remove the damaged section of the tube, utilizing a 90° cut at either end. Cut a replacement steel tube of the same material, diameter, and at least the same wall thickness to match the length of the removed portion of the damaged tube. The replacement tube must bear against the stubs of the original tube with a tolerance of ±1⁄64-inch. The material selected for the outer sleeve must be of the same material and at least the same wall thickness as the original tube. The clearance between the inside diameter of the sleeve and the outside diameter of the original tube may not exceed 1⁄16-inch. From this outer sleeve tube material, either cut diagonally or fishmouth two sections of tubing, each of such a length that the nearest end of the outer sleeve is a minimum distance of 1½ tube diameters from the end of the cut on the original tube. Use the fish mouth sleeve wherever possible. Remove all burrs from the edges of the replacement tube, sleeves, and the original tube stubs.
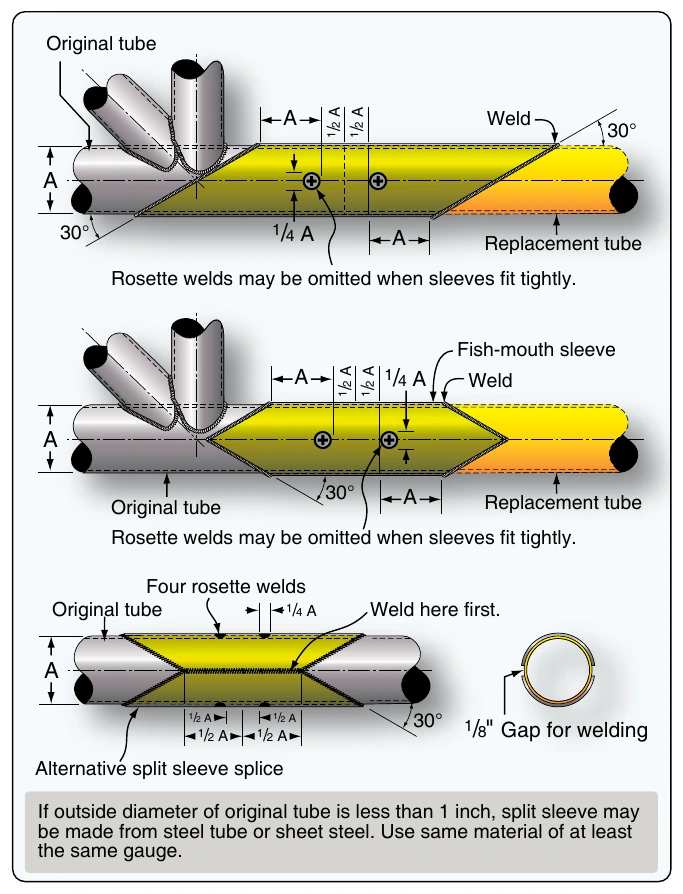
Slip the two sleeves over the replacement tube, align the replacement tube with the original tube stubs, and slip the sleeves over the center of each joint. Adjust the sleeves to the area to provide maximum reinforcement.
Tack weld the two sleeves to the replacement tube in two places before welding ends. Apply a uniform weld around both ends of one of the reinforcement sleeves and allow the weld to cool. Then, weld around both ends of the remaining reinforcement tube. Allow one sleeve weld to cool before welding the remaining tube to prevent undue warping.