
Chapter 10
Advanced Maneuvers
You should also perform a balance and flight control check and note the position of the cyclic. Then position the helicopter into the wind and return the helicopter to the surface. Normally, this maneuver is initiated from the surface. After checking the area for obstacles and other aircraft, select reference points along the takeoff path to maintain ground track. You should also consider alternate routes in case you are not able to complete the maneuver. [Figure 10-1]
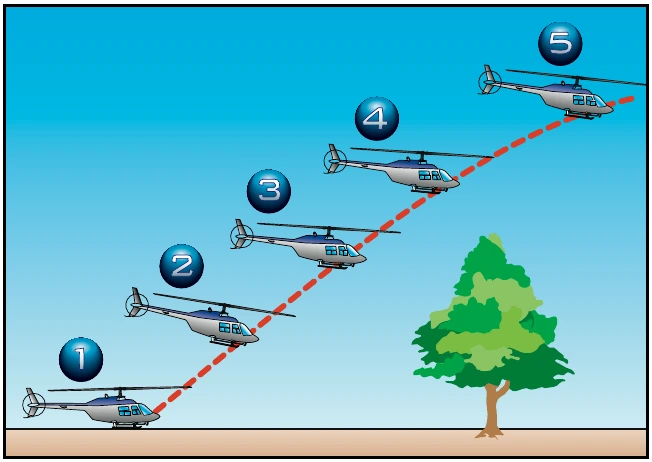
Begin the takeoff by getting the helicopter light on the skids (position 1). Pause and neutralize all aircraft movement. Slowly increase the collective and position the cyclic so as to break ground in a 40 knot attitude. This is approximately the same attitude as when the helicopter is light on the skids. Continue to slowly increase the collective until the maximum power available is reached. This large collective movement requires a substantial increase in pedal pressure to maintain heading (position 2). Use the cyclic, as necessary, to control movement toward the desired flight path and, therefore, climb angle during the maneuver (position 3). Maintain rotor r.p.m. at its maximum, and do not allow it to decrease since you would probably have to lower the collective to regain it. Maintain these inputs until the helicopter clears the obstacle, or until reaching 50 feet for demonstration purposes (position 4).
Then, establish a normal climb attitude and reduce power (position 5). As in any maximum performance maneuver, the techniques you use affect the actual results. Smooth, coordinated inputs coupled with precise control allow the helicopter to attain its maximum performance.
Common Errors
- Failure to consider performance data, including height/velocity diagram.
- Nose too low initially, causing horizontal flight rather than more vertical flight.
- Failure to maintain maximum permissible r.p.m.
- Abrupt control movements.
- Failure to resume normal climb power and airspeed after clearing the obstacle.
Running/Rolling Takeoff
A running takeoff in a skid-type helicopter or a rolling takeoff in a wheeled helicopter is sometimes used when conditions of load and/or density altitude prevent a sustained hover at normal hovering altitude. However, you should not attempt this maneuver if you do not have sufficient power to hover, at least momentarily. If the helicopter cannot be hovered, its performance is unpredictable. If the helicopter cannot be raised off the surface at all, sufficient power might not be available to safely accomplish the maneuver. If you cannot momentarily hover the helicopter, you must wait for conditions to improve or off-load some of the weight.
To accomplish a safe running or rolling takeoff, the surface area must be of sufficient length and smoothness, and there cannot be any barriers in the flight path to interfere with a shallow climb.
For wheeled helicopters, a rolling takeoff is sometimes used to minimize the downwash created during a takeoff from a hover.
Technique
Refer to figure 10-2. To begin the maneuver, first align the helicopter to the takeoff path. Next, increase the throttle to obtain takeoff r.p.m., and increase the collective smoothly until the helicopter becomes light on the skids or landing gear (position 1). Then, move the cyclic slightly forward of the neutral hovering position, and apply additional collective to start the forward movement (position 2). To simulate a reduced power condition during practice, use one to two inches less manifold pressure, or three to five percent less torque, than that required to hover.
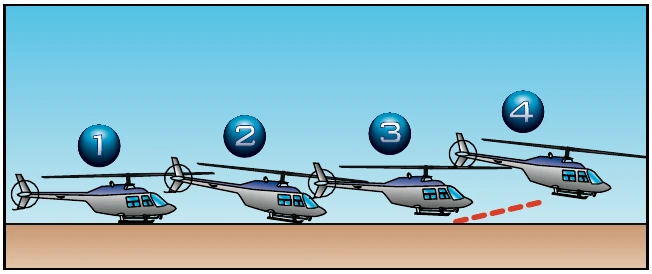
Maintain a straight ground track with lateral cyclic and heading with antitorque pedals until a climb is established.
As effective translational lift is gained, the helicopter becomes airborne in a fairly level attitude with little or no pitching (position 3). Maintain an altitude to take advantage of ground effect, and allow the airspeed to increase toward normal climb speed. Then, follow a climb profile that takes you through the clear area of the height/velocity diagram (position 4). During practice maneuvers, after you have climbed to an altitude of 50 feet, establish the normal climb power setting and attitude.
Common Errors
- Failing to align heading and ground track to keep surface friction to a minimum.
- Attempting to become airborne before obtaining effective translational lift.
- Using too much forward cyclic during the surface run.
- Lowering the nose too much after becoming airborne, resulting in the helicopter settling back to the surface.
- Failing to remain below the recommended altitude until airspeed approaches normal climb speed.
Rapid Deceleration (Quick Stop)
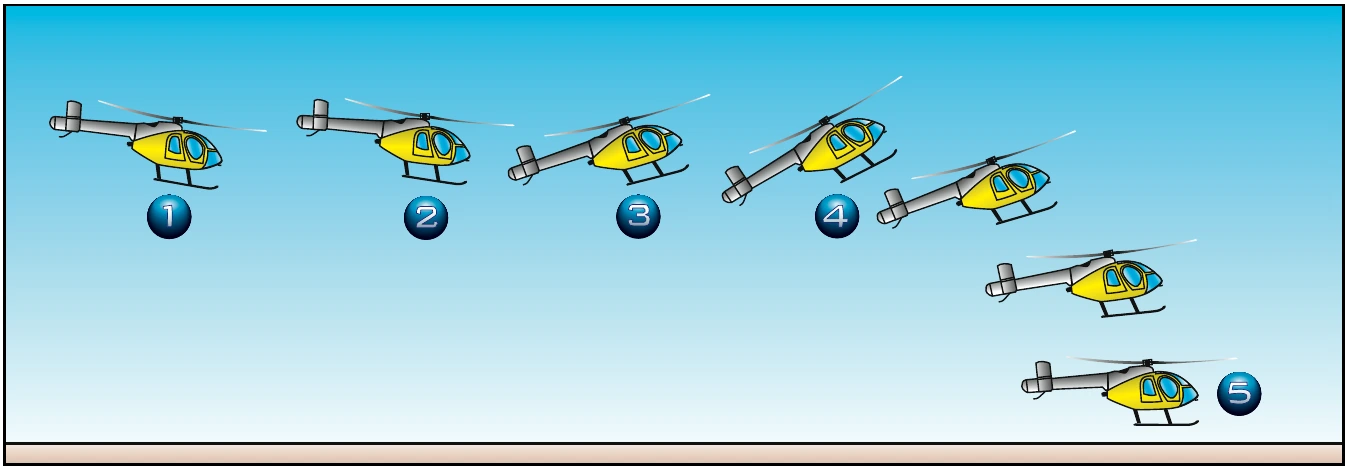
In normal operations, use the rapid deceleration or quick stop maneuver to slow the helicopter rapidly and bring it to a stationary hover. The maneuver requires a high degree of coordination of all controls. It is practiced at an altitude that permits a safe clearance between the tail rotor and the surface throughout the maneuver, especially at the point where the pitch attitude is highest.