
Chapter 8
Emergency Open Sea Operations
If operating at night, equip the seaplane with parachute flares, smoke floats, glow sticks, or other markers.
Sea Evaluation at Night
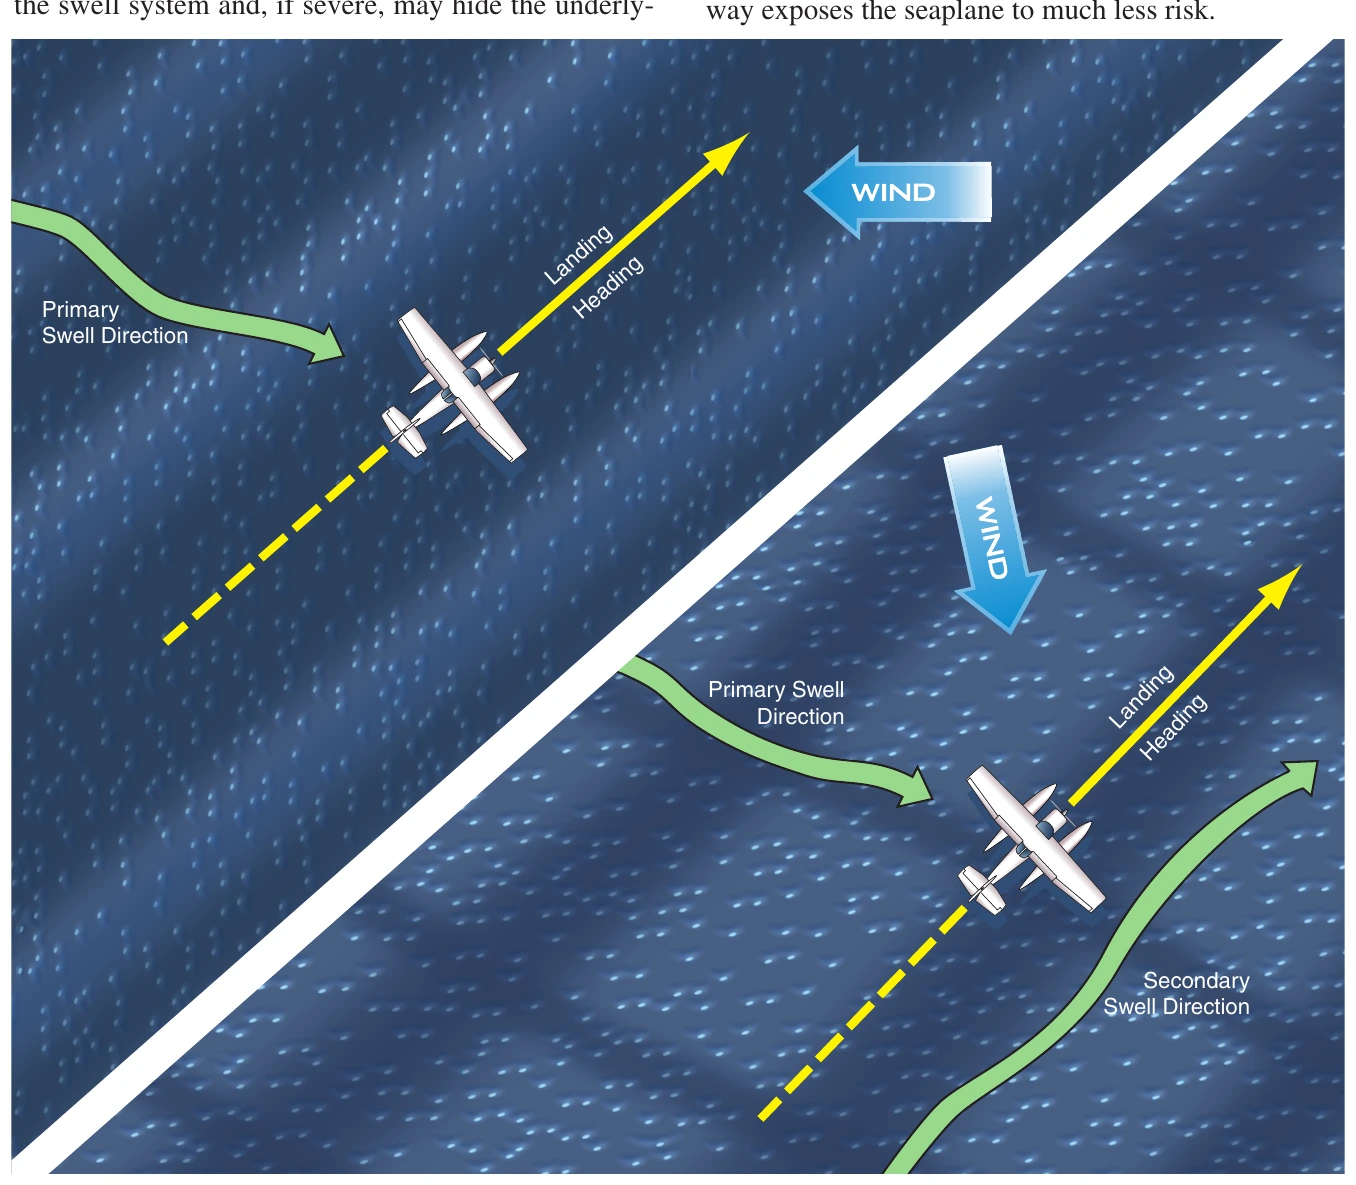
Before attempting a night landing, perform a sea state evaluation as described in previous sections. If an emergency occurs shortly after nightfall, a landing heading can be determined by estimating the current conditions from those conditions prevalent before nightfall. If the pilot has no information to form an estimate of the conditions, the information must be obtained from other sources or determined by the pilot from a sea state evaluation by flare illumination or moonlight. If near a ship, sea weather conditions and a recommended landing heading may be obtained from the ship. However, a landing heading based on such information is subject to error and should only be used as a last resort. A pilot evaluation is preferred and can be accomplished by performing the teardrop pattern night sea evaluation as follows:
- Set a parachute flare and adjust the altitude so that the flare ignites at 1,700 feet. Altitude should be as close to 2,000 feet as possible.
- After the drop, adjust altitude to 2,000 feet and maintain the heading for 45 seconds.
- Turn back 220°, left or right, until the flare is almost dead ahead. The sea becomes visible after the first 70° of the turn is completed, allowing approximately 90 seconds for sea evaluation. Use standard rate turn (3° per second).
- Immediately after passing the flare, if it is still burning, the pilot may circle to make additional evaluation during remaining burning time.
If both pilot and copilot are present, the pilot should fly the seaplane and the copilot should concentrate on the sea evaluation. If only two flares are available and sea conditions are known or believed to be moderate, it may be advisable to dispense with the sea evaluation and use both flares for landing.
Night Emergency Landing
A night landing should be performed only after exhausting all other options. Be sure all occupants are wearing life vests and secure loose items prior to touchdown. Remove liferafts and survival equipment from their storage containers and give them to those occupants closest to the exits. Prior to the landing pattern, unlatch the doors to prevent jamming that may be caused by airframe distortion from a hard landing. If time permits, make distress calls and activate the emergency locator transmitter.
Landing by Parachute Flare
When a landing heading has been determined and all emergency and cockpit procedures have been accomplished, the landing approach with the use of parachute flares is made as follows:
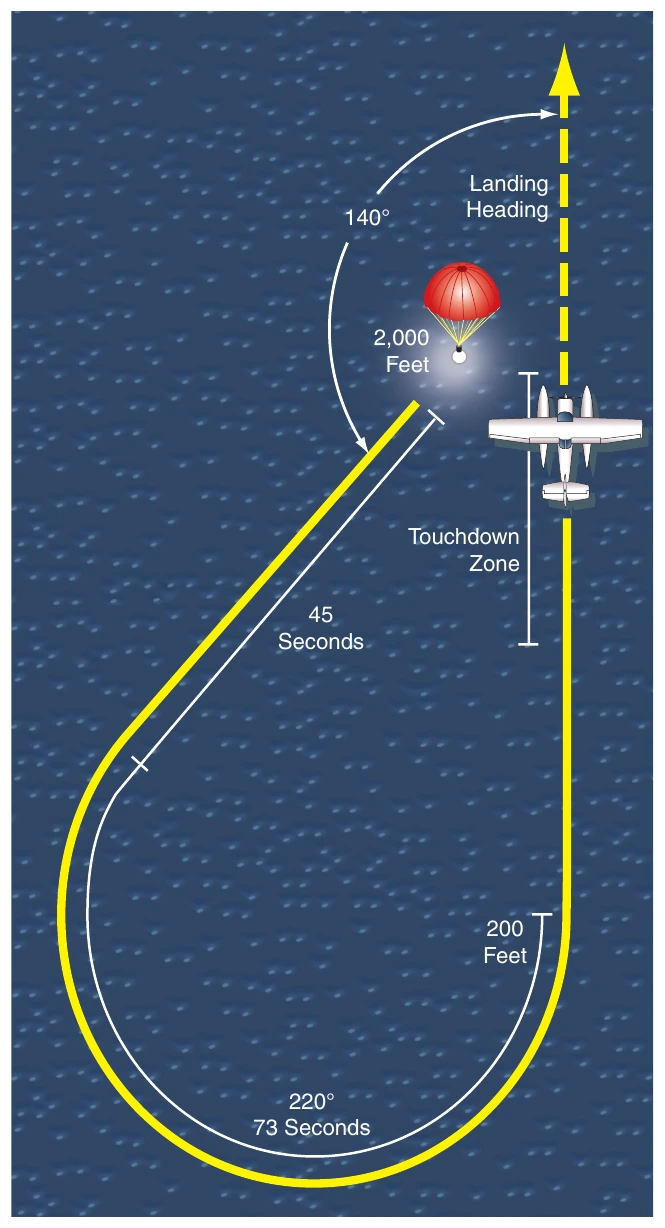
- Establish a heading 140° off the selected landing heading.
- Lower the flaps and establish the desired landing pattern approach speed.
- As close to 2,000 feet above the surface as possible, set the parachute flare and adjust the altitude so the flare ignites at 1,700 feet.
- Release the flare and begin a descent of 900 f.p.m. while maintaining heading for 45 seconds. If the starting altitude is other than 2,000 feet, determine the rate of descent by subtracting 200 feet and dividing by two. (For example, 1800 feet minus 200 is 1600, divided by 2 equals an 800 f.p.m. rate of descent).
- After 45 seconds, make a standard rate turn of 3° per second toward the landing heading in line with the flare. This turn is 220° and takes approximately 73 seconds.
- Roll out on the landing heading in line with the flare at an altitude of 200 feet. During the last two-thirds of the turn, the water is clearly visible and the seaplane can be controlled by visual reference.
- Land straight ahead using the light of the flare. Do not overshoot. Overshooting the flare results in a shadow in front of the aircraft making depth perception very difficult. The best touchdown point is several hundred yards short of the flare.
A rapid descent in the early stages of the approach allows a slow rate of descent when near the water. This should prevent flying into the water at a high rate of descent due to faulty depth perception or altimeter setting. [Figure 8-8]
Landing by Markers
If parachute flares are not available, use a series of lighted markers to establish visual cues for landing. When a landing heading has been determined and all emergency and cockpit procedures are completed, use drift signals or smoke floats and perform the landing approach as follows:
- Establish a heading on the reciprocal of the landing heading.
- Drop up to 20 markers at 2 second intervals.
- Perform a right 90° turn followed immediately by a 270° left turn while descending to 200 feet.
- Slightly overshoot the turn to the final approach heading to establish a path parallel and slightly to the right of the markers.
- Establish a powered approach with a 200 f.p.m. rate of descent and airspeed 10 percent to 20 percent above stall speed with flaps down, as if for a glassy water landing.
- Maintain the landing attitude until water contact, and reduce power to idle after touchdown.
Do not use landing lights during the approach unless considerable whitecaps are present. The landing lights may cause a false depth perception. [Figure 8-9]
Emergency Landing Under Instrument Conditions
When surface visibilities are near zero, the pilot has no alternative but to fly the seaplane onto the water by instruments. A landing heading can be estimated from forecasts prior to departure, broadcast sea conditions, or reports from ships in the area. Obtain the latest local altimeter setting to minimize the possibility of altitude errors during the approach.
Due to the high possibility of damage or capsizing upon landing, be sure all occupants have life vests on and secure all loose items prior to touchdown. Remove liferafts and survival equipment from their storage containers and give them to those occupants closest to the exits. Prior to the landing pattern, unlatch doors to prevent jamming caused by airframe distortion from a hard landing. If time permits, transmit a distress call and activate the emergency locator transmitter.