
Chapter 6
Aircraft Wood & Structural Repair
Splayed Patch
A splayed patch is a flush patch. The term splayed denotes that the edges of the patch are tapered, with the slope cut at a 5:1 ratio to the thickness of the skin. This may be used for small holes where the largest dimension of the hole to be repaired is not more than 15 times the skin thickness and the skin is not more than 1⁄10-inch thick. This calculates to nothing larger than a 1½-inch trimmed hole in very thin plywood.
Using the sample 1⁄10-inch thick plywood and a maximum trimmed hole size of 1½-inches, and cutting a 5:1 scarf, results in a 2½-inches round section to be patched. The patch should be fabricated with a 5:1 scarf, from the same type and thickness plywood as the surface being repaired.
Glue is applied to the beveled edges and the patch is set with the grain parallel to the surface being repaired. A pressure plate of thicker plywood cut to the exact size of the patch is centered over the patch covered with waxed paper. A suitable weight is used for pressure until the glue has set. The repair is then sanded and finished to match the original surface. [Figure 6-29]
Surface Patch
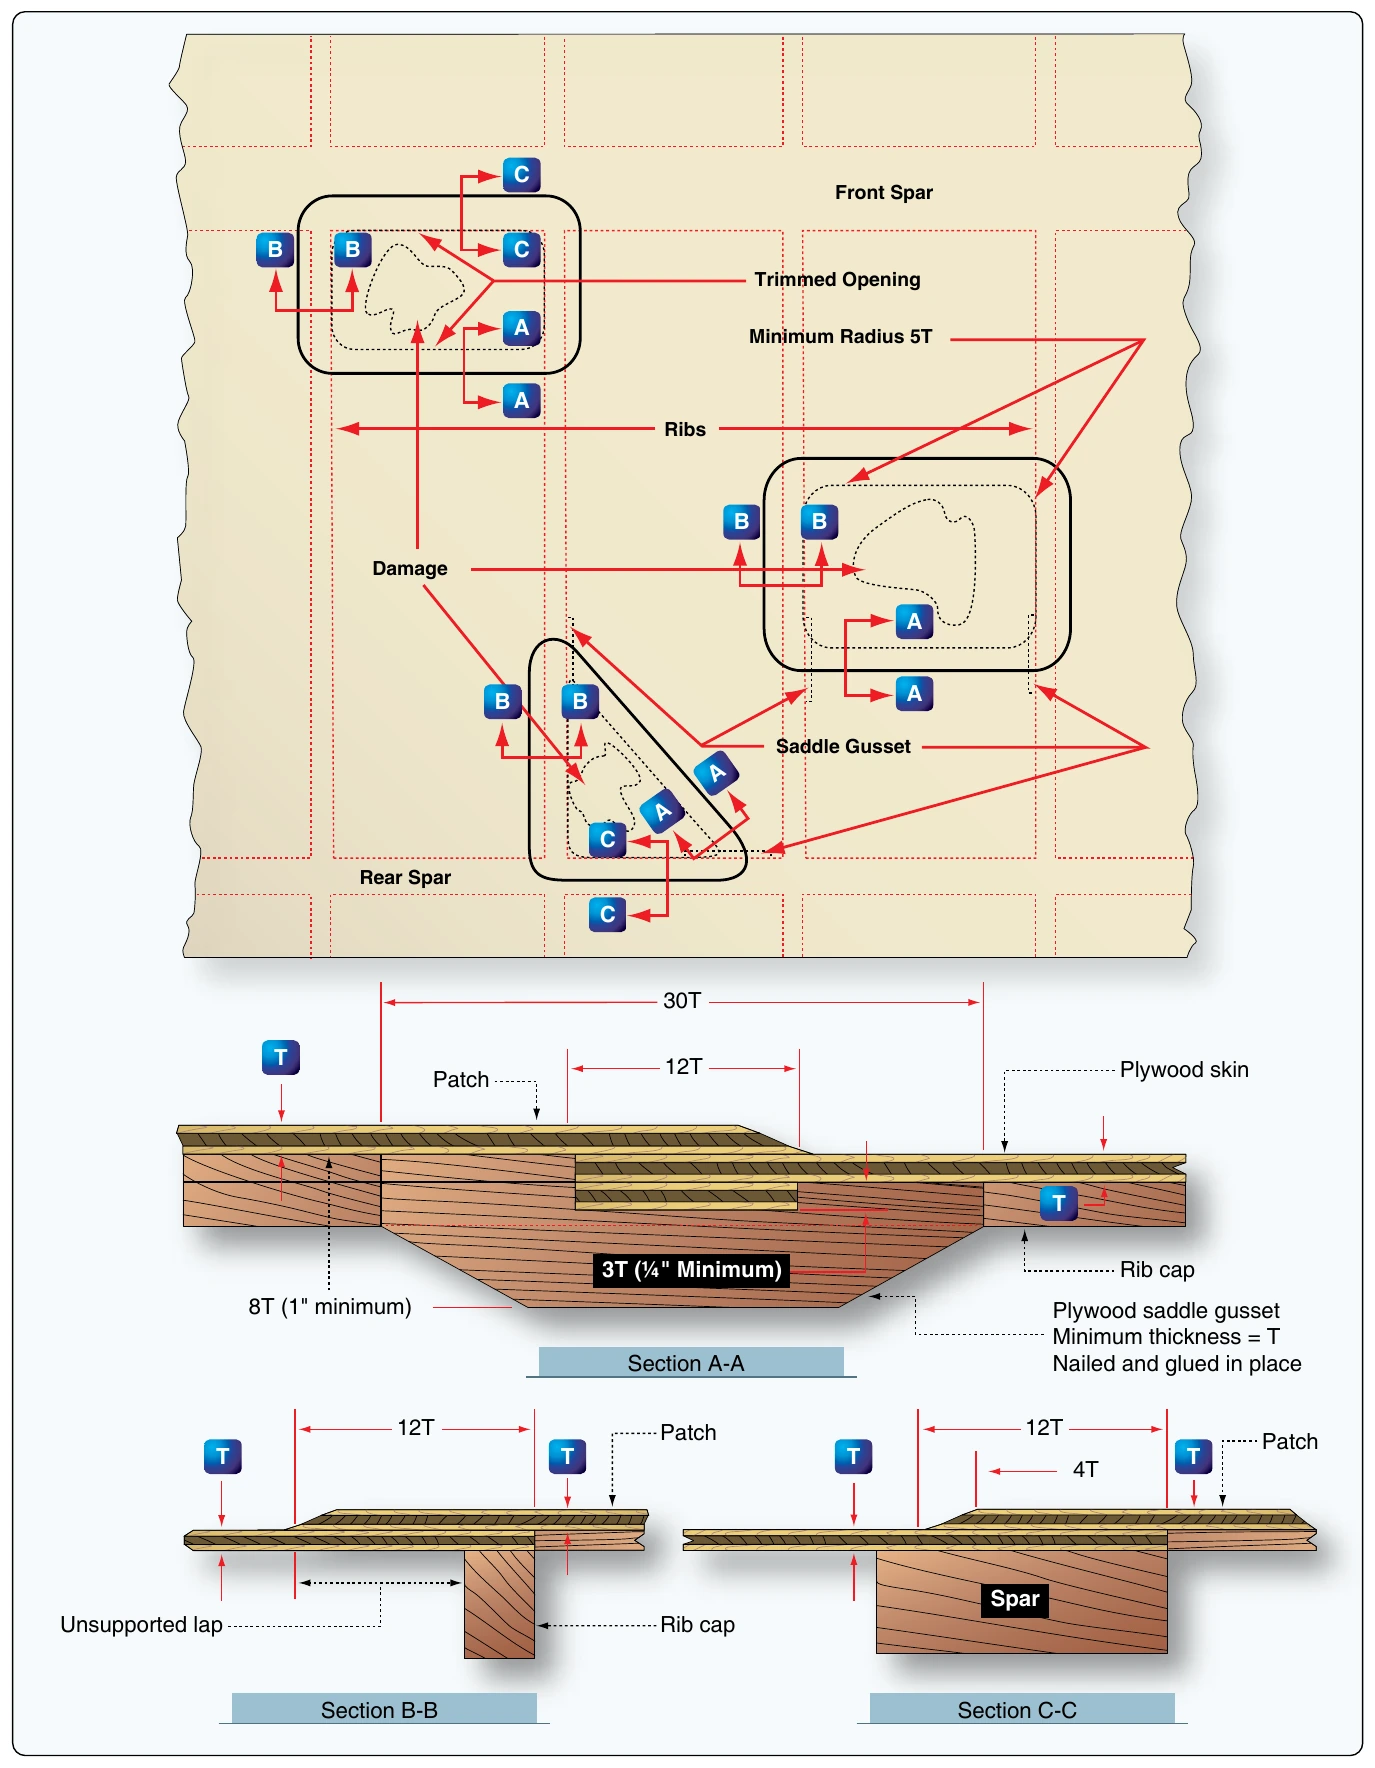
Plywood skins not over 1⁄8-inch thick that are damaged between or along framing members may be repaired with a surface or overlay patch. Surface patches located aft of the 10 percent chord line, or which wrap around the leading edge and terminate aft of the 10 percent chord line, are permissible. You can use surface patches to patch trimmed holes up to a 50-inch perimeter, and may cover an area as large as one frame or rib space.
Trim the damaged area to a rectangle or triangular shape with rounded corners. The radius of the corners must be at least 5 times the skin thickness. Doublers made of plywood at least ¼-inch thick are reinforcements placed under the edge of the hole inside the skin. Nail and glue the doublers in place. Extend the doublers from one framing member to another and strengthen at the ends by saddle gussets attached to the framing members. [Figure 6-30]
The surface patch is sized to extend beyond the cutout as indicated. All edges of the patch are beveled, but the leading edge of the patch should be beveled at an angle at least 4:1 of the skin thickness. The face-grain direction of the patch must be in the same direction of the original skin. Where possible, weights are used to apply pressure to a surface patch until the glue has dried. If the location of the patch precludes the use of weight, small round head wood screws can be used to apply glue pressure to secure the patch. After a surface patch has dried, the screws can be removed and the holes filled. The patch should be covered with fabric that overlaps the original surface by at least 2-inches. The fabric should be from one of the approved fabric covering systems using the procedures recommended by the manufacturer to cement and finish the fabric.
Plug Patch
Two types of plug patch, oval and round, may be used on plywood skins. Because the plug patch is only a skin repair, use it only for damage that does not involve the supporting structure under the skin.
Cut the edges of a plug patch at right angles to the surface of the skin. Cut the skin also to a clean round or oval hole with edges at right angles to the surface. Cut the patch to the exact size of the hole; when installed, the edge of the patch forms a butt joint with the edge of the hole.
You can use a round plug patch where the cutout repair is no larger than 6-inches in diameter. Sample dimensions for holes of 4-inches and 6-inches in diameter appear in Figure 6-31.
The following steps provide a method for making a round plug patch:
- Cut a round patch large enough to cover the intended repair. If applicable for size, use the sample dimensions in Figure 6-31. The patch must be of the same material and thickness as the original skin.
- Place the patch over the damaged spot and mark a circle of the same size as the patch.
- Cut the skin inside the marked circle so that the plug patch fits snugly into the hole around the entire perimeter.
- Cut a doubler of soft quarter-inch plywood, such as poplar. A small patch is cut so that its outside radius is 5⁄8-inch greater than the hole to be patched and the inside radius is 5⁄8-inch less. For a large patch the dimensions would be increased to 7⁄8-inch each. If the curvature of the skin surface is greater than a rise of 1⁄8-inch in 6-inches, the doubler should be preformed to the curvature using hot water or steam. As an alternative, the doubler may be laminated from two pieces of 1⁄8-inch plywood.
- Cut the doubler through one side so that it can be inserted through the hole to the back of the skin. Place the patch plug centered on the doubler and mark around its perimeter. Apply a coat of glue outside the line to the outer half of the doubler surface that will bear against the inner surface of the skin.
- Install the doubler by slipping it through the cutout
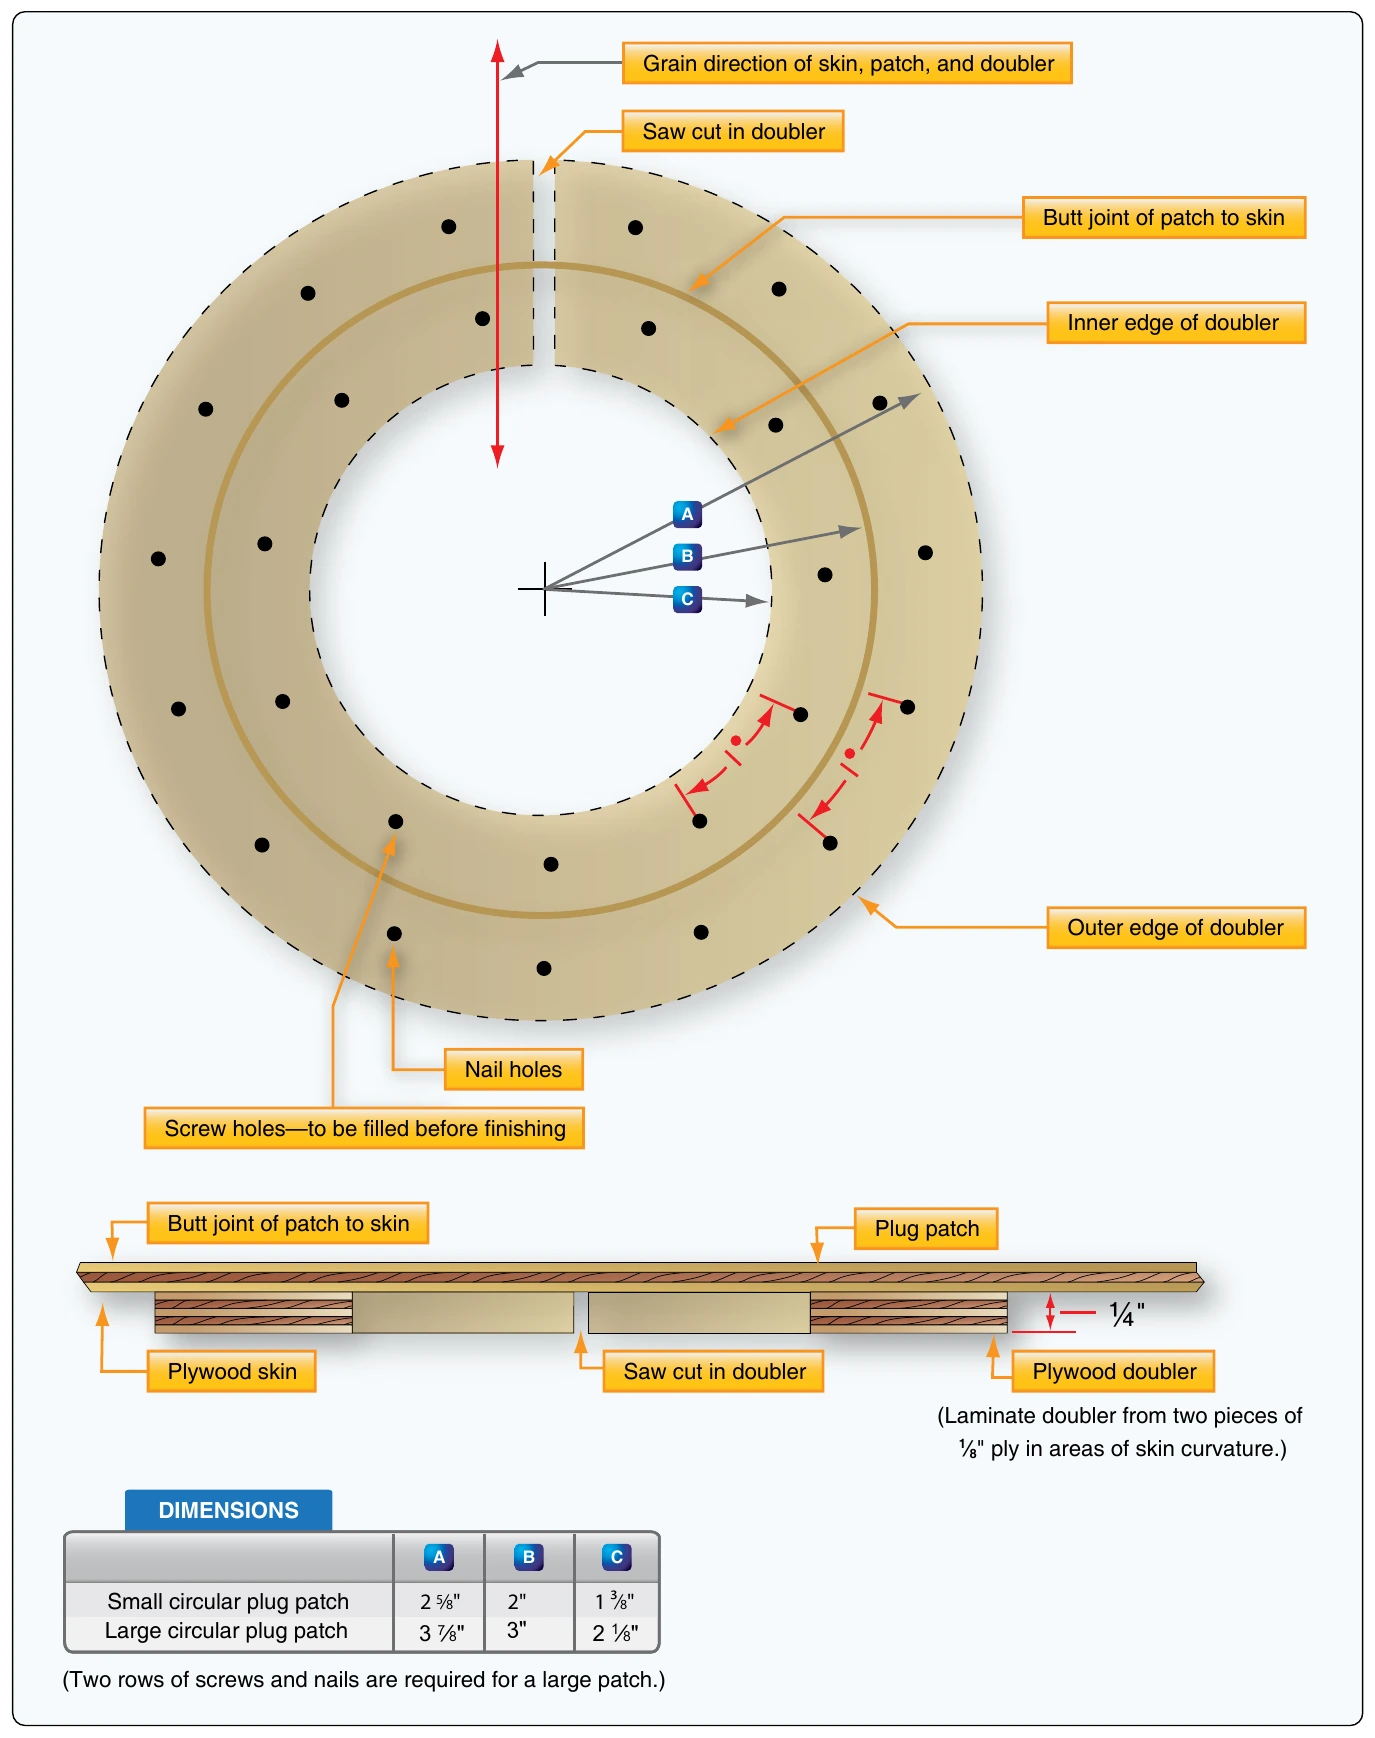
hole and place it so that the mark is concentric with the hole. Nail it in place with nailing strips, while holding a bucking bar or similar object under the doubler for backup. Place waxed paper between the nailing strips and the skin. Cloth webbing under the nailing strips facilitates removal of the strips and nails after the glue dries.
- After the glue has set for the installed doubler, and you have removed the nail strips, apply glue to the inner half of the doubler and to the patch plug. Drill holes around the plug’s circumference to accept No. 4 round head wood screws. Insert the plug with the grain aligned to the surface wood.
- Apply the pressure to the patch by means of the wood screws. No other pressure is necessary.
- After the glue has set, remove the screws and fill the nail and screw holes. Sand and finish to match the original surface.
The steps for making an oval plug patch are identical to those for making the round patch. The maximum dimensions for large oval patches are 7-inches long and 5-inches wide. Oval patches must be cut, so when installed, the face grain matches the direction of the original surface. [Figure 6-32]