Chapter 7
Advanced Composite Materials
Composite materials can be used to structurally repair, restore, or enhance aluminum, steel, and titanium components. Bonded composite doublers have the ability to slow or stop fatigue crack growth, replace lost structural area due to corrosion grind-outs, and structurally enhance areas with small and negative margins. This technology has often been referred to as a combination of metal bonding and conventional on-aircraft composite bonded repair. Boron prepreg tape with an epoxy resin is most often used for this application.
Co-bonding
In the co-bonding process, one of the detail parts is precured with the mating part being cured simultaneously with the adhesive. Film adhesive is often used to improve peel strength.
Layup Process (Typical Laminated Wet Layup)
Layup Techniques
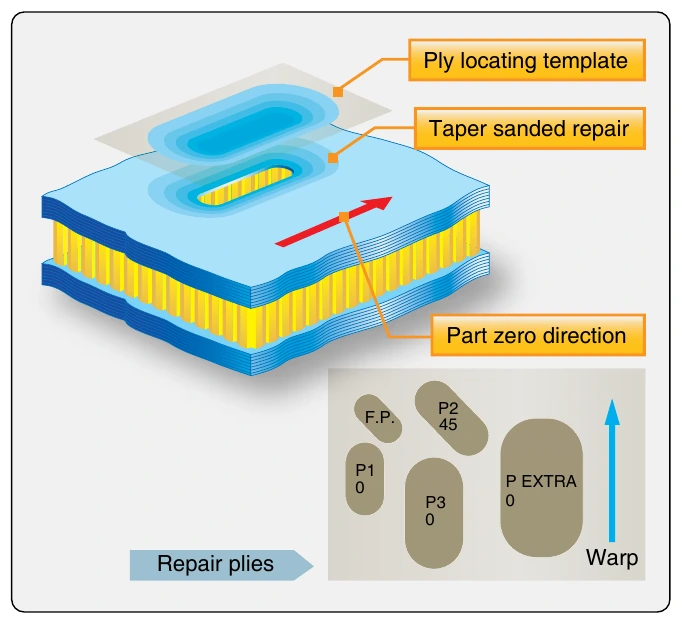
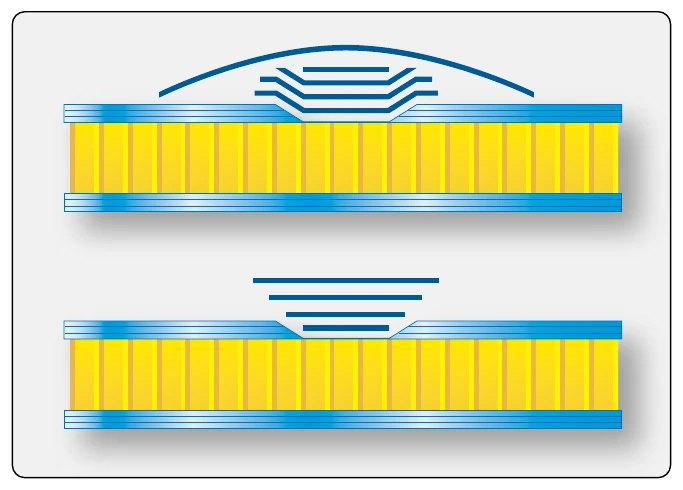
Read the SRM and determine the correct repair material, number of plies required for the repair, and the ply orientation. Dry the part, remove the damage, and taper sand the edges of damaged area. Use a piece of thin plastic, and trace the size of each repair ply from the damaged area. Indicate the ply orientation of each ply on the trace sheet. Copy the repair ply information to a piece of repair material that is large enough to cut all plies. Impregnate the repair material with resin, place a piece of transparent release film over the fabric, cut out the plies, and lay up the plies in the damaged area. The plies are usually placed using the smallest ply first taper layup sequence, but an alternative method is to use the largest ply first layup sequence. In this sequence, the first layer of reinforcing fabric completely covers the work area, followed by successively smaller layers, and then is finished with an extra outer layer or two extending over the patch and onto the sound laminate for some distance. Both methods are illustrated in Figures 7-46 and 7-47.
Bleedout Technique
The traditional bleedout using a vacuum bag technique places a perforated release film and a breather/bleeder ply on top of the repair. The holes in the release film allow air to breath and resin to bleed off over the entire repair area. The amount of resin bled off depends on the size and number of holes in the perforated release film, the thickness of the bleeder/breather cloth, the resin viscosity and temperature, and the vacuum pressure.
Controlled bleed allows a limited amount of resin to bleed out in a bleeder ply. Place a piece of perforated release film on top of the prepreg material, a bleeder ply on top of the perforated release film, and a solid release film on top of the bleeder. Use a breather and a vacuum bag to compact the repair. The breather allows the air to escape. The bleeder can only absorb a limited amount of resin, and the amount of resin that is bled can be controlled by using multiple bleeder plies. Too many bleeder plies can result in a resin-starved repair. Always consult the maintenance manual or manufacturer tech sheets for correct bagging and bleeding techniques.
No Bleedout
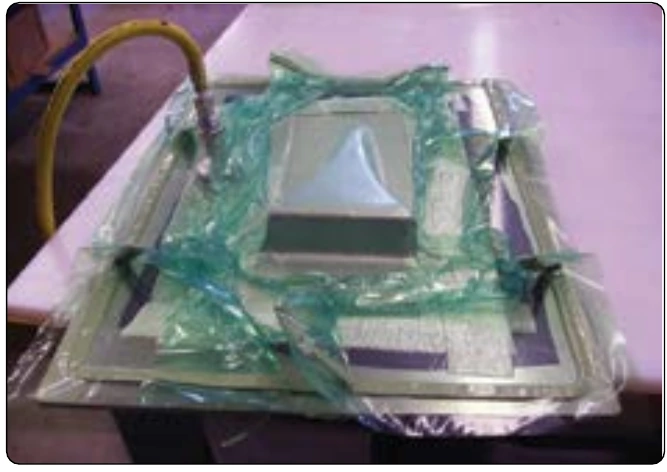
Prepreg systems with 32 to 35 percent resin content are typically no-bleed systems. These prepregs contain exactly the amount of resin needed in the cured laminate; therefore, resin bleedoff is not desired. Bleedout of these prepregs results in a resin-starved repair or part. Many high-strength prepregs in use today are no-bleed systems. No bleeder is used, and the resin is trapped/sealed so that none bleeds away. Consult the maintenance manual to determine if bleeder plies are required for the repair. A sheet of solid release film (no holes) is placed on top of the prepreg and taped off at the edges with flash tape. Small openings are created at the edges of the tape so that air can escape. A breather and vacuum bag are installed to compact the prepreg plies. The air can escape on the edge of the repair but no resin can bleed out. [Figure 7-48]
Horizontal (or edge) bleedout is used for small room temperature wet layup repairs. A 2-inch strip of breather cloth is placed around the repair or part (edge breather). There is no need for a release film because there is no bleeder/breather cloth on top of the repair. The part is impregnated with resin, and the vacuum bag is placed over the repair. A vacuum is applied and a squeegee is used to remove air and excess resin to the edge breather.
Ply Orientation Warp Clock
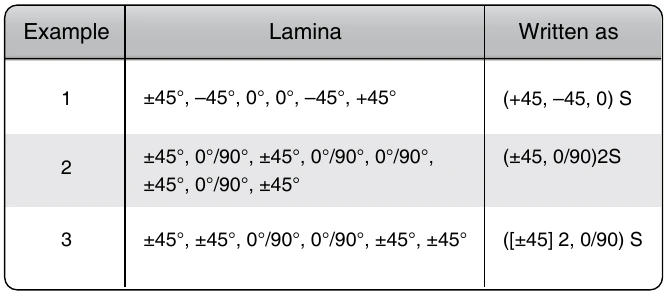
In order to minimize any residual thermal stresses caused during cure of the resin, it is always good practice to design a symmetrical, or balanced, laminate. Examples of balance laminates are presented in Figure 7-49. The first example uses unidirectional tape, and examples 2 and 3 are typical quasi-isotropic laminates fabricated from woven cloth.
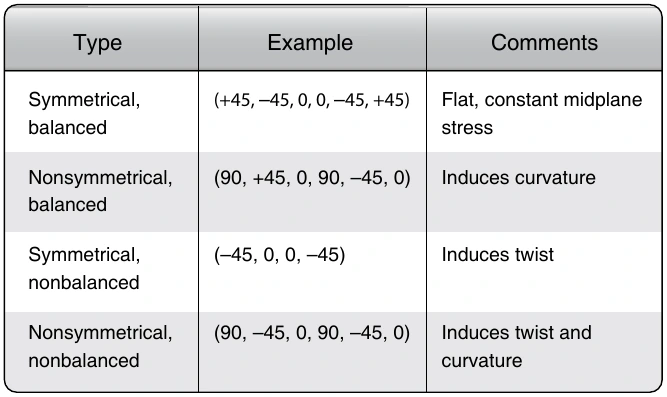
Figure 7-50 presents examples of the effects caused by nonsymmetrical laminates. These effects are most pronounced in laminates that are cured at high temperature in an autoclave or oven due to the thermal stresses developed in the laminate as the laminate cools down from the cure temperature to room temperature. Laminates cured at room temperature using typical wet layup do not exhibit the same degree of distortion due to the much smaller thermal stresses. The strength and stiffness of a composite buildup depends on the ply orientation. The practical range of strength and stiffness of carbon epoxy extends from values as low as those provided by fiberglass to as high as those provided by titanium. This range of values is determined by the orientation of the plies to the applied load. Because the strength design requirement is a function of the applied load direction, ply orientation and ply sequence must be correct. It is critical during a repair operation to replace each damaged ply with a ply of the same material and orientation or an approved substitute.