
Chapter 11
Hand Tools & Measuring Devices
Twist drills are made of carbon steel or high-speed alloy steel. Carbon steel twist drills are satisfactory for the general run of work and are relatively inexpensive. The more expensive high-speed twist drills are used for the tough materials, such as stainless steels. Twist drills have from one to four spiral flutes. Drills with two flutes are used for most drilling. Whereas those with three or four flutes are used principally to follow smaller drills or to enlarge holes.
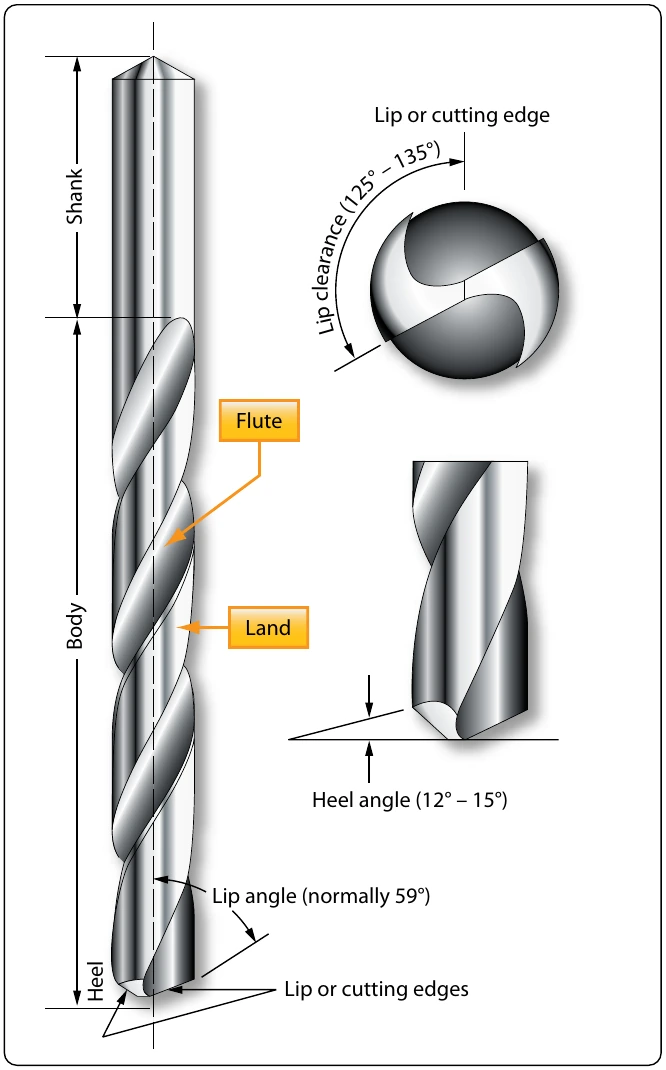
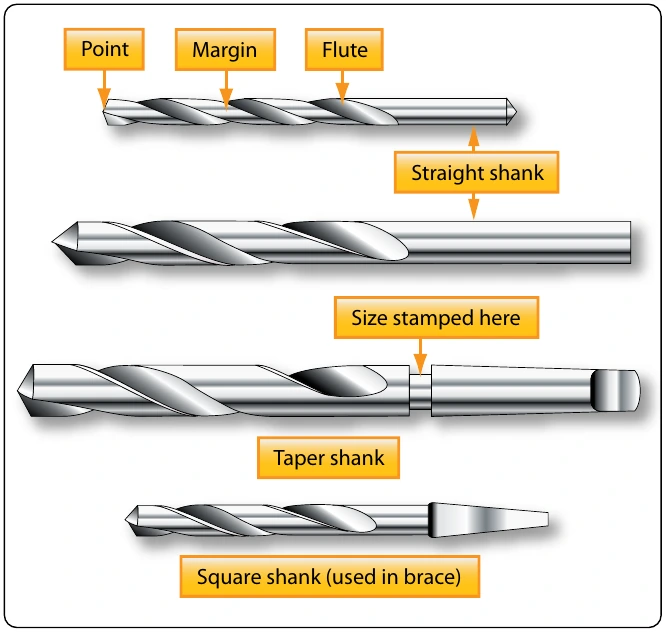
The principal parts of a twist drill are the shank, the body, and the heel. [Figure 11-19] The drill shank is the end that fits into the chuck of a hand or power drill. The two shank shapes most commonly used in hand drills are the straight shank and the square or bit stock shank. The straight shank generally is used in hand, breast, and portable electric or pneumatic drills. The square shank is made to fit into a carpenter’s brace. Tapered shanks generally are used in machine shop drill presses. [Figure 11-20]
The metal column forming the core of the drill is the body. The body clearance area lies just back of the margin. It is slightly smaller in diameter than the margin to reduce the friction between the drill and the sides of the hole. The angle at which the drill point is ground is the lip clearance angle. On standard drills used to cut steel and cast iron, the angle should be 59° from the axis of the drill. For faster drilling of soft materials, sharper angles are used.
The diameter of a twist drill may be given in one of three ways: by fractions, letters, or numbers. Fractionally, they are classified by sixteenths of an inch (from 1⁄16 to 31⁄2 inches), by thirty-secondths (from 1⁄32 to 21⁄2 inches), or by sixty-fourths (from 1⁄64 to 11⁄4 inches). For a more exact measurement, a letter system is used with decimal equivalents: A (0.234 inch) to Z (0.413 inch). The number system of classification is most accurate: No. 80 (0.0314 inch) to No. 1 (0.228 inch). Drill sizes and their decimal equivalents are shown in Figure 11-21.
The twist drill should be sharpened at the first sign of dullness. For most drilling, a twist drill with a cutting angle of 118° (59° on either side of center) is sufficient. However, when drilling soft metals, a cutting angle of 90° may be more efficient.
Typical procedures for sharpening drills are as follows: [Figure 11-22]
- Hold the drill between the thumb and index finger of the right or left hand. Grasp the body of the drill near the shank with the other hand.
- Place the hand on the tool rest with the centerline of the drill making a 59° angle with the cutting face of the grinding wheel. Lower the shank end of the drill slightly.
- Slowly place the cutting edge of the drill against the grinding wheel. Gradually lower the shank of the drill as you twist the drill in a clockwise direction. Maintain pressure against the grinding surface only until you reach the heel of the drill.
- Check the results of grinding with a gauge to determine whether or not the lips are the same length and at a 59° angle.
Alternatively, there are commercially available twist drill grinders available, as well as attachments for bench grinders that ensure consistent, even sharpening of twist drills.
Reamers
Reamers are used to smooth and enlarge holes to exact size. Hand reamers have square end shanks so that they can be turned with a tap wrench or similar handle. The various types of reamers are illustrated in Figure 11-23.
A hole that is to be reamed to exact size must be drilled about 0.003 to 0.007 inch undersize. A cut that removes more than 0.007 inch places too much load on the reamer and should not be attempted.
Reamers are made of either carbon tool steel or high-speed steel. The cutting blades of a high-speed steel reamer lose their original keenness sooner than those of a carbon steel reamer; however, after the first super keenness is gone, they are still serviceable. The high-speed reamer usually lasts much longer than the carbon steel type.
Reamer blades are hardened to the point of being brittle and must be handled carefully to avoid chipping them. When reaming a hole, rotate the reamer in the cutting direction only. Do not back a reamer out of a hole by rotating it opposite the cutting direction. Turn the reamer steadily and evenly to prevent chattering, or marking and scoring of the hole walls.
Reamers are available in any standard size. The straight fluted reamer is less expensive than the spiral fluted reamer, but the spiral type has less tendency to chatter. Both types are tapered for a short distance back of the end to aid in starting. Bottoming reamers have no taper and are used to complete the reaming of blind holes.
For general use, an expansion reamer is the most practical. This type is furnished in standard sizes from 1⁄4 inch to 1 inch, increasing in diameter by 1⁄32-inch increments.
Taper reamers, both hand and machine operated, are used to smooth and true taper holes and recesses.