
Chapter 5
Aircraft Welding
TIG welding of titanium is performed using DC straight polarity. A water-cooled torch, equipped with a ¾-inch ceramic cup and a gas lens, is recommended. The gas lens provides a uniform, nonturbulent inert gas flow. Thoriated tungsten electrodes are recommended for TIG welding of titanium. The smallest diameter electrode that can carry the required current should be used. A remote contactor controlled by the operator should be employed to allow the arc to be broken without removing the torch from the cooling weld metal, allowing the shielding gas to cover the weld until the temperature drops.
Most titanium welding is performed in an open fabrication shop. Chamber welding is still in use on a limited basis, but field welding is common. A separate area should be set aside and isolated from any dirt producing operations, such as grinding or painting. Additionally, the welding area should be free of air drafts and the humidity should be controlled.
Molten titanium weld metal must be totally shielded from contamination by air. Molten titanium reacts readily with oxygen, nitrogen, and hydrogen; exposure to these elements in air or in surface contaminants during welding can adversely affect titanium weld properties and cause weld embrittlement. Argon is preferred for manual welding because of better arc stability characteristics. Helium is used in automated welding and when heavier base metals or deeper penetration is required.
Care must be taken to ensure that the heat affected zones and the root side of the titanium welds are shielded until the weld metal temperature drops below 800 °F. This can be accomplished using shielding gas in three separate gas streams during welding.
- The first shielding of the molten puddle and adjacent surfaces is provided by the flow of gas through the torch. Manufacturer recommendations should be followed for electrodes, tip grinding, cup size, and gas flow rates.
- The secondary, or trailing, shield of gas protects the solidified weld metal and the heat affected zone until the temperature drops. Trailing shields are custom-made to fit a specific torch and a particular welding operation.
- The third, or backup, flow is provided by a shielding device that can take many forms. On straight seam welds, it may be a grooved copper backing bar clamped behind the seam allowing the gas flow in the groove and serving as a heat sink. Irregular areas may be enclosed with aluminum tents taped to the backside of welds and purged with the inert gas.
Titanium weld joints are similar to those employed with other metals. Before welding, the weld joint surfaces must be cleaned and remain free of any contamination during the welding operation. Detergent cleaners and nonchlorinated cleaners, such as denatured isopropyl alcohol, may be used. The same requirements apply to the filler rod, it too must be cleaned and free of all contaminates. Welding gloves, especially the one holding the filler, must be contaminate free.
A good indication and measure of weld quality for titanium is the weld color. A bright silver weld indicates that the shielding is satisfactory and the heat affected zone and backup was properly purged until weld temperatures dropped. Straw-colored films indicate slight contamination, unlikely to affect mechanical properties; dark blue films or white powdery oxide on the weld would indicate a seriously deficient purge. A weld in that condition must be completely removed and rewelded.
Arc Welding Procedures, Techniques, & Welding Safety Equipment
Arc welding, also referred to as stick welding, has been performed successfully on almost all types of metals. This section addresses the procedures as they may apply to fusion welding of steel plate and provides the basic steps and procedures required to produce an acceptable arc weld. Additional instruction and information pertaining to arc welding of other metals can be obtained from training institutions and the various manufacturers of the welding equipment.
The first step in preparing to arc weld is to make certain that the necessary equipment is available and that the welding machine is properly connected and in good working order. Particular attention should be given to the ground connection, since a poor connection results in a fluctuating arc, that is difficult to control.
When using a shielded electrode, the bare end of the electrode should be clamped in its holder at a 90° angle to the jaws. (Some holders allow the electrode to be inserted at a 45° angle when needed for various welding positions.)
Before starting to weld, the following typical list of items should be checked:
- Is the proper personal safety equipment being used, including a welding helmet, welding gloves, protective clothing, and footwear; if not, in an adequately ventilated area, appropriate breathing equipment?
- Has the ground connection been properly made to the work piece and is it making a good connection?
- Has the proper type and size electrode been selected for the job?
- Is the electrode properly secured in the holder?
- Does the polarity of the machine coincide with that of the electrode?
- Is the machine in good working order and is it adjusted to provide the necessary current for the job?
The welding arc is established by touching the base metal plate with the electrode and immediately withdrawing it a short distance. At the instant the electrode touches the plate, a rush of current flows through the point of contact. As the electrode is withdrawn, an electric arc is formed, melting a spot on the plate and at the end of the electrode.
Correctly striking an arc takes practice. The main difficulty in confronting a beginner in striking the arc is sticking the electrode to the work. If the electrode is not withdrawn promptly upon contact with the metal, the high amperage flows through the electrode causing it to stick or freeze to the plate and practically short circuits the welding machine. A quick roll of the wrist, either right or left, usually breaks the electrode loose from the work piece. If that does not work, quickly unclamp the holder from the electrode, and turn off the machine. A small chisel and hammer frees the electrode from the metal so it can be regripped in the holder. The welding machine can then be turned back on.
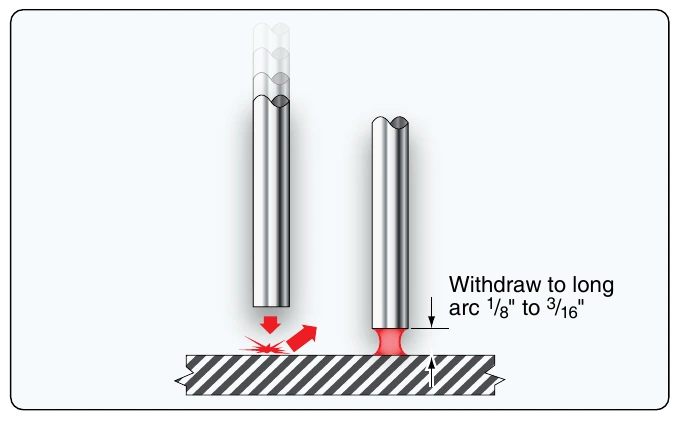
There are two essentially similar methods of striking the arc. One is the touch or tapping method. When using this method, the electrode should be held in a vertical position and lowered until it is an inch or so above the point where the arc is to be struck. Then, the electrode is lightly tapped on the work piece and immediately lifted to form an arc approximately ¼-inch in length. [Figure 5-29]
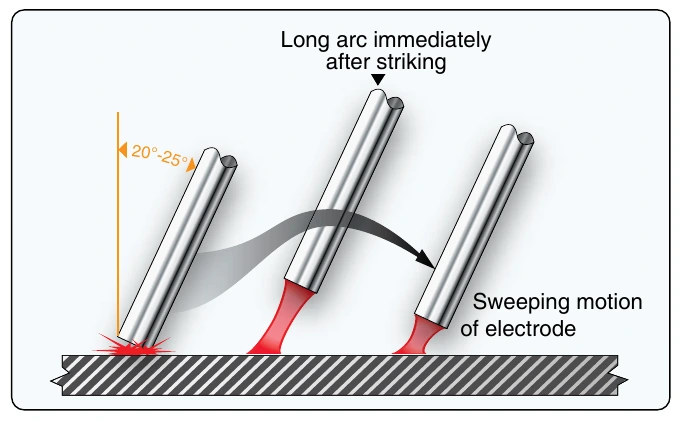
The second (and usually easier to master) is a scratch or sweeping method. To strike the arc by the scratch method, the electrode is held just above the plate at an angle of 20°–25°. The arc should be struck by sweeping the electrode with a wrist motion and lightly scratching the plate. The electrode is then lifted immediately to form an arc. [Figure 5-30]
Either method takes some practice, but with time and experience, it becomes easy. The key is to raise the electrode quickly, but only about ¼-inch from the base or the arc is lost. If it is raised too slowly, the electrode sticks to the plate.