
Chapter 5
Aircraft Welding
- Turn in the adjusting screw on the oxygen pressure regulator until the working pressure indicates 10 psi. Turn in the adjusting screw on the acetylene pressure regulator until the working pressure indicates 5 psi.
- Back out both adjusting screws on the regulators and verify that the working pressure remains steady. If it drops and pressure is lost, a leak is indicated between the regulator and the torch.
- A general tightening of all connections should fix the leak. Repeat a check of the system.
- If a leak is still indicated by a loss in working pressure, a mixture of soapy water on all the connections reveals the source of the leak. Never check for a leak with a flame because a serious explosion could occur.
Select the Tip Size
Welding and cutting tips are available in a variety of sizes for almost any job, and are identified by number. The higher the number, the bigger the hole in the tip, allowing more heat to be directed onto the metal and allowing thicker metal to be welded or cut.
Welding tips have one hole and cutting tips have a number of holes. The cutting tip has one large hole in the center for the cutting oxygen and a number of smaller holes around it that supply fuel, gas, and oxygen for the preheating flame. The selection of the tip size is very important, not only for the quality of the weld and/or the efficiency of the cutting process, but for the overall operation of the welding equipment and safety of the personnel using it.
Starvation occurs if torch tips are operated at less than the required volume of gas, leading to tip overheating and possible flashbacks. Incorrect tip size and obstructed tip orifices can also cause overheating and/or flashback conditions.
All fuel cylinders have a limited capacity to deliver gas to the tip. That capacity is further limited by the gas contents remaining in the cylinder and the temperature of the cylinder.
The following provides some recommended procedures to guard against overheating and flashbacks:
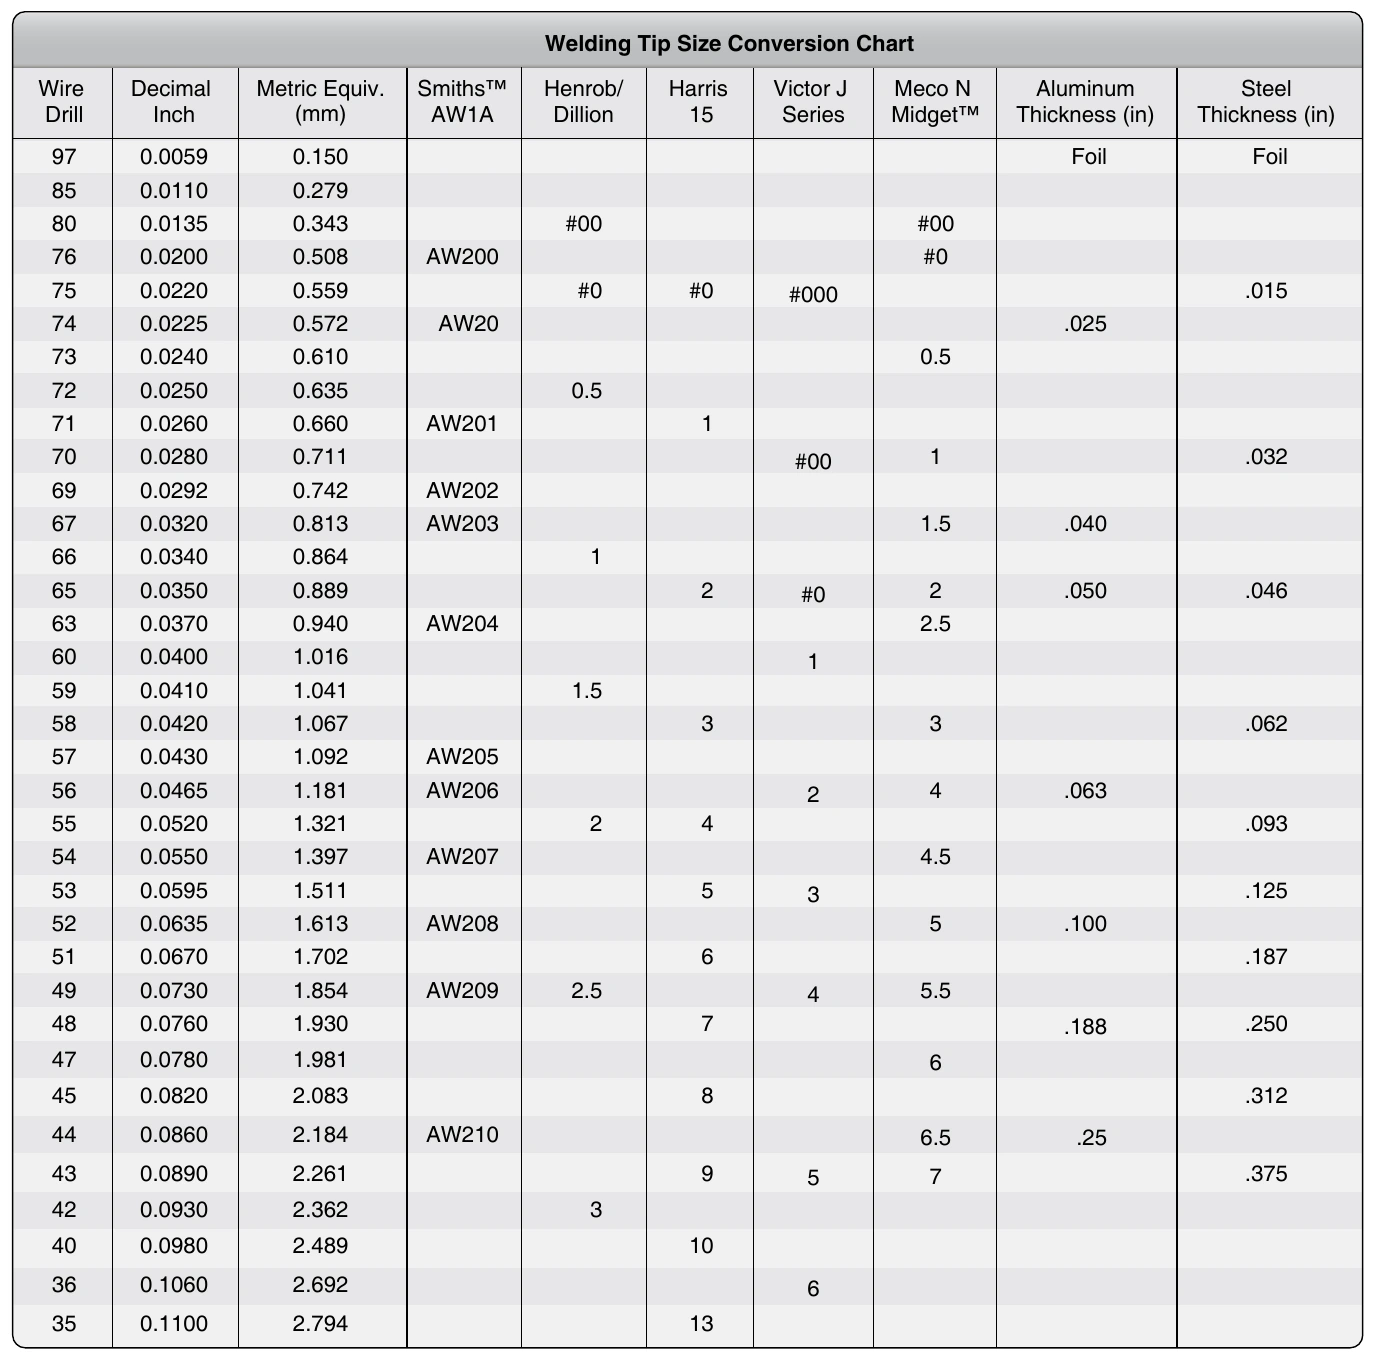
- Refer to the manufacturer’s recommendations for tip size based on the metal’s thickness.
- Use the recommended gas pressure settings for the tip size being used.
- Provide the correct volume of gas as recommended for each tip size.
- Do not use an excessively long hose, one with multiple splices, or one that may be too small in diameter and restrict the flow of gas.
(cylinder capacity) by 7 (one-seventh of the cylinder capacity). As a safety precaution, it is recommended that flashback arrestors be installed between the regulators and the gas supply hoses of all welding outfits. Figure 5-21 shows recommended tip sizes of different manufacturers, for welding various thickness of metals.
Adjusting the Regulator Working Pressure
The working pressure should be set according to the manufacturer’s recommendation for the tip size that is being used to weld or cut. This is a recommended method that works for most welding and cutting operations.
In a well ventilated area, open the acetylene valve on the torch and turn the adjusting screw on the acetylene pressure regulator clockwise until the desired pressure is set. Close the acetylene valve on the torch. Then, set the oxygen pressure in the same manner by opening the oxygen valve on the torch and turning the adjusting screw clockwise on the oxygen regulator until desired pressure is set. Then, close the oxygen valve on the torch handle. With the working pressures set, the welding or cutting operation can be initiated.
Lighting & Adjusting the Torch
With the proper working pressures set for the acetylene and oxygen, open the torch acetylene valve a quarter to a half turn. Direct the torch away from the body and ignite the acetylene gas with the flint striker. Open the acetylene valve until the black sooty smoke disappears from the flame. The pure acetylene flame is long, bushy, and has a yellowish color. Open the torch oxygen valve slowly and the flame shortens and turns to a bluish-white color that forms a bright inner luminous cone surrounded by an outer flame envelope. This is a neutral flame that should be set before either a carburizing or oxidizing flame mixture is set.
Different Flames
The three types of flame commonly used for welding are neutral, carburizing, and oxidizing. Each serves a specific purpose. [Figure 5-22]