Chapter 8
Aircraft Painting & Finishing
When the surfaces are completely dry from the previous process, the next step is to apply Alodine® or another type of an aluminum conversion coating. This coating is also applied like a wash, allowing the coating to contact the surface and keeping it wet for 2 to 5 minutes without letting it dry. It then must be thoroughly rinsed with clean water to remove all chemical salts from the surface. Depending on the brand, the conversion coating may color the aluminum a light gold or green, but some brands are colorless. When the surface is thoroughly dry, the primer should be applied as soon as possible as recommended by the manufacturer.
The primer should be one that is compatible with the topcoat finish. Two-part epoxy primers provide excellent corrosion resistance and adhesion for most epoxy and urethane surfaces and polyurethane topcoats. Zinc chromate should not be used under polyurethane paints.
Composite surfaces that need to be primed may include the entire aircraft if it is constructed from those materials, or they may only be components of the aircraft, such as fairings, radomes, antennas, and the tips of the control surfaces.
Epoxy sanding primers have been developed that provide an excellent base over composites and can be finish sanded with 320 grit using a dual action orbital sander. They are compatible with two-part epoxy primers and polyurethane topcoats.
Topcoats must be applied over primers within the recommended time window, or the primer may have to be scuff sanded before the finish coat is applied. Always follow the recommendations of the coating manufacturer.
Primer & Paint
Purchase aircraft paint for the aviation painting project. Paint manufacturers use different formulas for aircraft and automobiles because of the environments they operate in. The aviation coatings are formulated to have more flexibility and chemical resistance than the automotive paint.
It is also highly recommended that compatible paints of the same brand are used for the entire project. The complete system (of a particular brand) from etching to primers and reducers to the finish topcoat are formulated to work together. Mixing brands is a risk that may ruin the entire project.
When purchasing the coatings for a project, always request a manufacturer’s technical or material data and safety data sheets, for each component used. Before starting to spray, read the sheets. If the manufacturer’s recommendations are not followed, a less than satisfactory finish or a hazard to personal safety or the environment may result. It cannot be emphasized enough to follow the manufacturer’s recommendations. The finished result is well worth the effort.
Before primer or paint is used for any type application, it must be thoroughly mixed. This is done so that any pigment that may have settled to the bottom of the container is brought into suspension and distributed evenly throughout the paint. Coatings now have shelf lives listed in their specification sheets. If a previously opened container is found to have a skin or film formed over the primer or paint, the film must be completely removed before mixing. The material should not be used if it has exceeded its shelf life and/or has become thick or jelled.
Mechanical shaking is recommended for all coatings within 5 days of use. After opening, a test with a hand stirrer should be made to ensure that all the pigment has been brought into suspension. Mechanical stirring is recommended for all two-part coatings. When mixing any two-part paint, the catalyst/activator should always be added to the base or pigmented component. The technical or material data sheet of the coating manufacturer should be followed for recommended times of induction (the time necessary for the catalyst to react with the base prior to application). Some coatings do not require any induction time after mixing, and others need 30 minutes of reaction time before being applied.
Thinning of the coating material should follow the recommendations of the manufacturer. The degree of thinning depends on the method of application. For spray application, the type of equipment, air pressure, and atmospheric conditions guide the selection and mixing ratios for the thinners. Because of the importance of accurate thinning to the finished product, use a viscosity measuring (flow) cup. Material thinned using this method is the correct viscosity for the best application results.
Thin all coating materials and mix in containers separate from the paint cup or pot. Then, filter the material through a paint strainer recommended for the type coating you are spraying as you pour it into the cup or supply pot.
Spray Gun Operation
Adjusting the Spray Pattern
To obtain the correct spray pattern, set the recommended air pressure on the gun, usually 40 to 50 psi for a conventional gun. Test the pattern of the gun by spraying a piece of masking paper taped to the wall. Hold the gun square to the wall approximately 8 to 10 inches from the surface. (With hand spread, it is the distance from the tip of the thumb to the tip of the little finger.)
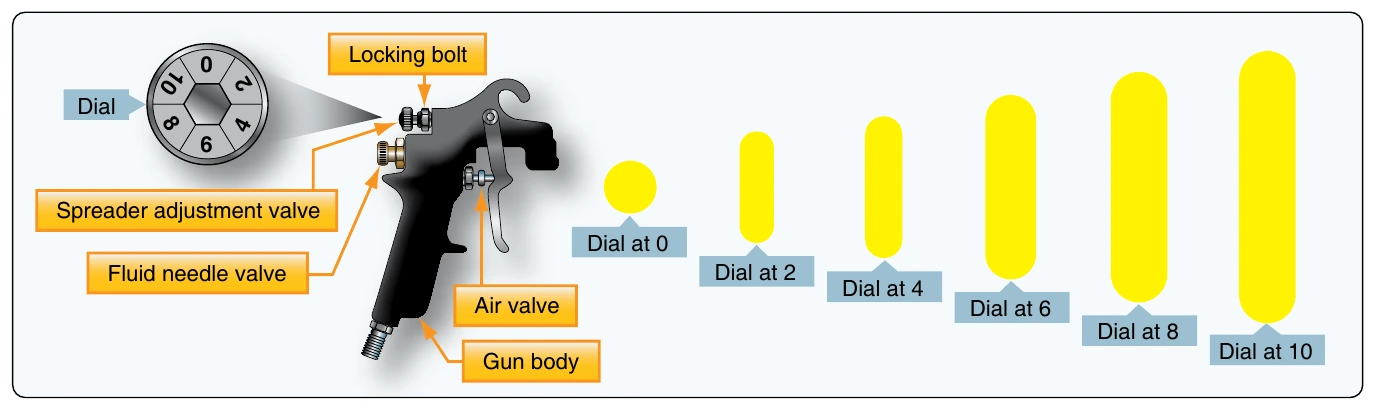
All spray guns (regardless of brand name) have the same type of adjustments. The upper control knob proportions the air flow, adjusting the spray pattern of the gun. [Figure 8-11] The lower knob adjusts the fluid passing the needle, which in turn controls the amount or volume of paint being delivered through the gun.
Pull the trigger lever fully back. Move the gun across the paper, and alternately adjust between the two knobs to obtain a spray fan of paint that is wet from top to bottom (somewhat like the pattern at dial 10.) Turning in (to the right) on the lower, or fluid knob, reduces the amount of paint going through the gun. Turning out increases the volume of paint. Turning out (to the left) on the upper, or pattern control knob, widens the spray pattern. Turning in reduces it to a cone shape (as shown with dial set at 0).
Once the pattern is set on the gun, the next step is to follow the correct spraying technique for applying the coating to the surface.