
Chapter 7
Propellers
- Place the propeller on a cart for transport.
Installation
A flange propeller has six studs configured in a four-inch circle. Two special studs that also function as dowel pins are provided to transfer torque and index the propeller with respect to the engine crankshaft. The dowel pin locations used on a particular propeller installation are indicated in the propeller model stamped on the hub. Perform the applicable steps under Spinner Pre-Installation and clean the engine flange and propeller flange with quick dry Stoddard solvent or methyl ethyl ketone (MEK). Install the O-ring in the O-ring groove in the hub bore. Note: When the propeller is received from the factory, the O-ring has usually been installed. With a suitable support, such as a crane hoist or similar equipment, carefully move the propeller assembly to the aircraft engine mounting flange in preparation for installation.
Install the propeller on the engine flange. Make certain to align the dowel studs in the propeller flange with the corresponding holes in the engine mounting flange. The propeller may be installed on the engine flange in a given position, or 180° from that position. Check the engine and airframe manuals to determine if either manual specifies a propeller mounting position.
Install the propeller mounting nuts (dry) with spacers. Torque the propeller mounting nuts (dry) in accordance with the proper specifications and safety wire the studs in pairs (if required by the aircraft maintenance manual) at the rear of the propeller mounting flange.
Servicing Propellers
Propeller servicing includes cleaning, lubricating, and replenishing operating lubrication supplies.
Cleaning Propeller Blades
Aluminum and steel propeller blades and hubs are usually cleaned by washing the blades with a suitable cleaning solvent, using a brush or cloth but current manufacturer's information should always be used. Do not use acid or caustic materials. Power buffers, steel wool, steel brushes, or any other tool or substance that may scratch or mar the blade should be avoided. If a high polish is desired, a number of good grades of commercial metal polish are available. After completing the polishing operation, immediately remove all traces of polish. When the blades are clean, coat them with a clean film of engine oil or suitable equivalent.
To clean wooden propellers, use warm water and a mild soap, together with brushes or cloth. If a propeller has been subjected to salt water, flush it with fresh water until all traces of salt have been removed. This should be accomplished as soon as possible after the salt water has splashed on the propeller, regardless of whether the propeller parts are aluminum alloy, steel, or wood. After flushing, thoroughly dry all parts, and coat metal parts with clean engine oil or a suitable equivalent.
To remove grease or oil from propeller surfaces, apply Stoddard solvent or equivalent to a clean cloth and wipe the part clean. Using a noncorrosive soap solution, wash the propeller. Thoroughly rinse with water. Permit to dry. Aluminum and steel propeller blades and hubs usually are cleaned by washing the blades with a suitable cleaning solvent, using a brush or cloth. Do not use acid or caustic materials. Avoid power buffers, steel wool, steel brushes, or any other tool or substance that may scratch or mar the blade. If a high polish is desired, a number of good grades of commercial metal polish are available. After completing the polishing operation, immediately remove all traces of polish. When the blades are clean, coat them with a clean film of engine oil or suitable equivalent.
Charging the Propeller Air Dome
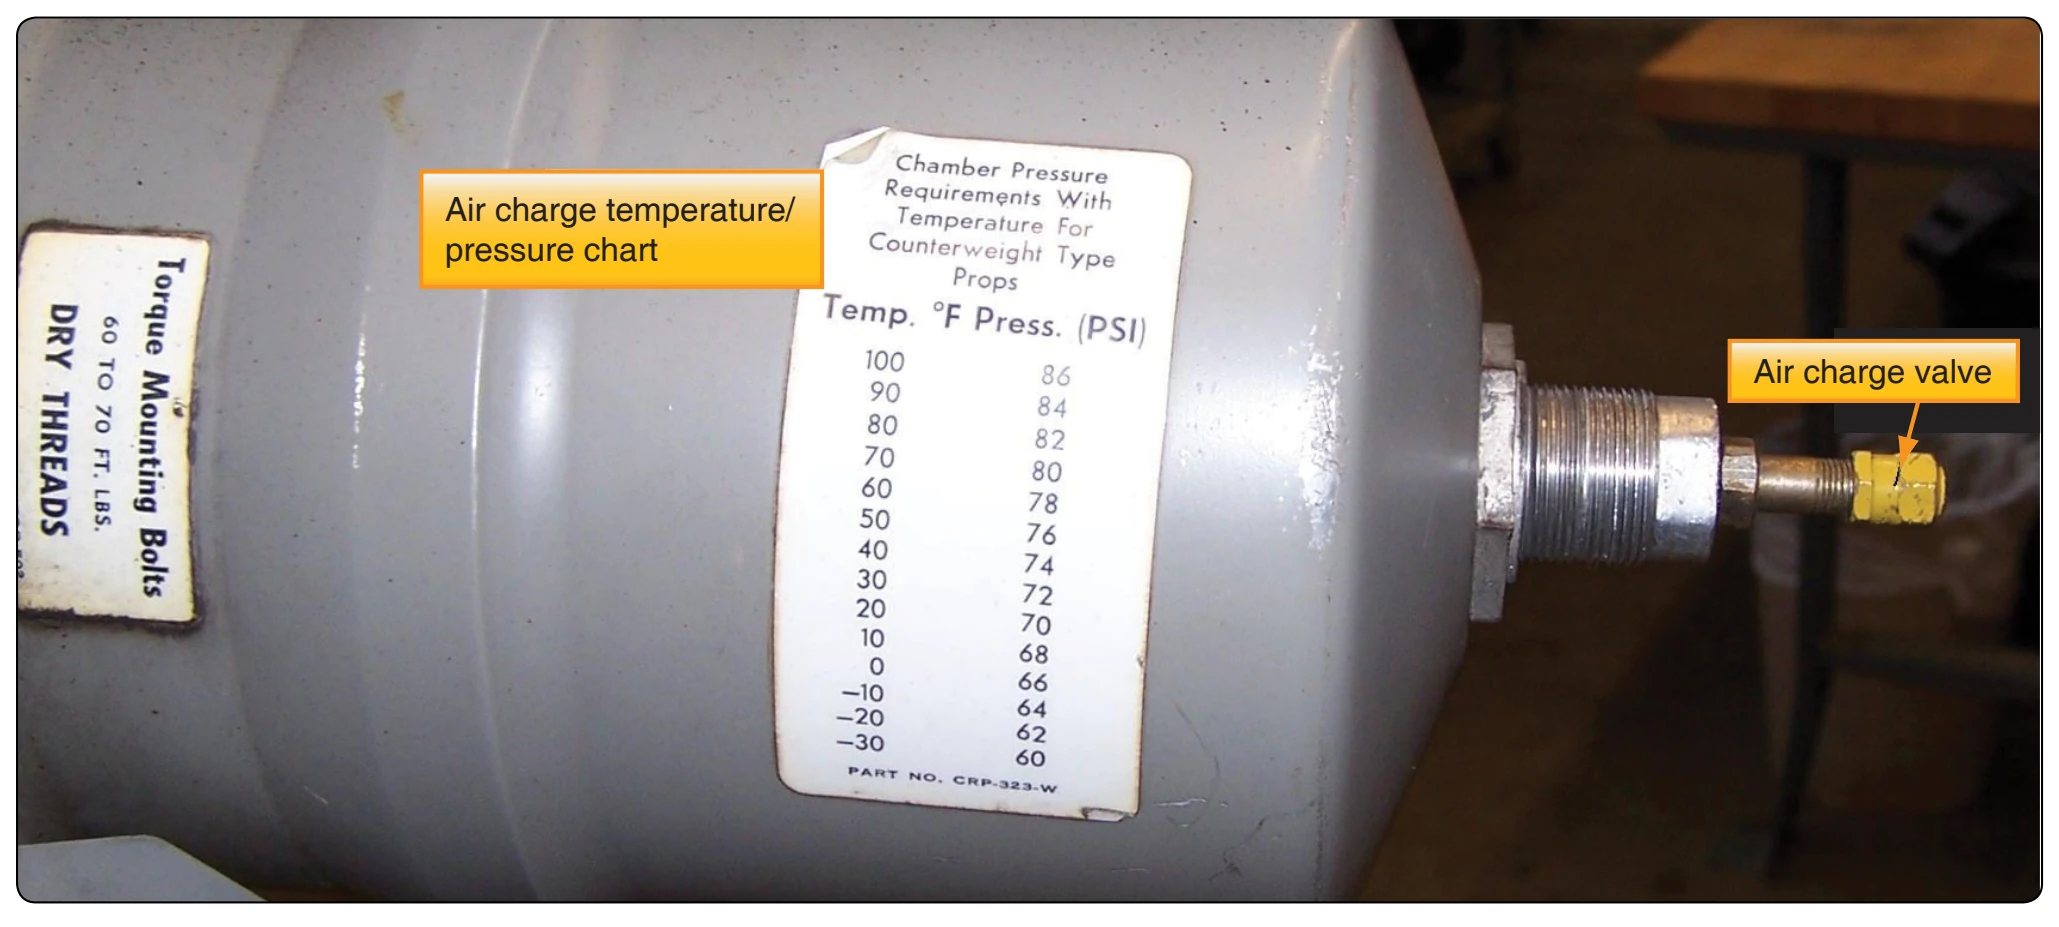
These instructions are general in nature and do not represent any aircraft procedure. Always check the correct manual before servicing any propeller system. Examine the propeller to make sure that it is positioned on the start locks and using the proper control, then charge the cylinder with dry air or nitrogen. The air charge valve is located on the cylinder as indicated in Figure 7-41. Nitrogen is the preferred charging medium. The correct charge pressure is identified by checking the correct table shown. The temperature is used to find the correct pressure to charge the hub air pressure.
Propeller Lubrication
Hydromatic propellers operated with engine oil and some sealed propellers do not require lubrication. Electric propellers require oils and greases for hub lubricants and pitch change drive mechanisms. Proper propeller lubrication procedures, with oil and grease specifications, are usually published in the manufacturer’s instructions. Experience indicates that water sometimes gets into the propeller blade bearing assembly on some models of propellers. For this reason, the propeller manufacturer’s greasing schedule must be followed to ensure proper lubrication of moving parts and protection from corrosion. Observe overhaul periods because most defects in propellers are not external but unseen internal corrosion. Dissimilar metals in the prop and hub create an environment ripe for corrosion, and the only way to properly inspect many of these areas is through a teardown. Extensive corrosion can dramatically reduce the strength of the blades or hub. Even
seemingly minor corrosion may cause a blade or hub to fail an inspection. Because of the safety implications (blade loss), this is clearly an area in which close monitoring is needed.