
Chapter 7
Airplane Basic Flight Maneuvers
As the airplane accelerates, cross-check both heading indicator and ASI rapidly. The attitude indicator may precess to a slight nose-up attitude. As flying speed is approached (approximately 15–25 knots below takeoff speed), smoothly apply elevator control for the desired takeoff attitude on the attitude indicator. This is approximately a two bar width climb indication for most small airplanes.
Continue with a rapid cross-check of heading indicator and attitude indicator as the airplane leaves the ground. Do not pull it off; let it fly off while holding the selected attitude constant. Maintain pitch-and-bank control by referencing the attitude indicator, and make coordinated corrections in heading when indicated on the heading indicator. Cross-check the altimeter and VSI for a positive rate of climb (steady clockwise rotation of the altimeter needle, and the VSI showing a stable rate of climb appropriate to the airplane).
When the altimeter shows a safe altitude (approximately 100 feet), raise the landing gear and flaps, maintaining attitude by referencing the attitude indicator. Because of control pressure changes during gear and flap operation, overcontrolling is likely unless the pilot notes pitch indications accurately and quickly. Trim off control pressures necessary to hold the stable climb attitude. Check the altimeter, VSI, and airspeed for a smooth acceleration to the predetermined climb speed (altimeter and airspeed increasing, vertical speed stable). At climb speed, reduce power to climb setting (unless full power is recommended for climb by the POH/AFM and trim).
Throughout the instrument takeoff, cross-check and interpretation must be rapid and control positive and smooth. During liftoff, gear and flap retraction, power reduction, and the changing control reactions demand rapid cross-check, adjustment of control pressures, and accurate trim changes.
Common Errors in Instrument Takeoffs
Common errors during the instrument takeoff include the following:
- Failure to perform an adequate flight deck check before the takeoff. Pilots have attempted instrument takeoffs with inoperative airspeed indicators (pitot tube obstructed), gyros caged, controls locked, and numerous other oversights due to haste or carelessness.
- Improper alignment on the runway. This may result from improper brake application, allowing the airplane to creep after alignment or from alignment with the nosewheel or tailwheel cocked. In any case, the result is a built-in directional control problem as the takeoff starts.
- Improper application of power. Abrupt application of power complicates directional control. Add power with a smooth, uninterrupted motion.
- Improper use of brakes. Incorrect seat or rudder pedal adjustment, with feet in an uncomfortable position, frequently cause inadvertent application of brakes and excessive heading changes.
- Overcontrolling rudder pedals. This fault may be caused by late recognition of heading changes, tension on the controls, misinterpretation of the heading indicator (and correcting in the wrong direction), failure to appreciate changing effectiveness of rudder control as the aircraft accelerates, and other factors. If heading changes are observed and corrected instantly with small movement of the rudder pedals, swerving tendencies can be reduced.
- Failure to maintain attitude after becoming airborne. If the pilot reacts to seat-of-the-pants sensations when the airplane lifts off, pitch control is guesswork. The pilot may either allow excessive pitch or apply excessive forward elevator pressure, depending on the reaction to trim changes.
- Inadequate cross-check. Fixations are likely during trim changes, attitude changes, gear and flap retractions, and power changes. Once an instrument or a control input is applied, continue the cross-check and note the effect during the next cross-check sequence.
- Inadequate interpretation of instruments. Failure to understand instrument indications immediately indicates that further study of the maneuver is necessary.
Basic Instrument Flight Patterns
Flight patterns are basic maneuvers, flown by sole reference to the instruments rather than outside visual clues, for the purpose of practicing basic attitude flying. The patterns simulate maneuvers encountered on instrument flights, such as holding patterns, procedure turns, and approaches. After attaining a reasonable degree of proficiency in basic maneuvers, apply these skills to the various combinations of individual maneuvers. The following practice flight patterns are directly applicable to operational instrument flying.
Racetrack Pattern
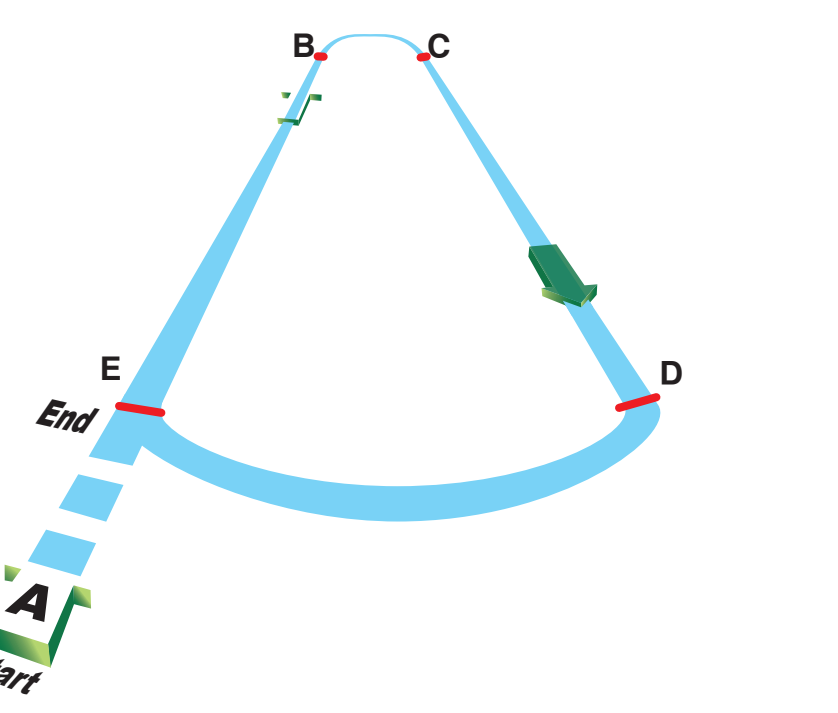
- Time 3 minutes straight-and-level flight from A to B. [Figure 7-41] During this interval, reduce airspeed to the holding speed appropriate for the aircraft.
- Start a 180° standard rate turn to the right at B. Roll-out at C on the reciprocal of the heading originally used at A.
- Time a 1 minute straight-and-level flight from C to D.
- Start a 180° standard rate turn to the right at D, rolling-out on the original heading.
- Fly 1 minute on the original heading, adjusting the outbound leg so that the inbound segment is 1 minute.
Procedure Turn
A procedure turn is a maneuver that facilitates:
- A reversal in flight direction.
- A descent from an initial approach fix or assigned altitude to a permissible altitude (usually the procedure turn altitude).
- An interception of the inbound course at a sufficient distance allowing the aircraft to become aligned with the final approach.
Procedure turn types include the 45° turn, the 80/260 turn, and the teardrop turn. All of these turns are normally conducted no more than 10 nautical miles (NM) from the primary airport. The procedure turn altitude generally provides a minimum of 1,000' obstacle clearance in the procedure turn area (not necessarily within the 10 NM arc around the primary airport). Turns may have to be increased or decreased but should not exceed 30° of a bank angle.
Standard 45° Procedure Turn
- Start timing at point A (usually identified on approach procedures by a fix). For example, fly outbound on a heading of 360° for a given time (2 minutes, in this example). [Figure 7-42]
- After flying outbound for 2 minutes (point B), turn left 45° to a heading of 315° using a standard rate turn. After roll-out and stabilizing, fly this new heading of 315° for 40 seconds and the aircraft will be at the approximate position of C.