
Chapter 7
Repairs, Alterations, and Manufacture
In many situations, it is a better decision, economically and for the end repair, to return the damaged equipment to the manufacturer. This answers all questions as to the quality, manufacturer/FAA repair requirements, and airworthiness of the item when returned to service and confirms that the repair meets the continued service condition.
Repair Techniques
The following procedures use a format that provides the rigger with all of the necessary information to complete the repair properly. It has been used by at least one manufacturer to provide the necessary documentation to riggers in the field to perform major repairs or alterations on that manufacturer’s equipment. The procedures provide the following information to the rigger:
- Applicable products—those parts of the parachute that the procedure addresses.
- Description—brief explanation of the repair or alteration.
- Materials—those items needed to perform the procedure.
- Machines—those machines required to do the procedure. In addition to the machines, there may be special attachments required to do the work properly.
- Equipment—additional tools needed (in addition to the sewing machines).
- Procedure—the step-by-step guide through the repair. This may include a disassembly and reassembly procedure. Disassembly may be straightforward, but the reassembly instructions may provide special tips or procedures to accomplish the task.
- Inspection—the final inspection of the finished repair. This is a very critical part. In many cases, the rigger is doing the work alone. Within the manufacturing environment, the persons doing the work generally do not inspect their own work. This is given over to dedicated inspection personnel. For the private rigger, there may be no one around to inspect the work. In the case of simple repairs, it is easy for the rigger to inspect the finished job. For more extensive repairs, such as a harness main lift web replacement, there can be several areas that need to be addressed, such as dimensions, stitching, and hardware orientation. By having an inspection checklist, the rigger can be assured of not missing any critical area.
Each of the seven sections in this chapter has a list that describes common repair procedures today’s rigger might use. While not necessarily encompassing everything, the techniques used in these repairs can be expanded upon to address almost any other scenario that might be encountered. This is acceptable data as referred to earlier in the chapter. If the rigger encounters a repair that he or she is not familiar with, then the rigger should contact the manufacturer for further direction and guidance. The rigger should also remember that each procedure is just one method of accomplishing a given repair. There might be more than one or an individual might develop a different technique to achieve the same results. The exception to this is approved data that requires a specific procedure, rating, equipment, materials, or repair process.
No matter what techniques or procedures that are followed, remember that there are three basic requirements to follow for any proper repair procedure.
- Knowledge to do the job, to include the required certification and authorization
- Proper equipment, such as sewing machines or hand tools
- Availability of the proper materials
The individual may be a master rigger with a complete parachute loft at his or her disposal but, without the materials as used in the original manufacture, the correct repair cannot be made. By following these simple guidelines, riggers are always able to determine whether or not they can do the job properly.
Most of today’s manufacturers provide guidance for the repair and maintenance of their products. These instructions are the official guidelines that the rigger must follow. The four primary areas of parachute repair and maintenance are: canopy and lines; container; harness and risers; and accessory components. These areas are summarized within the seven sections of this chapter as follows:
- Section 1—Canopy and lines
- Section 2—Container
- Section 3—Harness and Risers
- Section 4—Accessory Components
- Section 5—Alterations
- Section 6—Manufacturing
- Section 7—Miscellaneous
Section 1, Canopy and Lines
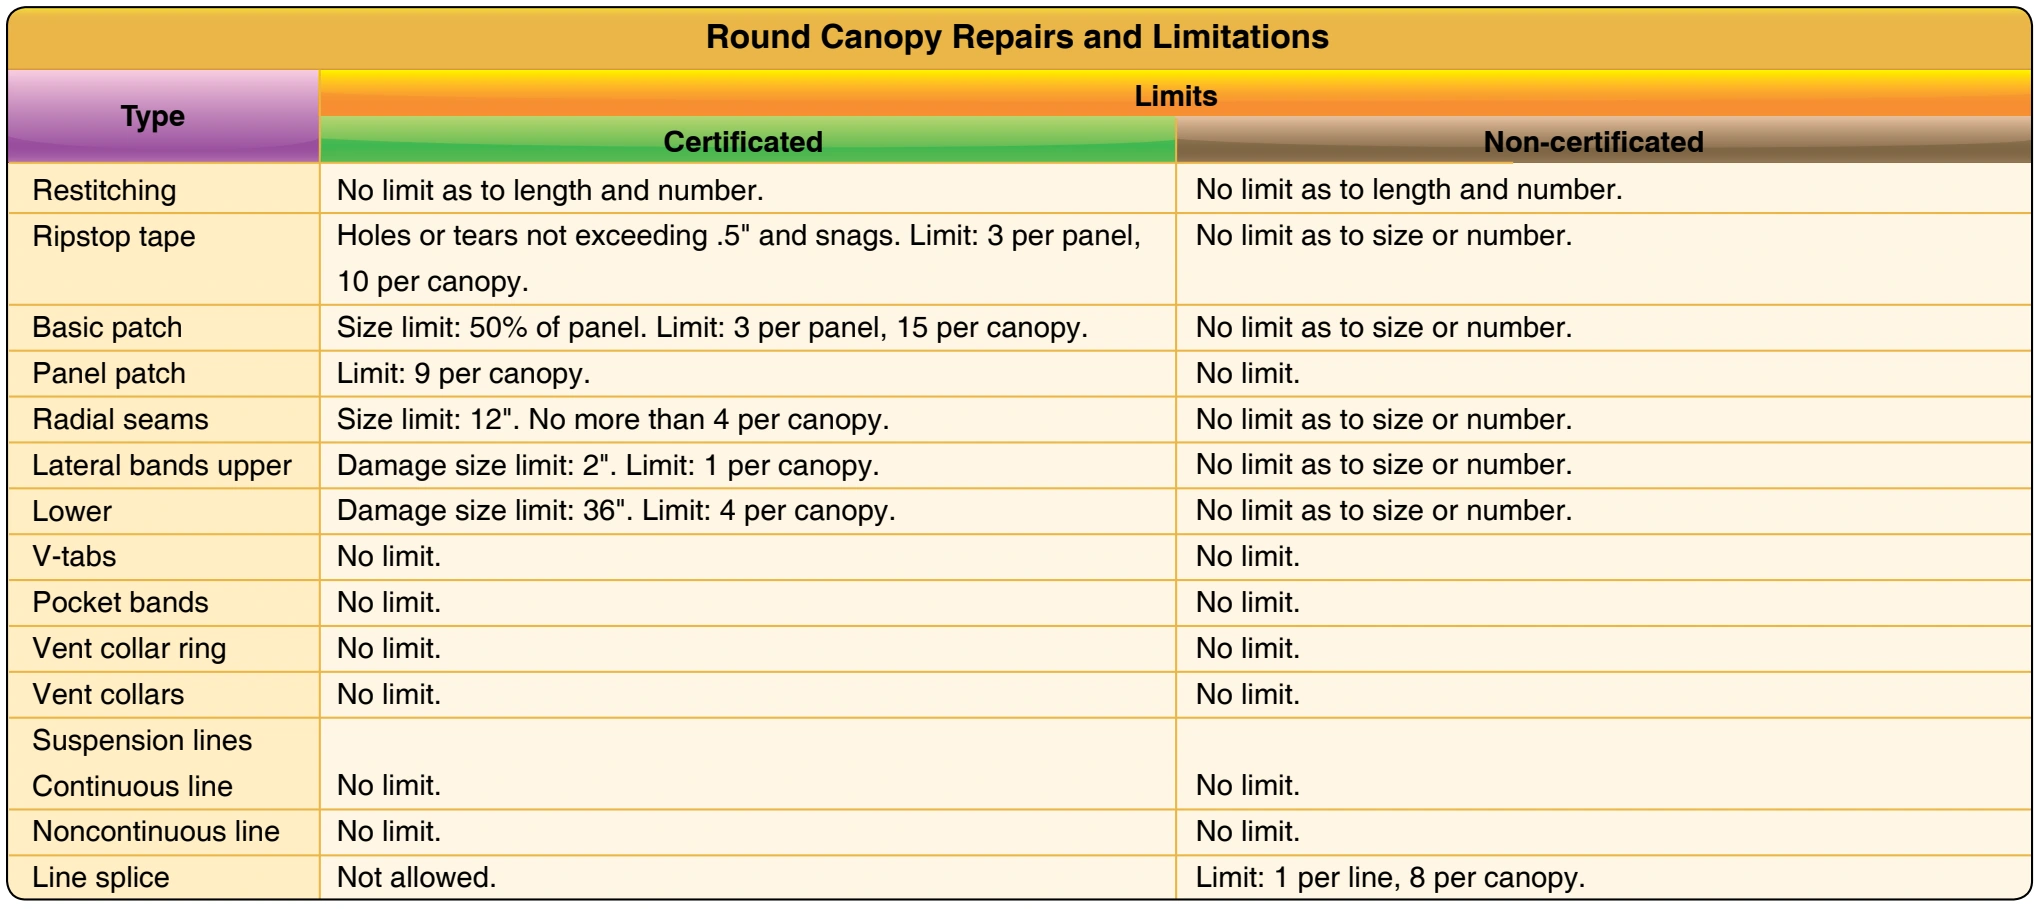
There are two general categories of canopies: round and square. While there are other canopy types, their construction and repair techniques generally follow those of the round and square canopies. Figure 7-14 shows a round canopy repair table, created from current military manuals, and describes the types and limits of canopy repairs, most of which pertain to military or surplus canopies. It must be mentioned that all of the services differ in their approach to methods of repair. Those called out in this book are methods that have been proven to be practical and efficient and commonly accepted throughout the parachute industry. The techniques are similar with only minor differences in seam dimensions and tolerances. While these limits are practical from the technical point of view, the economic cost may not be in many cases.
Figure 7-15 shows a table of square canopy repairs and limitations. These are for reference only. Not all manufacturers recognize the same types of repairs. The information in this table is an excepted cross-section of allowable repairs. The rigger should consult with the manufacturers to confirm what repairs are allowed on any particular canopy.
Detailed Information on Square Canopy Repairs
Holes or snags smaller than the size of one ripstop box (1⁄8 inch, 3.2 mm) may remain unrepaired as long as no more than one hole exists within any 10-inch (25.4 cm) circle. A maximum of three such holes or snags per cell are allowed.
Ripstop tape is not authorized for use on parachutes. If the damage is enough to warrant a repair, a sewn repair must be performed. Darning is not a means of repairing any parachute currently in production.
Any hole or tear up to 10 inches (25.4 cm) in length may be repaired by a Senior Rigger as long as the closest area of the completed repair is at least 1 inch from the nearest seam and at least 5 inches from the nearest tape or line attachment. These are minor repairs. Any damage or hole larger than 10 inches (25.4 cm) may be repaired by a Master Rigger, in either direction or involving a seam or tape. This is a major repair.
Any damage that requires a repair of an area that is larger than 50 percent of the total area of a cell skin (upper or lower) requires cell skin replacement and should be returned to the manufacturer.