
Chapter 7
Repairs, Alterations, and Manufacture
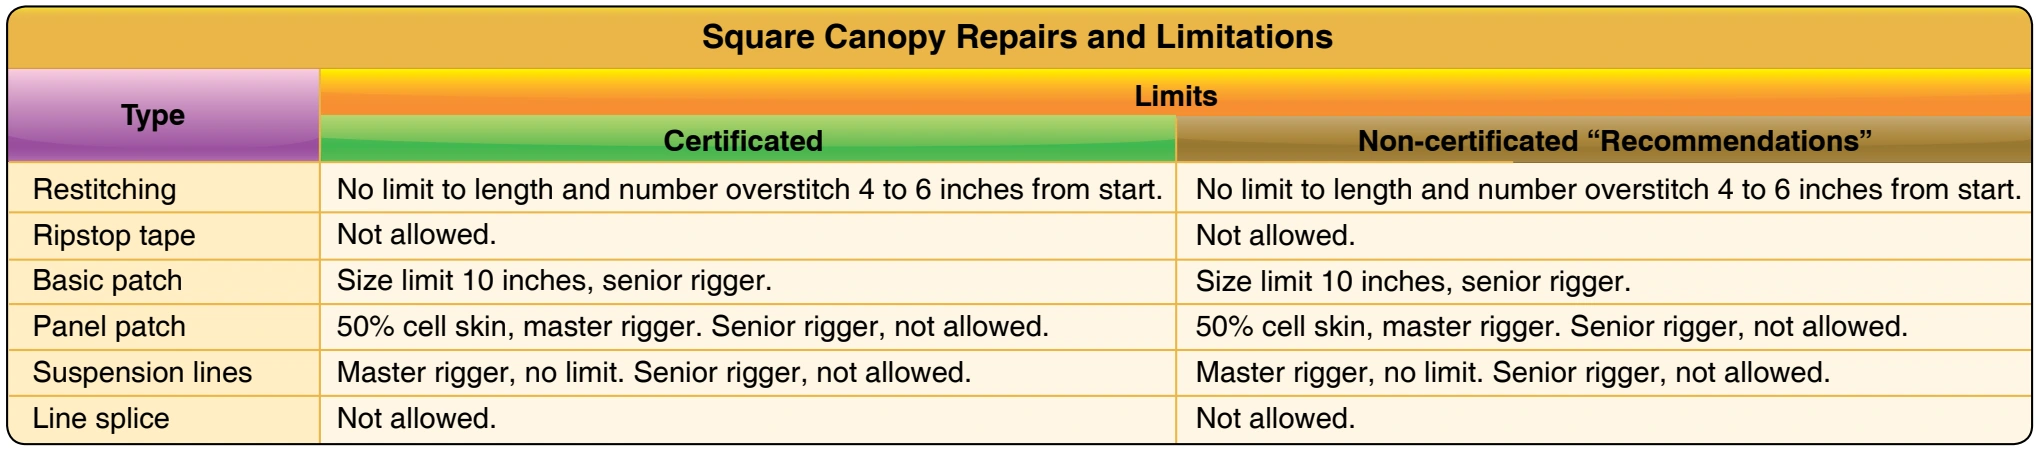
Master riggers may perform repairs that do not involve taking apart any bartacks on the canopy unless they have the correct bartack machine or equivalent. Special bartack patterns are used that are not normally found in the field. In addition, removal and replacement of these stitch patterns usually weakens the fabric to the point that it is necessary to replace or reinforce portions of the panels. This should also be considered in the repairs of load bearing and non load bearing ribs as most have these types of bartack stitches located at the ends.
Before performing a repair, contact with the canopy manufacturer is very important, as some of these repair standards and limitations may vary slightly.
Materials
Certified canopies should only be repaired using certified materials or equivalent. All replacement materials should come from the manufacturer or meet production quality and shelf life standards. Under-strength thread and fabric is frequently found in the field. The only way to be sure the material meets manufacturer standards is to obtain them directly from manufacturer or locate materials recognized by the manufacturer as acceptable for the repair needed.
The following are the repairs found in Section 1, Canopy and Lines:
- Seam re-stitching
- Canopy ripstop tape repair
- Round and square canopy—basic patch
- Round canopy—panel replacement
- Square canopy—partial panel replacement
- Square canopy—rib repair
- Square canopy—pilot chute attachment point repair
- Round canopy—non-continuous line replacement
- Square canopy—main line replacement
- Square canopy—control line replacement
- Square canopy—crossport repair
- Square canopy—trim check and re-trim
Some methods are covered with older processes and procedures of repair; some include the newest methods as are used by most riggers today. All methods are acceptable to provide a safe and airworthy repair, but it should always be the focus of the rigger to understand all methods and strive to utilize the best possible technique to allow for repairs to be completed to the highest possible standards.
Seam Restitching
- Applicable products: All canopies—round and square; main and reserve
- Description: Replacement of broken or damaged seam threads.
- Authorized repairmen: FAA Senior or Master Parachute Rigger
- Materials: E thread—color to match original
- Machines: 301 straight stitch—light duty 7–11 stitches per inch (SPI), 308 zigzag—medium duty 7–11 SPI
- Equipment: Scissors, seam ripper
Procedure
On lightweight material, the rigger should first set up the machine with similar material and thickness to set the tension of the machine before sewing the actual parachute.
- Inspect the damaged thread or seam area. If the thread is merely broken or frayed, overstitch the seam with a minimum of 4 to 6 inches at each end.
- If the seam is gathered or bunched up, it may be necessary to cut the thread in order to smooth out the seam and then overstitch the damaged area with a minimum of 4 to 6 inches at each end. [Figure A and Figure B]
- If the restitching was done on a radial seam of a round canopy, which has a tape or suspension line within the seam, make sure you did not catch the tape or line in the stitching.
- For zigzag stitching, such as on suspension lines, a .25 inch overstitch on each end is standard. [Figure C]
Inspection
- Check that the seam tension and stitch length match the original. Make sure to check top and bottom.
- Make sure that you have not captured any adjacent fabric in the seam. This is a common mistake on square canopies where you may have three panels joining together.
- On radial seams, slide the seam material up and down over the tape or line to check for free movement.
Canopy Ripstop Tape Repair
- Applicable products: All main canopies. Reserve canopies as specified by the manufacturer
- Description: Using ripstop tape for temporary or minor canopy repairs
- Authorized repairmen: FAA Senior or Master Parachute Rigger
- Materials: Ripstop tape—color to match fabric E thread (optional)
- Machines: 301 straight stitch—medium duty 7—11 SPI (optional)
- Equipment: Scissors, shot bags, wallpaper roller, and scotch tape (optional)
Procedure
- Spread out the canopy on a smooth surface.
- Smooth out the damaged area and hold in place with the shot bags. [Figure A]
- Inspect the damaged area.
- Trim any loose threads and smooth any loose fabric back into place.
- For small holes, a single-side patch will suffice. For holes up to .5-inch in diameter or a tear, a double-sided patch is necessary.
- If the damage is a tear, the two sides must be positioned so the edges touch. Use scotch tape to temporarily hold the edges together. [Figure B]
- For a hole, cut a piece of ripstop tape 2 inches square. For a double-sided patch, cut two pieces. [Figure C] For a tear, cut the tape approximately 2 inches longer than the length of the tear and cut two pieces.
- For the single-side patch, round the corners with approximately a 1⁄8 inch radius. For the double-sided patches, place the two pieces face to face and round the corners of both pieces at the same time. This ensures a perfect match and alignment. [Figure D]
- For the 2 × 2 inch patch, peel back one edge of the paper backing and center the tape over the damaged area. Press the exposed adhesive side of the tape to the fabric and smoothly peel the rest of the paper from the fabric with one hand while smoothing the fabric with the other hand. [Figure E]
- Use the wallpaper roller to smooth out the patch and remove any air bubbles from the patch. [Figure F]
- For a double-side patch, turn the canopy or damaged material inside out. Align the second piece of ripstop with the edges of the first and repeat the process. Again smooth out the tape with the roller.
- If the patch is to be a temporary one, the repair is complete. If, however, it is to be permanent, it may be advisable to sew around the edge of the patch. In this case, use the single-needle machine and sew approximately 1⁄8 inch in from the edge of the tape. Overstitch a minimum of 1.25 inches. [Figure G]