Chapter 3
Aircraft Fabric Covering
Fabric Seams
Seams parallel to the line of flight are preferable; however, spanwise seams are acceptable.
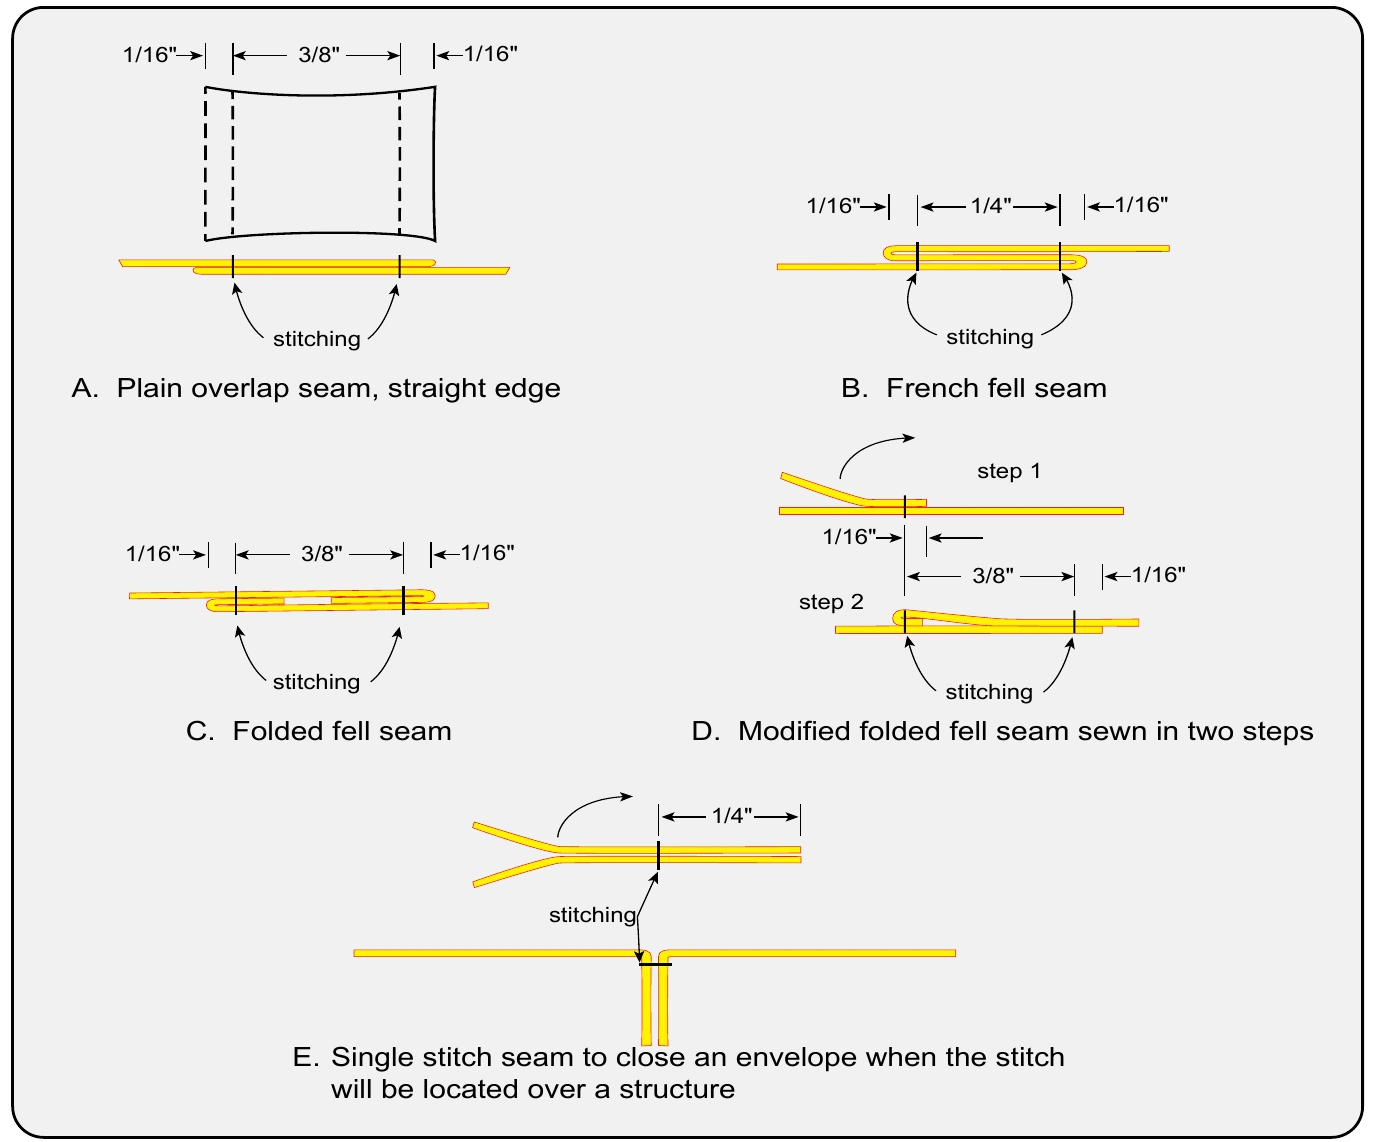
Sewn Seams Machine-sewn seams should be double stitched using any of the styles illustrated in Figure 3-21 A, B, C, or D. A machine-sewn seam used to close an envelope at a wingtip, wing trailing edge, empennage and control surface trailing edge, and a fuselage longeron may be made with a single stitch when the seam will be positioned over a structure. [Figure 3-21E] The envelope size should accommodate fittings or other small protrusions with minimum excess for installation. Thick or protruding leading edge sewn seams should be avoided on thin airfoils with a sharp leading edge radius because they may act as a stall strip.
Hand sew, with plain overthrow or baseball stitches at a minimum of four stitches per inch, or permanent tacking, to the point where uncut fabric or a machine-sewn seam is reached. Lock hand sewing at a maximum of 10 stitch intervals with a double half hitch, and tie off the end stitch with a double half hitch. At the point where the hand-sewing or permanent tacking is necessary, cut the fabric so that it can be doubled under a minimum of 3/8 inch before sewing or permanent tacking is performed.
After hand sewing is complete, any temporary tacks used to secure the fabric over wood structures may be removed.
Cover a sewn spanwise seam on a wing’s leading edge with a minimum 4-inch wide pinked-edged surface tape with the tape centered on the seam.
Cover a spanwise-sewn seam at the wing trailing edge with pinked-edge surface tape that is at least 3 inches wide. For aircraft with never-exceed speeds in excess of 200 mph, cut V notches at least 1 inch in depth and 1/4 inch in width in both edges of the surface tape when used to cover spanwise seams on trailing edges of control surfaces. Space notches at intervals not exceeding 6 inches. On tape less than 3 inches wide, the notches should be 1/3 the tape width. In the event the surface tape begins to separate because of poor adhesion or other causes, the tape will tear at a notched section, thus preventing progressive loosening of the entire length of the tape which could seriously affect the controllability of the aircraft. A loose tape acts as a trim tab only on a movable surface. It becomes a spoiler on a fixed surface and has no effect at the trailing edge other than drag.
Make spanwise-sewn seams on the wing’s upper or lower surfaces in a manner that will minimize any protrusions. Cover the seams with finishing tape at least 3 inches wide, centering the tape on the seam.
Sewn seams parallel to the line of flight (chordwise) may be located over ribs. However, careful attention must be given to avoid damage to the seam threads by rib lace needles, screws, rivets, or wire clips that are used to attach the fabric to the rib. Cover chordwise seams with a finishing tape at least 3 inches wide with the tape centered on the seam.
Doped Seams For an overlapped and doped span-wise seam on a wing’s leading edge, overlap the fabric at least 4 inches and cover with finishing tape at least 4 inches wide, with the tape centered at the outside edge of the overlap seam.
For an overlapped and doped span-wise seam at the trailing edge, lap the fabric at least 3 inches and cover with pinked-edge surface tape at least 4 inches wide, with the tape centered on the outside edge of the overlap seam.
For an overlapped and doped seam on wingtips, wing butts, perimeters of wing control surfaces, perimeters of empennage surfaces, and all fuselage areas, overlap the fabric 2 inches and cover with a finishing tape that is at least 3 inches wide, centered on the outside edge of the overlap seam.
For an overlapped and doped seam on a wing’s leading edge, on aircraft with a velocity never exceed speed (VNE) up to and including 150 mph, overlap the fabric 2 inches and cover with a finishing tape that is at least 3 inches wide, with the tape centered on the outside edge of the overlap seam.
For an overlapped and doped seam on the perimeter of a wing (except a leading edge), perimeters of wing control surfaces, perimeters of empennage surfaces, and all areas of a fuselage, on aircraft with a VNE speed up to and including 150 mph, overlap the fabric 1 inch and cover with a finishing tape that is at least 3 inches wide, centered on the outside edge of the overlap seam.
Fabric Cement
A polyester fabric covering is cemented or glued to the airframe structure at all points where it makes contact. Special formula adhesives have replaced nitrate dope for adhesion in most covering processes. The adhesive (as well as all subsequent coating materials) should be mixed for optimum characteristics at the temperature at which the work is being performed. Follow the manufacturer’s or STC’s guidance when mixing.
To attach the fabric to the airframe, first pre-apply two coats of adhesive to the structure at all points that will come in contact with the fabric. (It is important to follow the manufacturer’s or STC’s guidance as all systems are different.) Allow these to dry. The fabric is then spread over the surface and clamped into position. It should not be pulled tighter than the relaxed but not wrinkled condition it assumes when lying on the structure. Clamps or clothespins are used to attach the fabric completely around the perimeter. The Stewart System STC does not need clamps because the glue assumes a tacky condition when precoated and dried. There is sufficient adhesion in the precoat to position the fabric.
The fabric should be positioned in all areas before undertaking final adhesion. Final adhesion often involves lifting the fabric, applying a wet bed of cement, and pressing the fabric into the bed. An additional coat of cement over the top of the fabric is common. Depending on the process, wrinkles and excess cement are smoothed out with a squeegee or are ironed out. The Stewart System calls for heat activation of the cement precoats through the fabric with an iron while the fabric is in place. Follow the approved instructions for the covering method being used.