
Chapter 4
Aircraft Metal Structural Repair
Two methods for obtaining edge distance:
- The rivet diameter of a protruding head rivet is 3⁄32-inch. Multiply 2 times 3⁄32-inch to obtain the minimum edge distance, 3⁄16-inch, add 1⁄16-inch to yield the preferred edge distance of 1⁄4-inch.
- The rivet diameter of a protruding head rivet is 3⁄32-inch. Select the next size of rivet, which is 1⁄8-inch. Calculate the edge distance by multiplying 2 times 1⁄8-inch to get 1⁄4-inch.
Rivet Pitch
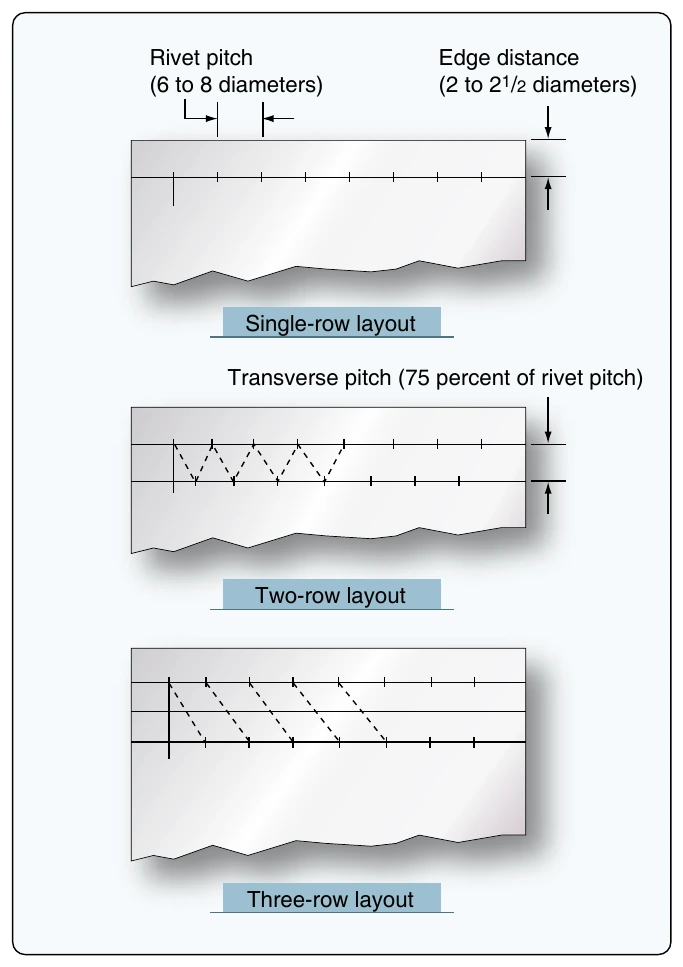
Rivet pitch is the distance between the centers of neighboring rivets in the same row. The smallest allowable rivet pitch is 3 rivet diameters. The average rivet pitch usually ranges from 4 to 6 rivet diameters, although in some instances rivet pitch could be as large as 10 rivet diameters. Rivet spacing on parts that are subjected to bending moments is often closer to the minimum spacing to prevent buckling of the skin between the rivets. The minimum pitch also depends on the number of rows of rivets. One-and three-row layouts have a minimum pitch of 3 rivet diameters, a two-row layout has a minimum pitch of 4 rivet diameters. The pitch for countersunk rivets is larger than for universal head rivets. If the rivet spacing is made at least 1⁄16-inch larger than the minimum, the rivet hole can be oversized without violating the minimum rivet spacing requirement. [Figure 4-80]
Transverse Pitch
Transverse pitch is the perpendicular distance between rivet rows. It is usually 75 percent of the rivet pitch. The smallest allowable transverse pitch is 21⁄2 rivet diameters. The smallest allowable transverse pitch is 21⁄2 rivet diameters. Rivet pitch and transverse pitch often have the same dimension and are simply called rivet spacing.
Rivet Layout Example
The general rules for rivet spacing, as it is applied to a straight-row layout, are quite simple. In a one-row layout, find the edge distance at each end of the row and then lay off the rivet pitch (distance between rivets), as shown in
the second row a distance equal to the transverse pitch from the first row, and then lay off rivet spots in the second row so that they fall midway between those in the first row. In the three-row layout, first lay off the first and third rows, then use a straightedge to determine the second row rivet spots.

When splicing a damaged tube, and the rivets pass completely through the tube, space the rivets four to seven rivet diameters apart if adjacent rivets are at right angles to each other, and space them five to seven rivet diameters apart if the rivets are parallel to each other. The first rivet on each side of the joint should be no less than 21⁄2 rivet diameters from the end of the sleeve.
Rivet Installation Tools
The various tools needed in the normal course of driving and upsetting rivets include drills, reamers, rivet cutters or nippers, bucking bars, riveting hammers, draw sets, dimpling dies or other types of countersinking equipment, rivet guns, and squeeze riveters. C-clamps, vises, and other fasteners used to hold sheets together when riveting were discussed earlier in the chapter. Other tools and equipment needed in the installation of rivets are discussed in the following paragraphs.
Hand Tools
A variety of hand tools are used in the normal course of driving and upsetting rivets. They include rivet cutters, bucking bars, hand riveters, countersinks, and dimpling tools.
Rivet Cutter
The rivet cutter is used to trim rivets when rivets of the required length are unavailable. [Figure 4-82] To use the rotary rivet cutter, insert the rivet in the correct hole, place the required number of shims under the rivet head, and squeeze the cutter as if it were a pair of pliers. Rotation of the discs cuts the rivet to give the right length, which is determined by the number of shims inserted under the head. When using a large rivet cutter, place it in a vise, insert the rivet in the proper hole, and cut by pulling the handle, which shears off the rivet. If regular rivet cutters are not available, diagonal cutting pliers can be used as a substitute cutter.
Bucking Bar
The bucking bar, sometimes called a dolly, bucking iron, or bucking block, is a heavy chunk of steel whose countervibration during installation contributes to proper rivet installation. They come in a variety of shapes and sizes, and their weights ranges from a few ounces to 8 or 10 pounds, depending upon the nature of the work. Bucking bars are most often made from low-carbon steel that has been case hardened or alloy bar stock. Those made of better grades of steel last longer and require less reconditioning.