
Chapter 4
Aircraft Metal Structural Repair
Once the rivet is installed, there should be no evidence of rotation of rivets or looseness of riveted parts. After the trimming operation, examine for tightness. Apply a force of 10 pounds to the trimmed stem. A tight stem is one indication of an acceptable rivet installation. Any degree of looseness indicates an oversize hole and requires replacement of the rivet with an oversize shank diameter rivet.A rivet installation is assumed satisfactory when the rivet head is seated snugly against the item to be retained (0.005-inch feeler gauge should not go under rivet head for more than one-half the circumference) and the stem is proved tight.
Countersunk Rivets
An improperly made countersink reduces the strength of a flush-riveted joint and may even cause failure of the sheet or the rivet head. The two methods of countersinking commonly used for flush riveting in aircraft construction and repair are:
- Machine or drill countersinking.
- Dimpling or press countersinking.
The proper method for any particular application depends on the thickness of the parts to be riveted, the height and angle of the countersunk head, the tools available, and accessibility.
Countersinking
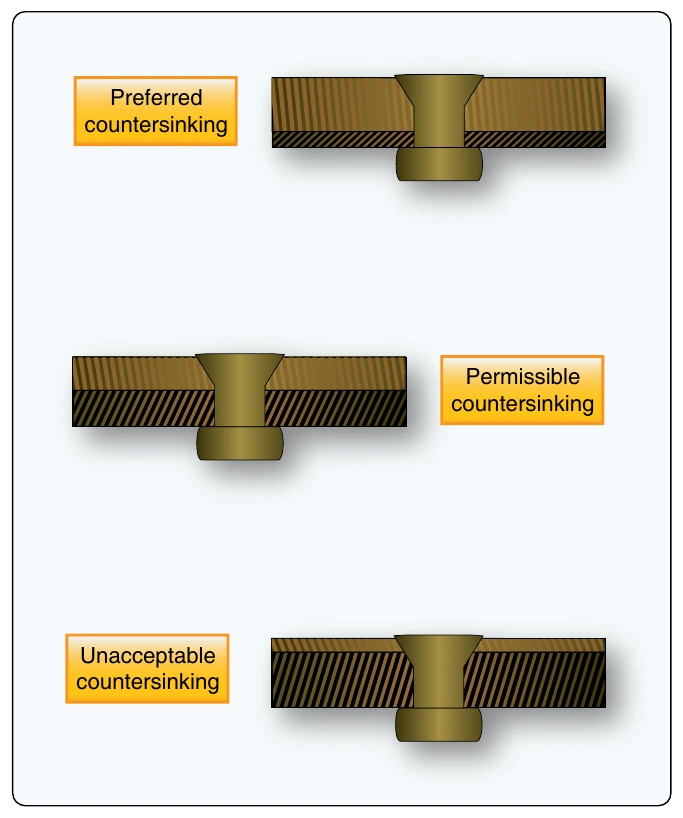
When using countersunk rivets, it is necessary to make a conical recess in the skin for the head. The type of countersink required depends upon the relation of the thickness of the sheets to the depth of the rivet head. Use the proper degree and diameter countersink and cut only deep enough for the rivet head and metal to form a flush surface.
Countersinking is an important factor in the design of fastener patterns, as the removal of material in the countersinking process necessitates an increase in the number of fasteners to assure the required load-transfer strength. If countersinking is done on metal below a certain thickness, a knife edge with less than the minimum bearing surface or actual enlarging of the hole may result. The edge distance required when using countersunk fasteners is greater than when universal head fasteners are used.
The general rule for countersinking and flush fastener installation procedures has been reevaluated in recent years because countersunk holes have been responsible for fatigue cracks in aircraft pressurized skin. In the past, the general rule for countersinking held that the fastener head must be contained within the outer sheet. Acombination of countersinks too deep (creating a knife edge), number of pressurization cycles, fatigue, deterioration of bonding materials, and working fasteners caused a high stress concentration that resulted in skin cracks and fastener failures. In primary structure and pressurized skin repairs, some manufacturers are currently recommending the countersink depth be no more than 2⁄3 the outer sheet thickness or down to 0.020-inch minimum fastener shank depth, whichever is greater. Dimple the skin if it is too thin for machine countersinking. [Figure 4-91]
Keep the rivet high before driving to ensure the force of riveting is applied to the rivet and not to the skin. If the rivet is driven while it is flush or too deep, the surrounding skin is work hardened.
Countersinking Tools
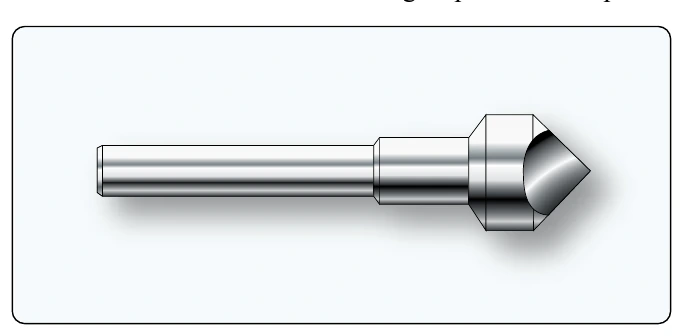
While there are many types of countersink tools, the most commonly used has an included angle of 100°. Sometimes types of 82° or 120° are used to form countersunk wells. [Figure 4-84] A six-fluted countersink works best in aluminum. There are also four- and three-fluted countersinks, but those are harder to control from a chatter standpoint. A single-flute type, such as those manufactured by the Weldon Tool Company®, works best for corrosion-resistant steel. [Figure 4-92]
The microstop countersink is the preferred countersinking tool. [Figure 4-85] It has an adjustable-sleeve cage that functions as a limit stop and holds the revolving countersink in a vertical position. Its threaded and replaceable cutters may cutter centered in the hole. The pilot should be approximately 0.002-inch smaller than the hole size. It is recommended to test adjustments on a piece of scrap material before countersinking repair or replacement parts.
Freehand countersinking is needed where a microstop countersink cannot fit. This method should be practiced on scrap material to develop the required skill. Holding the drill motor steady and perpendicular is as critical during this operation as when drilling.
Chattering is the most common problem encountered when countersinking. Some precautions that may eliminate or minimize chatter include:
- Use sharp tooling.
- Use a slow speed and steady firm pressure.
- Use a piloted countersink with a pilot approximately 0.002-inch smaller than the hole.
- Use back-up material to hold the pilot steady when countersinking thin sheet material.
- Use a cutter with a different number of flutes.
- Pilot drill an undersized hole, countersink, and then enlarge the hole to final size.
Dimpling
Dimpling is the process of making an indentation or a dimple around a rivet hole to make the top of the head of a countersunk rivet flush with the surface of the metal. Dimpling is done with a male and female die, or forms, often called punch and die set. The male die has a guide the size of the rivet hole and is beveled to correspond to the degree of countersink of the rivet head. The female die has a hole into which the male guide fits and is beveled to a corresponding degree of countersink.