
Chapter 4
Aircraft Metal Structural Repair
draw die causes tension stresses in the upper portion of the metal. Under some conditions, a crack may be created that runs around the edge of the dimple. Such cracks do not always show since they may be underneath the cladding. When found, they are cause for rejection. These cracks are most common in hot-dimpled 7075 T6 aluminum alloy material. The usual cause is insufficient dimpling heat.
Evaluating the Rivet
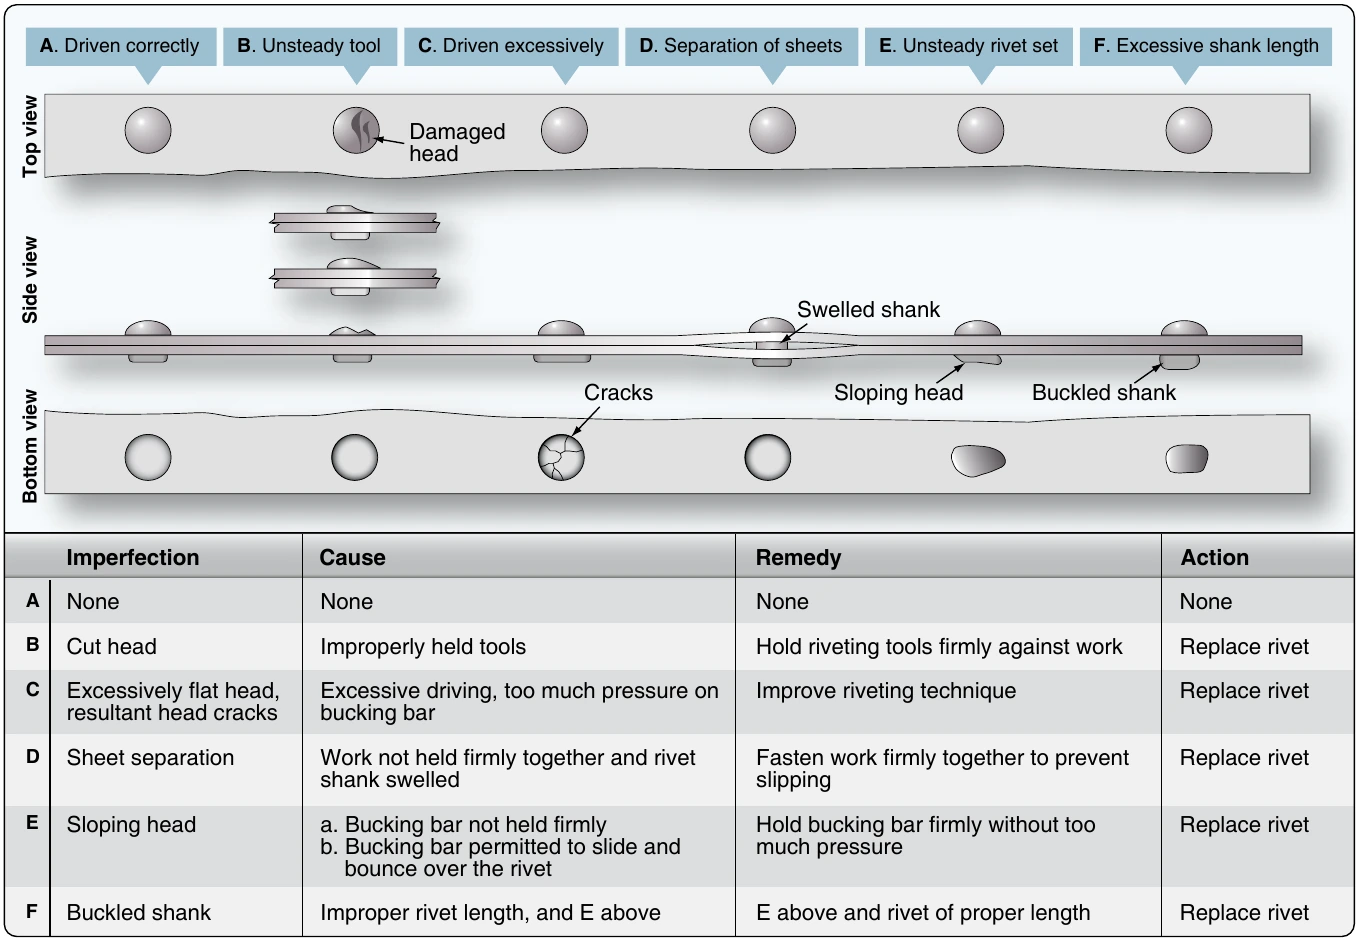
To obtain high structural efficiency in the manufacture and repair of aircraft, an inspection must be made of all rivets before the part is put in service. This inspection consists of examining both the shop and manufactured heads and the surrounding skin and structural parts for deformities. A scale or rivet gauge can be used to check the condition of the upset rivet head to see that it conforms to the proper requirements. Deformities in the manufactured head can be detected by the trained eye alone. [Figure 4-97]
Some common causes of unsatisfactory riveting are improper bucking, rivet set slipping off or being held at the wrong angle, and rivet holes or rivets of the wrong size. Additional causes for unsatisfactory riveting are countersunk rivets not flush with the well, work not properly fastened together during riveting, the presence of burrs, rivets too hard, too much or too little driving, and rivets out of line.
Occasionally, during an aircraft structural repair, it is wise to examine adjacent parts to determine the true condition of neighboring rivets. In doing so, it may be necessary to remove the paint. The presence of chipped or cracked paint around the heads may indicate shifted or loose rivets. Look for tipped or loose rivet heads. If the heads are tipped or if rivets are loose, they show up in groups of several consecutive rivets and probably tipped in the same direction. If heads that appear to be tipped are not in groups and are not tipped in the same direction, tipping may have occurred during some previous installation.
Inspect rivets known to have been critically loaded, but that show no visible distortion, by drilling off the head and carefully punching out the shank. If, upon examination, the shank appears joggled and the holes in the sheet misaligned, the rivet has failed in shear. In that case, try to determine what is causing the shearing stress and take the necessary corrective action. Flush rivets that show head slippage within the countersink or dimple, indicating either sheet bearing failure or rivet shear failure, must be removed for inspection and replacement.
Joggles in removed rivet shanks indicate partial shear failure. Replace these rivets with the next larger size. Also, if the rivet holes show elongation, replace the rivets with the next larger size. Sheet failures such as tear-outs, cracks between rivets, and the like usually indicate damaged rivets. The complete repair of the joint may require replacement of the rivets with the next larger size.
The general practice of replacing a rivet with the next larger size (1⁄32-inch greater diameter) is necessary to obtain the proper joint strength of rivet and sheet when the original rivet hole is enlarged. If the rivet in an elongated hole is replaced by a rivet of the same size, its ability to carry its share of the shear load is impaired and joint weakness results.
Removal of Rivets
When a rivet has to be replaced, remove it carefully to retain the rivet hole’s original size and shape. If removed correctly, the rivet does not need to be replaced with one of the next larger size. Also, if the rivet is not removed properly, the strength of the joint may be weakened and the replacement of rivets made more difficult.
When removing a rivet, work on the manufactured head. It is more symmetrical about the shank than the shop head, and there is less chance of damaging the rivet hole or the material around it. To remove rivets, use hand tools, a power drill, or a combination of both.
The procedure for universal or protruding head rivet removal is as follows:
- File a flat area on the head of the rivet and center punch the flat surface for drilling. Note: On thin metal, back up the rivet on the upset head when center punching to avoid depressing the metal.
- Use a drill bit one size smaller than the rivet shank to drill out the rivet head. Note: When using a power drill, set the drill on the rivet and rotate the chuck several revolutions by hand before turning on the power. This procedure helps the drill cut a good starting spot and eliminates the chance of the drill slipping off and tracking across the metal.
- Drill the rivet to the depth of its head, while holding the drill at a 90° angle. Do not drill too deeply, as the rivet shank will then turn with the drill and tear the surrounding metal. Note: The rivet head often breaks away and climbs the drill, which is a signal to withdraw the drill.
- If the rivet head does not come loose of its own accord, insert a drift punch into the hole and twist slightly to either side until the head comes off.
- Drive the remaining rivet shank out with a drift punch slightly smaller than the shank diameter.
On thin metal or unsupported structures, support the sheet with a bucking bar while driving out the shank. If the shank is unusually tight after the rivet head is removed, drill the rivet about two-thirds through the thickness of the material and then drive the rest of it out with a drift punch. Figure 4-98 shows the preferred procedure for removing universal rivets.
The procedure for the removal of countersunk rivets is the same as described above except no filing is necessary. Be careful to avoid elongation of the dimpled or the countersunk holes. The rivet head should be drilled to approximately one-half the thickness of the top sheet. The dimple in 2117–T rivets usually eliminates the necessity of filing and center punching the rivet head.
To remove a countersunk or flush head rivet, you must:
- Select a drill about 0.003-inch smaller than the rivet shank diameter.
- Drill into the exact center of the rivet head to the approximate depth of the head.
- Remove the head by breaking it off. Use a punch as a lever.
- Punch out the shank. Use a suitable backup, preferably wood (or equivalent), or a dedicated backup block. If the shank does not come out easily, use a small drill and drill through the shank. Be careful not to elongate the hole.
Replacing Rivets
Replace rivets with those of the same size and strength whenever possible. If the rivet hole becomes enlarged, deformed, or otherwise damaged, drill or ream the hole for the next larger size rivet. Do not replace a rivet with a type having lower strength properties, unless the lower strength is adequately compensated by an increase in size or a greater number of rivets. It is acceptable to replace 2017 rivets of 3⁄16-inch diameter or less, and 2024 rivets of 5⁄32-inch diameter or less with 2117 rivets for general repairs, provided the replacement rivets are 1⁄32-inch greater in diameter than the rivets they replace.