
Chapter 4
Aircraft Metal Structural Repair
- Locate and drill holes for alignment pins.
- Place the material between the form blocks and clamp blocks tightly in a vise to prevent the material from moving or shifting. Clamp the work as closely as possible to the particular area being hammered to
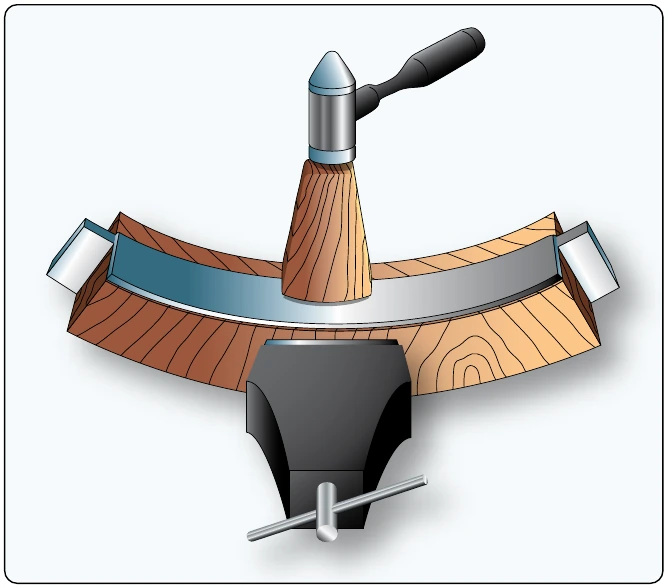
prevent strain on the form blocks and to keep the metal from slipping.
Concave Surfaces
Bend the flange on the concave curve first. This practice may keep the flange from splitting open or cracking when the metal is stretched. Should this occur, a new piece must be made. Using a plastic or rawhide mallet with a smooth, slightly rounded face, start hammering at the extreme ends of the part and continue toward the center of the bend. This procedure permits some of the metal at the ends of the part to be worked into the center of the curve where it is needed. Continue hammering until the metal is gradually worked down over the entire flange, flush with the form block. After the flange is formed, trim off the excess material and check the part for accuracy. [Figure 4-159]
Convex Surfaces
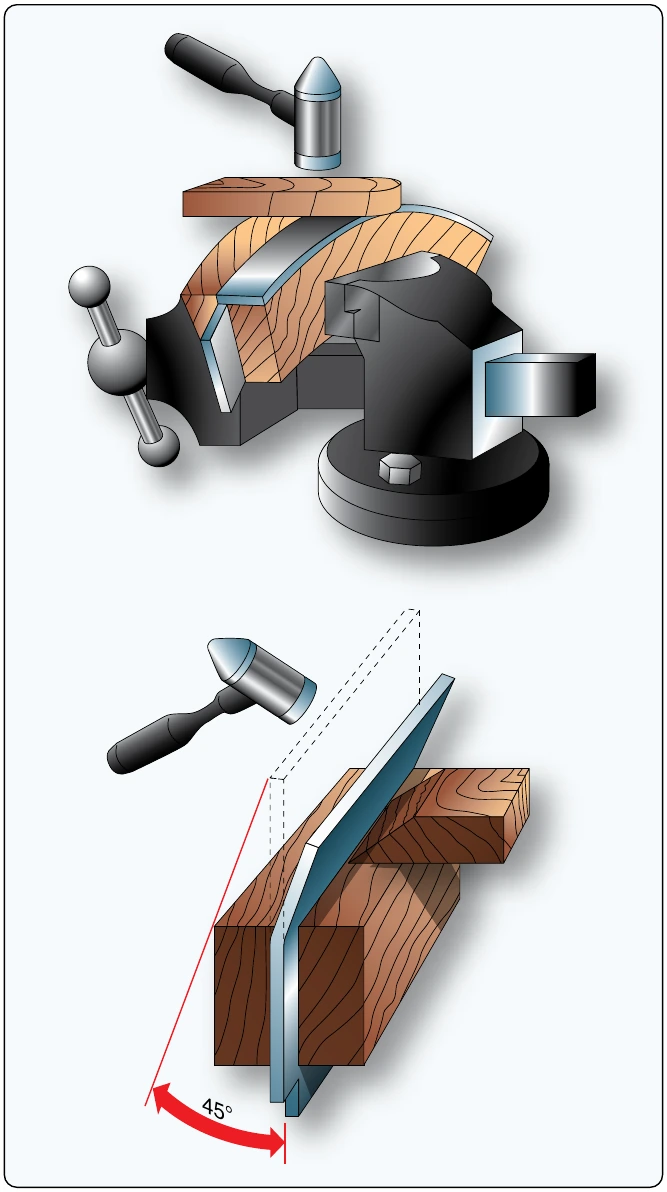
Convex surfaces are formed by shrinking the material over a form block. [Figure 4-160] Using a wooden or plastic shrinking mallet and a backup or wedge block, start at the center of the curve and work toward both ends. Hammer the flange down over the form, striking the metal with glancing blows at an angle of approximately 45° and with a motion that tends to pull the part away from the radius of the form block. Stretch the metal around the radius bend and remove the buckles gradually by hammering on a wedge block. Use the backup block to keep the edge of the flange as nearly perpendicular to the form block as possible. The backup block also lessens the possibility of buckles, splits, or cracks. Finally, trim the flanges of excess metal, planish, remove burrs, round the corners (if any), and check the part for accuracy.
Forming by Bumping
As discussed earlier, bumping involves stretching the sheet metal by bumping it into a form and making it balloon. [Figure 4-161] Bumping can be done on a form block or female die, or on a sandbag.
Either method requires only one form: a wooden block, a lead die, or a sandbag. The blister, or streamlined cover plate, is an example of a part made by the form block or die method of bumping. Wing fillets are an example of parts that are usually formed by bumping on a sandbag.
Form Block or Die
The wooden block or lead die designed for form block bumping must have the same dimensions and contour as the outside of the blister. To provide enough bucking weight and bearing surface for fastening the metal, the block or die should be at least one inch larger in all dimensions than the form requires.
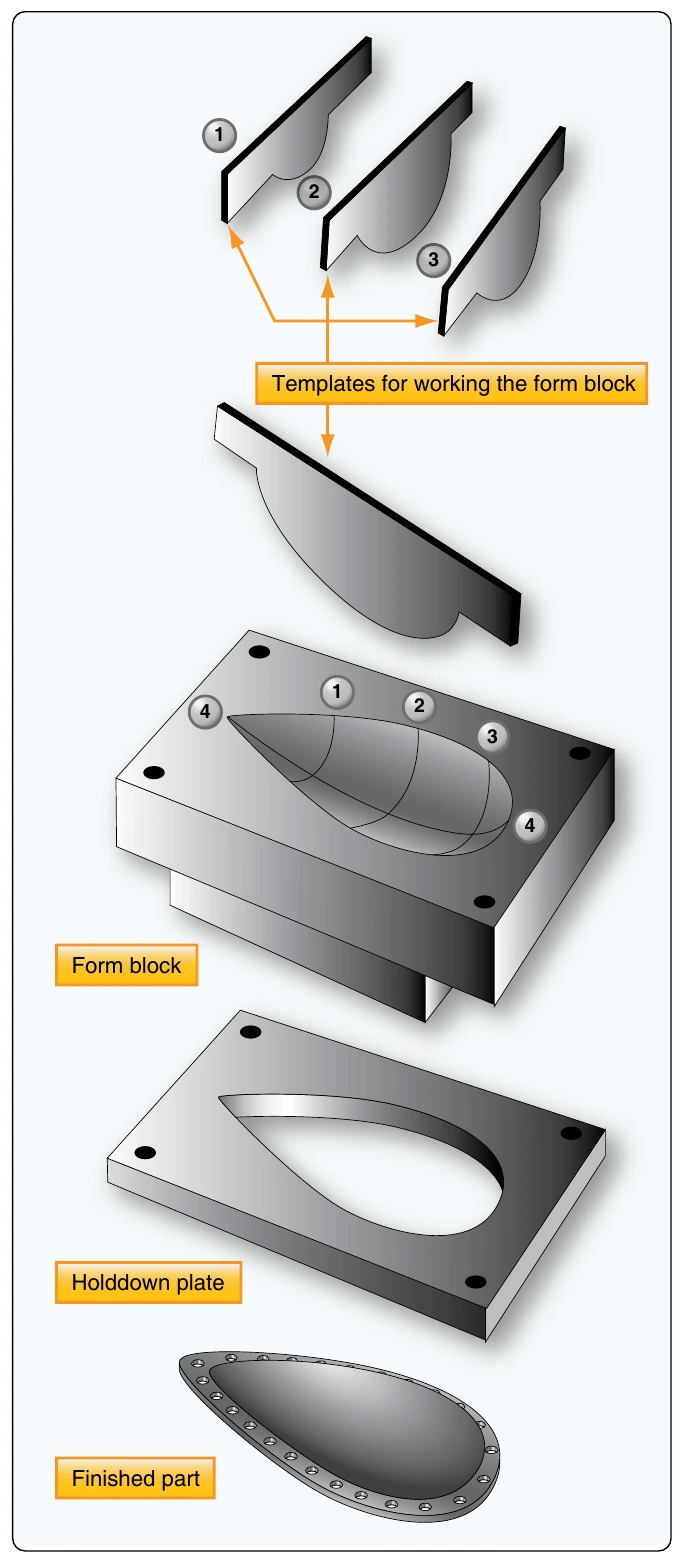
Follow these procedures to create a form block:
- Hollow the block out with tools, such as saws, chisels, gouges, files, and rasps.
- Smooth and finish the block with sandpaper. The inside of the form must be as smooth as possible, because the slightest irregularity shows up on the finished part.
- Prepare several templates (patterns of the cross-section), as shown in Figure 4-161 so that the form can be checked for accuracy.
- Shape the contour of the form at points 1, 2, and 3.
- Shape the areas between the template checkpoints to conform the remaining contour to template 4. Shaping of the form block requires particular care because the more nearly accurate it is, the less time it takes to produce a smooth, finished part.
After the form is prepared and checked, perform the bumping as follows:
- Cut a metal blank to size allowing an extra 1⁄2 to 1-inch to permit drawing.
- Apply a thin coat of light oil to the block and the aluminum to prevent galling (scraping on rough spots).
- Clamp the material between the block and steel plate. Ensure it is firmly supported yet it can slip a little toward the inside of the form.
- Clamp the bumping block in a bench vise. Use a soft-faced rubber mallet, or a hardwood drive block with a suitable mallet, to start the bumping near the edges of the form.
- Work the material down gradually from the edges with light blows of the mallet. Remember, the purpose of bumping is to work the material into shape by stretching rather than forcing it into the form with heavy blows. Always start bumping near the edge of the form. Never start near the center of the blister.
- Before removing the work from the form, smooth it as much as possible by rubbing it with the rounded end of either a maple block or a stretching mallet.
- Remove the blister from the bumping block and trim to size.
Sandbag Bumping
Sandbag bumping is one of the most difficult methods of hand forming sheet metal because there is no exact forming block to guide the operation. [Figure 4-162] In this method, a depression is made into the sandbag to take the shape of the hammered portion of the metal. The depression or pit has a tendency to shift from the hammering, which necessitates periodic readjustment during the bumping process. The degree of shifting depends largely on the contour or shape of the piece being formed, and whether glancing blows must be struck to stretch, draw, or shrink the metal. When forming by this method, prepare a contour template or some sort of a pattern to serve as a working guide and to ensure accuracy of the finished part. Make the pattern from ordinary kraft or similar paper, folding it over the part to be duplicated. Cut the paper cover at the points where it would have to be stretched to fit, and attach additional pieces of paper with masking tape to cover the exposed portions. After completely covering the part, trim the pattern to exact size.