
Chapter 12
Attitude Instrument Flying
To level off at a higher airspeed than descending airspeed, increase the power approximately 100 to 150 feet prior to reaching the desired altitude. The power setting should be that which is necessary to maintain the desired airspeed in level flight. Hold the vertical speed constant until approximately 50 feet above the desired altitude. At this point, the altimeter becomes primary for pitch, and the airspeed indicator becomes primary for power. The leveloff from a constant rate descent should be accomplished in the same manner as the leveloff from a constant airspeed descent.
Common Errors During Straight Climbs and Descents
- Failure to maintain heading.
- Improper use of power.
- Poor control of pitch attitude.
- Failure to maintain proper pedal trim.
- Failure to level off on desired altitude.
Turns
When making turns by reference to the flight instruments, they should be made at a definite rate. Turns described in this chapter are those that do not exceed a standard rate of 3° per second as indicated on the turn-and-slip indicator. True airspeed determines the angle of bank necessary to maintain a standard rate turn. A rule of thumb to determine the approximate angle of bank required for a standard rate turn is to divide your airspeed by 10 and add one-half the result. For example, at 60 knots, approximately 9° of bank is required (60 ÷ 10 = 6 + 3 = 9); at 80 knots, approximately 12° of bank is needed for a standard rate turn.
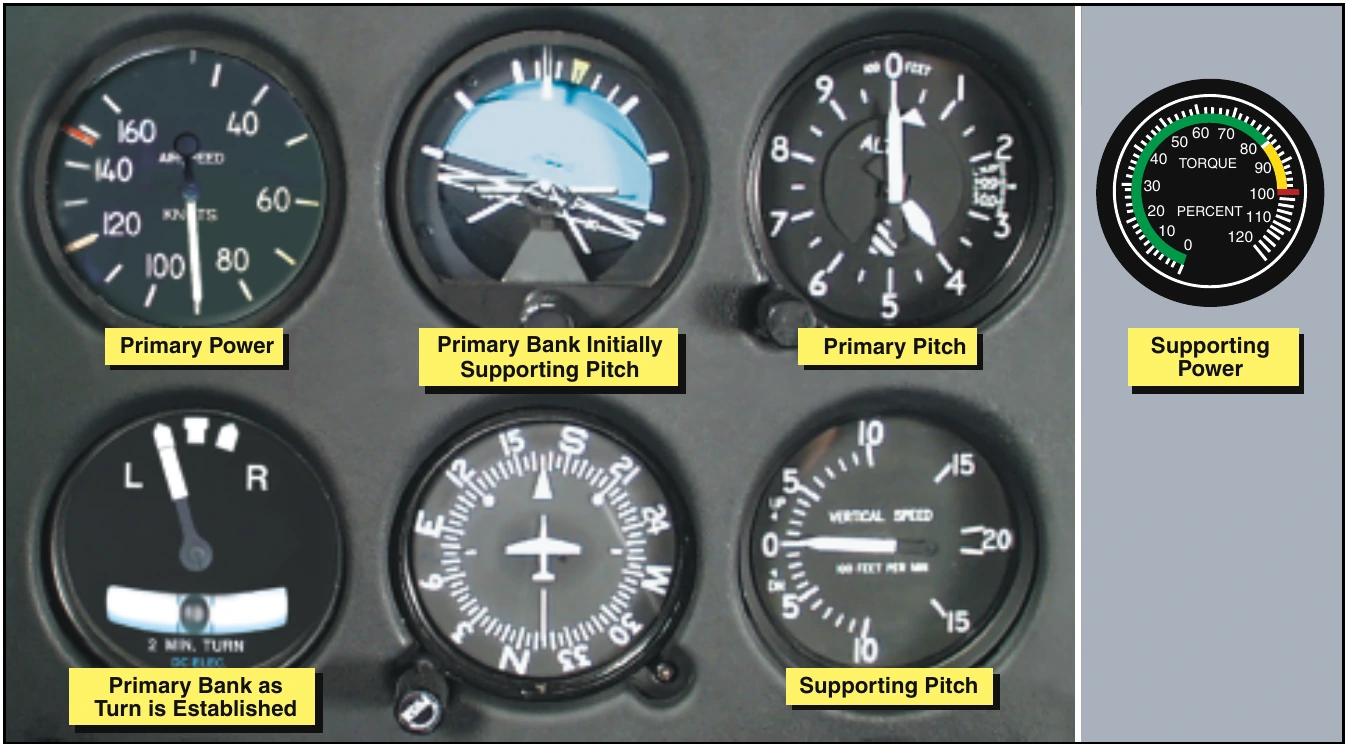
To enter a turn, apply lateral cyclic in the direction of the desired turn. The entry should be accomplished smoothly, using the attitude indicator to establish the approximate bank angle. When the turn indicator indicates a standard rate turn, it becomes primary for bank.
The attitude indicator now becomes a supporting instrument. During level turns, the altimeter is primary for pitch, and the airspeed indicator is primary for power.
Primary and supporting instruments for a stabilized standard rate turn are illustrated in figure 12-20. If an increase in power is required to maintain airspeed, slight forward cyclic pressure may be required since the helicopter tends to pitch up as collective pitch angle is increased. Apply pedal trim, as required, to keep the ball centered.
To recover to straight-and-level flight, apply cyclic in the direction opposite the turn. The rate of roll-out should be the same as the rate used when rolling into the turn. As you initiate the turn recover, the attitude indicator becomes primary for bank. When the helicopter is approximately level, the heading indicator becomes primary for bank as in straight-and-level flight. Cross-check the airspeed indicator and ball closely to maintain the desired airspeed and pedal trim.
Turns to a Predetermined Heading
A helicopter turns as long as its lateral axis is tilted; therefore, the recovery must start before the desired heading is reached. The amount of lead varies with the rate of turn and your piloting technique.
As a guide, when making a 3° per second rate of turn, use a lead of one-half the bank angle. For example, if you are using a 12° bank angle, use half of that, or 6°, as the lead point prior to your desired heading. Use this lead until you are able to determine the exact amount required by your particular technique. The bank angle should never exceed the number of degrees to be turned. As in any standard rate turn, the rate of recovery should be the same as the rate for entry. During turns to predetermined headings, cross-check the primary and supporting pitch, bank, and power instruments closely.
Timed Turns
A timed turn is a turn in which the clock and turn-and-slip indicator are used to change heading a definite number of degrees in a given time. For example, using a standard rate turn, a helicopter turns 45° in 15 seconds. Using a half-standard rate turn, the helicopter turns 45° in 30 seconds. Timed turns can be used if your heading indicator becomes inoperative.
Prior to performing timed turns, the turn coordinator should be calibrated to determine the accuracy of its indications. To do this, establish a standard rate turn by referring to the turn-and-slip indicator. Then as the sweep second hand of the clock passes a cardinal point (12, 3, 6, or 9), check the heading on the heading indicator. While holding the indicated rate of turn constant, note the heading changes at 10-second intervals. If the helicopter turns more or less than 30° in that interval, a smaller or larger deflection of the needle is necessary to produce a standard rate turn. When you have calibrated the turn-and-slip indicator during turns in each direction, note the corrected deflections, if any, and apply them during all timed turns.
You use the same cross-check and control technique in making timed turns that you use to make turns to a predetermined heading, except that you substitute the clock for the heading indicator. The needle of the turn-and-slip indicator is primary for bank control, the altimeter is primary for pitch control, and the airspeed indicator is primary for power control. Begin the roll-in when the clock’s second hand passes a cardinal point, hold the turn at the calibrated standard-rate indication, or half-standard-rate for small changes in heading, and begin the roll-out when the computed number of seconds has elapsed. If the roll-in and roll-out rates are the same, the time taken during entry and recovery need not be considered in the time computation.
If you practice timed turns with a full instrument panel, check the heading indicator for the accuracy of your turns. If you execute the turns without the heading indicator, use the magnetic compass at the completion of the turn to check turn accuracy, taking compass deviation errors into consideration.
Change of Airspeed in Turns
Changing airspeed in turns is an effective maneuver for increasing your proficiency in all three basic instrument skills. Since the maneuver involves simultaneous changes in all components of control, proper execution requires a rapid cross-check and interpretation, as well as smooth control. Proficiency in the maneuver also contributes to your confidence in the instruments during attitude and power changes involved in more complex maneuvers.